
Overview
In the previous module we connected directly to our data API pod using port forwarding and we also linked that service to a MongoDB database using the IP address of the pod it was running in. Both these approaches are bad practice, and should not be used when deploying real apps in production scenarios.
Why? In Kubernetes IP addresses and pod names are never fixed, pods are both ephemeral and mortal, they should be considered effectively transient. Here are some reasons:
- When scaling deployments to multiple replicas, how can we know the IP address or name of the pod? As there will be many
- Pods can move (be re-scheduled) between nodes, due to failures, resource scheduling or other reasons. This will result in the pod being destroyed and re-created on a different machine, and it is likely the IP address will change
- Rolling updates. When applying a change (e.g. updating the container image from myapp:v1 to myapp:v2) to a running deployment, Kubernetes employs a rolling update strategy, where each replica pod is updated in turn. This also results in it being destroyed and re-created
The analogy used here is ‘pets vs cattle’. Traditional static infrastructure such as VMs are considered “pets”, they have fixed names/IPs, considered permanent and they will be patched & maintained. On the other hand pods & containers are considered “cattle”, they are not given unique names, they are identical, managed en-mass and are replaceable
🖼️ Pets vs Cattle
Kubernetes Services
So how do we cope with all this in Kubernetes? The answer is to use services
📕 Kubernetes Glossary. A Kubernetes Service is an abstraction which defines a logical set of Pods and a policy by which to access them over the network.
There are several types of services in Kubernetes, we will deal with just two of them ClusterIP and LoadBalancer. One thing they all have in common is a selector this defines the set of pods the service represents. Typical selectors will filter on the label metadata attached to the pods when they were deployed
📘 Read More - Kubernetes Services
Create Service for MongoDB
Firstly we should create a service for our Mongo database. We don’t want to access this service outside of the cluster (the only thing calling it is the data-api), so we use ClusterIP.
Create a new file called mongo.svc.yaml (run touch mongo.svc.yaml and refresh the files view in the editor) and paste the following YAML contents
kind: Service
apiVersion: v1
metadata:
  name: mongodb-svc
spec:
  type: ClusterIP
  ports:
  - protocol: TCP
    port: 27017
    targetPort: 27017
  selector:
    app: mongodb
This will create a service mapped to all pods labelled with app=mongodb, and associate port 27017 (used by Mongo) on the service endpoint to port 27107 on the containers.
Create the new service with:
kubectl apply -f mongo.svc.yaml
You can view the service(s) you have by running kubectl get service. Check the mongodb-svc is there.
This new service will have a virtual IP inside the cluster, but Kubernetes also gives it an internal DNS name. How Kubernetes assigns DNS records to pods and services is a topic for another day, but any pod in the cluster can address our new service using any of:
mongodb-svc.default.svc.cluster.localmongodb-svc.defaultmongodb-svc
This gives us an anchor point; pods, nodes, IPs, etc, might all be transient, but the DNS record for our service provides something fixed
💬 Note. We’ve put the service for MongoDB into a separate YAML file from the deployment. Kubernetes allows you to define multiple resources in a single YAML file, but in most cases it makes sense to keep services and deployments in separate files
Update Data API to use MongoDB Service
Modify data-api.deploy.yaml and change the connection string environmental variable that points to the MongoDB host to use our new service DNS name, rather than IP address, e.g.
- name: MONGO_CONNSTR
  value: mongodb://mongodb-svc.default
Then update the deployment by re-running:
kubectl apply -f data-api.deploy.yaml
The command should output “data-api configured” rather than created. The use of kubectl apply tells Kubernetes to perform an update to the existing deployment, it will kill off the old pod(s) and create new one(s) with the updated connection string set. Check the status as before, and the logs of the pod with:
kubectl logs -l app=data-api
Create Service for Data API
Next create a service for our Smilr Data API. This service we do want to access outside of the cluster (as the Smilr client app communicates with it), so we use type LoadBalancer. A LoadBalancer in Kubernetes provides an external public IP address with load balanced access to each of the pods in the service. A Kubernetes LoadBalancer is actually instantiated by the cloud provider where the cluster resides, in our case Azure - but all of this is handled automatically for us
Create a new file called data-api.svc.yaml (run touch data-api.svc.yaml and refresh the files view in the editor) and paste the following YAML contents, save the file then run kubectl apply -f data-api.svc.yaml
kind: Service
apiVersion: v1
metadata:
  name: data-api-svc
spec:
  type: LoadBalancer
  ports:
  - protocol: TCP
    port: 80
    targetPort: 4000
  selector:
    app: data-api
When you run kubectl get service you will see the column EXTERNAL-IP and the data-api-svc will have <pending> as the status. It can take 5-10 minutes for the service to get an external IP the first time; as Azure is deploying an Azure LoadBalancer and Public IP, and setting up NAT rules
Keep checking kubectl get service and once the service has an external IP, you can access it with your browser and call the info API as before, with: http://{external_ip}/api/info.
Make a note of the Data API IP as we’ll use it in the next module.
💬 Note. Assigning DNS records to the external public IP is possible but outside the scope of this lab. Quick solution is to find the Azure Public IP in the MC_kube-lab_aks-cluster_westeurope resource group and assign it a DNS prefix
End of Module 4
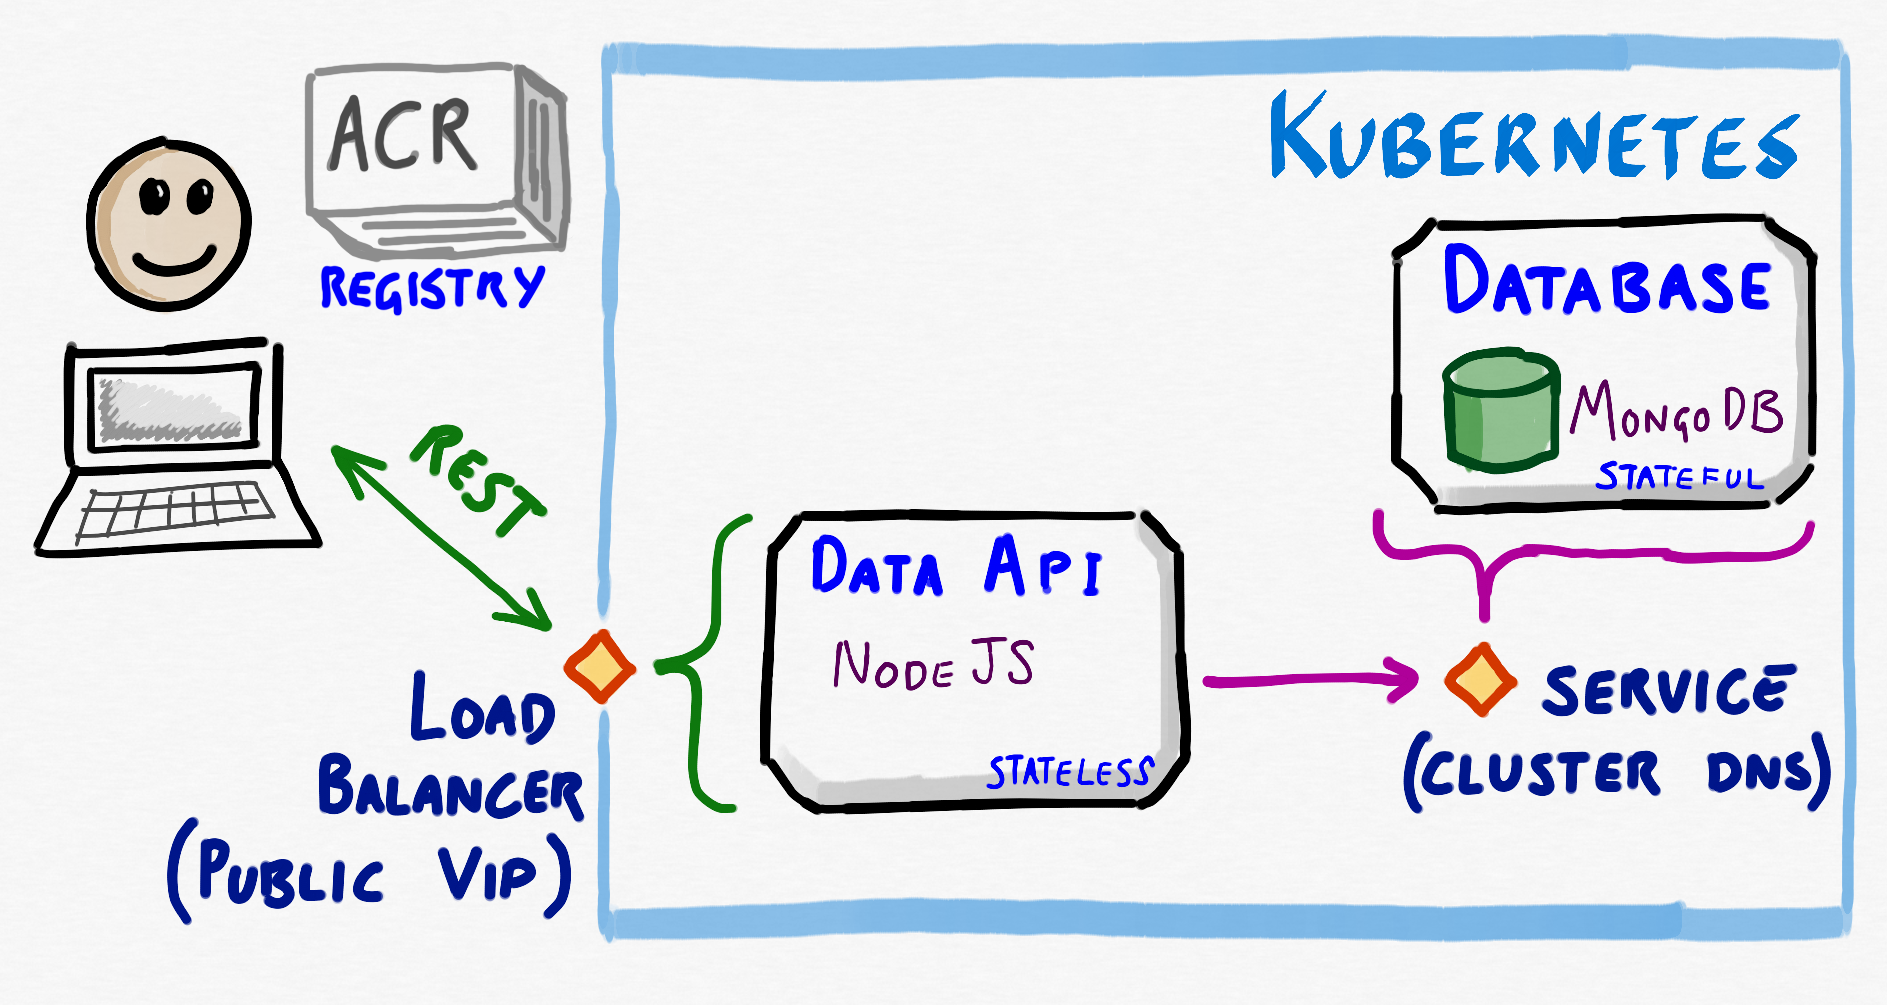
What we have at this stage in Kubernetes can be represented as follows
This is nearly everything we need to get our app up & running so let’s get the final part of Smilr deployed in the next module.
🡸 Module 3: Deploying the Data Layer 🡺 Module 5: Deploying the Frontend
Leave a comment