
Overview
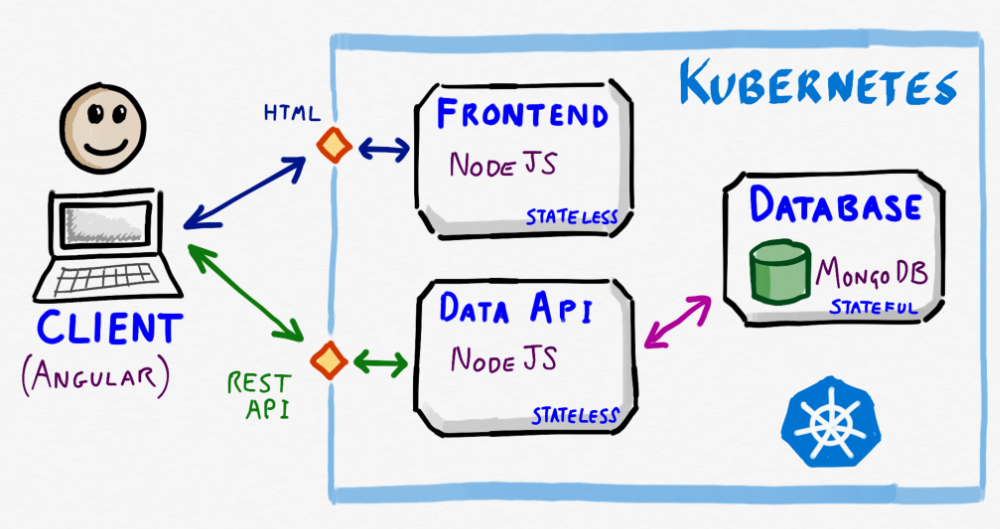
Now we know how to create deployments and services, we can pick up the pace a little, and get the frontend microservice up and running
Deploy Frontend
For the frontend we can start with the service, it doesn’t matter that the pods for it don’t exist yet, that is what the selector is for, it will pick them up when they are created. This service also needs to be a LoadBalancer as we clearly want to access it externally.
Create a new file called frontend.svc.yaml (run touch frontend.svc.yaml and refresh the files view in the editor) and paste the following YAML contents.
kind: Service
apiVersion: v1
metadata:
  name: frontend-svc
spec:
  type: LoadBalancer
  ports:
  - protocol: TCP
    port: 80
    targetPort: 3000
  selector:
    app: frontend
Save the file and then run run kubectl apply -f frontend.svc.yaml
As before check the status with kubectl get service, you can wait for the external IP to be assigned or carry on with the next step
Create another new file called frontend.deploy.yaml (run touch frontend.deploy.yaml and refresh the files view in the editor) and paste the following YAML contents. You will need to replace {acr_name} and {data_api_external_ip} (it’s public IP we accessed earlier) with their real values.
If you skipped Part 2, you are not using ACR, then you can omit the registry and just use smilr/frontend as the image and remove the imagePullSecrets: section.
Save the file and then run kubectl apply -f frontend.deploy.yaml
kind: Deployment
apiVersion: apps/v1
metadata:
  name: frontend
spec:
  replicas: 1
  selector:
    matchLabels:
      app: frontend
  template:
    metadata:
      labels:
        app: frontend
    spec:
      containers:
      - name: frontend-pod
        image: {acr_name}.azurecr.io/smilr/frontend
        ports:
        - containerPort: 3000
        env:
        - name: API_ENDPOINT
          value: http://{data_api_ip}/api
      imagePullSecrets:
      - name: acr-auth
Check the frontend pod is running with kubectl get pods.
By now the frontend-svc should have an external IP, get this IP using kubectl get svc/frontend-svc and copy and paste it into your browser.
The Smilr app client UI should load and look something like this, (here I’ve opened the browser console with F12 to check some of the log messages output by the app)
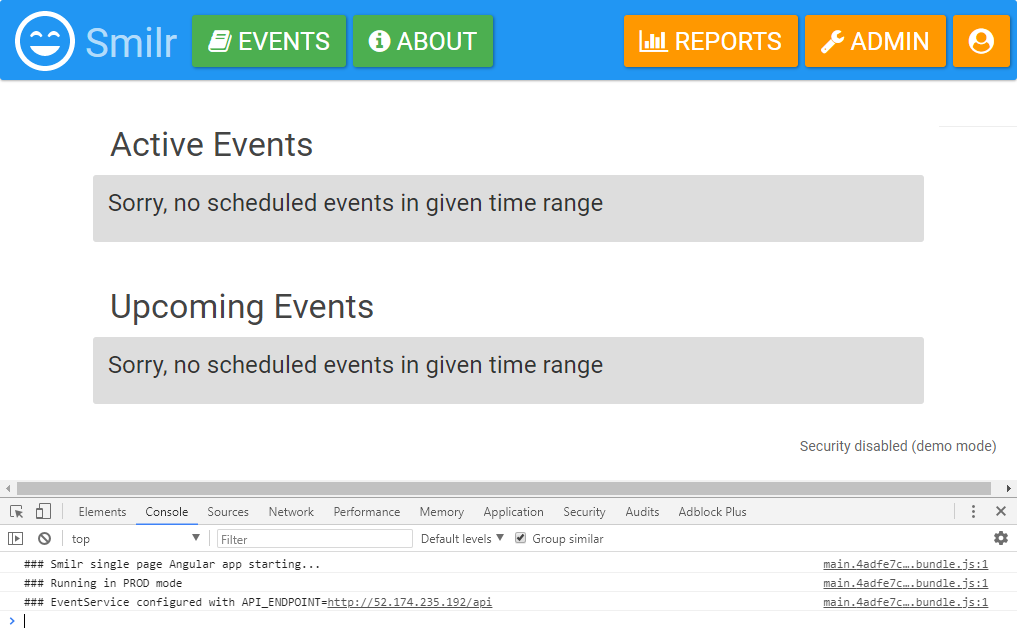
We have a functioning app! Well mostly, wouldn’t it be great to have some data in the app to look at. We could use the admin screens to manually create some events, but there is another way and we’ll use another feature of Kubernetes to do it
Create Demo Data
The Smilr data-api provides a way to bulk load data into the database, however for security reasons this particular API is only accessible from localhost. Lets look how we can get “inside” our pod and run commands from there to load a set of demo data
First get the name of the data-api pod with:
kubectl get pods -l app=data-api
Next we tell Kubernetes we want to run a command directly in one of the pods. This command could be anything, in this case the command is bash which will give us a shell session inside the pod
kubectl exec -it {pod_name} bash
You should see a linux command prompt, as this will drop us into a bash shell session right inside the running container in the pod. Run the ls command and have a look about, and running ps -ef you will see the node process which is the data-api app running inside the container.
💬 Note. The -it part of the kubectl command tells Docker to give us an interactive terminal session, and we run bash as the Smilr images are based on Linux. Not all Linux containers have bash installed and sometimes you need to fall back to plain sh. If this was a Windows container you would use powershell or the new pwsh command to start PowerShell Core
The following commands downloads some demo data and pushes it into the app via the API, make sure you run them from the bash session inside the pod
wget https://raw.githubusercontent.com/benc-uk/smilr/master/etc/demodata.json
apk add curl
curl -d @demodata.json -H "Content-Type: application/json" -X POST http://localhost:4000/api/bulk
Type exit to leave the bash session in the pod, and return to your terminal
Now refresh the Smilr app in your browser, and check there are events on the home screen, and go into the reports view to validate there is example feedback in the database.
End of Module 5
What we have at this stage in Kubernetes is our desired state
But there’s a few final improvements we need to make our app more robust
🡸 Module 4: Services & Networking
🡺 Module 6: Scaling & Persistence
Leave a comment