
Design
Build Anomaly detection model to detect Network Intrusions (i.e., Bad network connections or attacks) using KDDCup Synthetic Network Logs Dataset
Anomaly Detection is the ability to detect abnormal behavior in the given data like un-expected logs, events etc (or) in simple terms finding the odd-one-out from the given dataset.
Anomaly Detection have various applications like,
- Network Intrusion Detection
- Fraud Detection
- Patient Monitoring
- Application Monitoring etc
If implemented correctly Anomaly Detection can help users to take pro-active actions to avoid any catastropic losses in various domains. There are various techniques proposed to implement an Anomaly Detection as below,
- Supervised Anomaly Detection with Decision Trees, SVMs - Support Vector Machines, DNNs - Deep Neural Networks etc
- Semi-Supervised Anomaly Detection with One-class classification models like one-class SVMs
- Unsupervised Anomaly Detection with Clustering techniques like K-NN - K-Nearest Neighbours etc
This is the step-by-step guide to detect Anomalies in the large-scale data with Azure Databricks MLLib module.
In this tutorial we will use the Supervised Anomaly Detection technique using Decision Trees (in our case Random Forests in Spark MLLib) for detecting Anomalies within the KDD Cup Network Log Synthetic data and will detect the network intrusions.
Azure-Databricks Labs for building ML Models
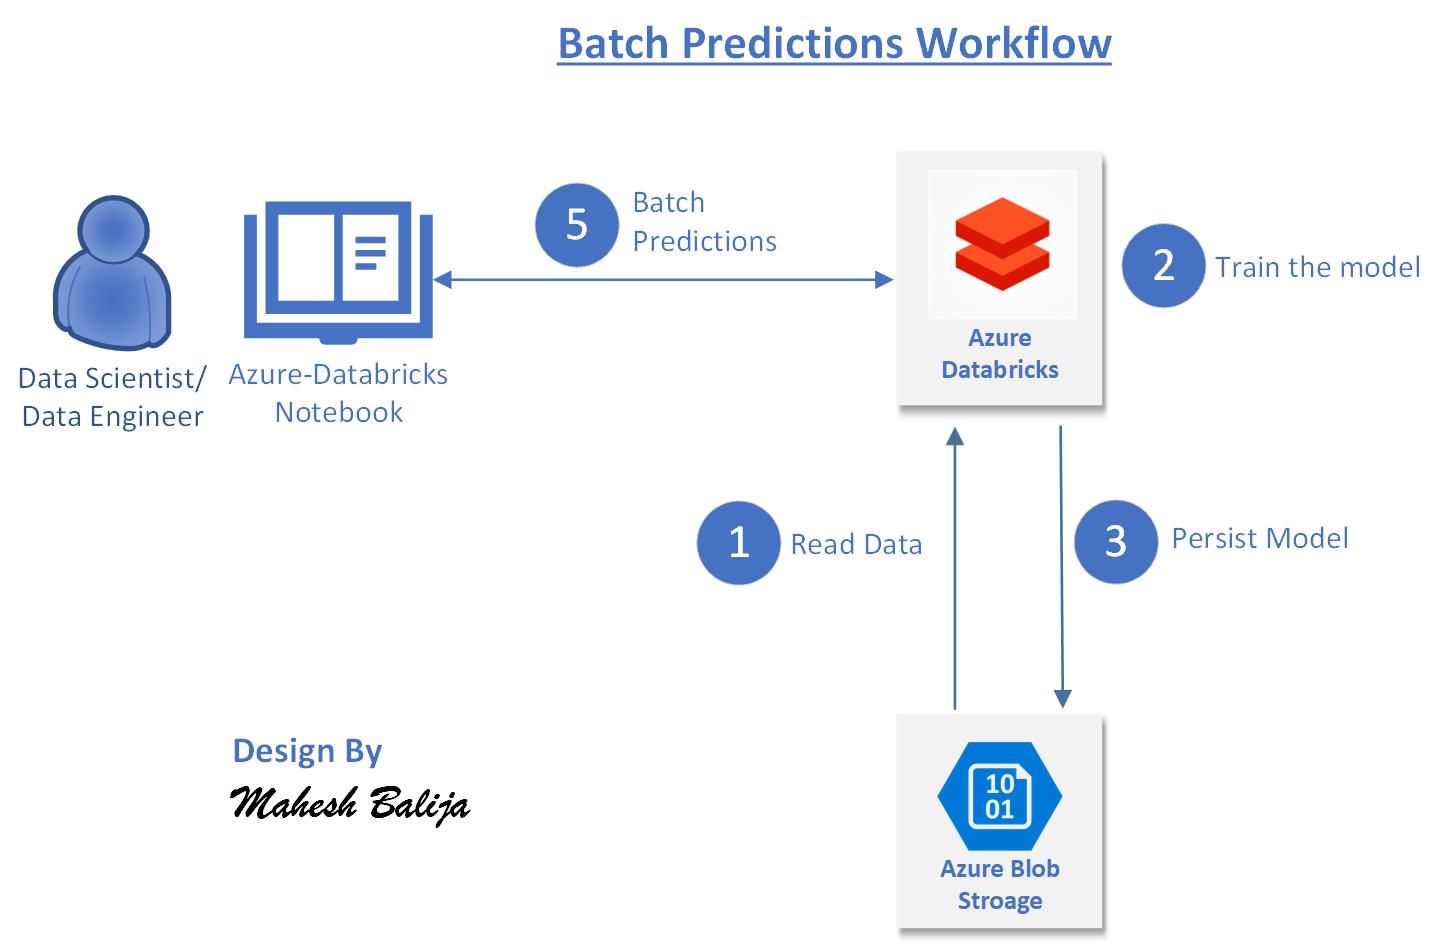
This tutorial mainly focuses on how to use Azure Databricks for Machine Learning workloads, saving and loading the Spark MLLib Model pipelines to Azure Storage. This tutorial in no means claim that this is the best approach for Anomaly detection, rather focuses on the approach to create, persist and load the Model pipelines in Azure Databricks.
Create an Azure Blob Storage account and upload the Network logs - Synthetic data
- Login to Azure portal:
The main Azure portal is https://portal.azure.com. - Click + Create a Resource button
- Select Storage and click Storage account - blob, file, table, queue
- Select a valid subscription, resource group, account name, nearest location, select standard
- For Account Kind select Blob Storage
- Leave Replication as RA-GRS and Access Tier as Hot
- Hit Review + Create and Create
- Once the deployment is successful, goto the storage account through the notification bell and clicking Go to resource button
- Under Settings select Access Keys and make a note of Key1 (or) Key2
- Download the file kddcup.data_10_percent.gz from below link
http://kdd.ics.uci.edu/databases/kddcup99/kddcup99.html | KDD Cup Datasets
NOTE: Only use the 10 percent dataset from this link for the scope of this labs. You can use the whole dataset for your learning in your personal time :)
- Extract the gzip file, you will get kddcup.data_10_percent_corrected
- Open Microsoft Azure Storage Explorer from your desktop and connect to your Azure subscription
NOTE: Follow the instructions in the dlsgen2 labs to download and install the storage explorer in your desktop, if it is not availble in your desktop or VM - Under the Storage accounts, open the newly created blob storage account
- Expand Blob Containers, right click and select create blob container and give a valid name, in my case I gave root as the container name
- Click on + New Folder and give a folder name as say network-logs
- Upload the file kddcup.data_10_percent_corrected from where you have extracted into the newly created folder network-logs in the blob container root
- Wait until the file is uploaded successfully!
Import the Anomaly Detection notebook .dbc file into your workspace, execute the ML Model and review the output
- Login to Azure portal
- Launch the Azure databricks workspace
- Click on Workspace icon from the left navigation pane
- Click on the down arrow icon next to workspace
- Hit Import
-
Upload the anomaly_detection_v1.dbc file from below GitHub repository into this workspace
Databricks Labs GitHub Repo - Click on Home icon from the left navigation pane
- Goto to the intrusion_detection_v1 notebook under the Recents section
- In the Cmd 1 replace all of the following,
- Replace <Azure Storage KEY - You can copy this from your Azure Portal> with your Blob Storage Key which you have copied from above instructions
- Replace
with your Storage Account name, this can be found from the overview page of the Storage resource in Azure portal - Replace
with the newly created contianer name above (in my case *root*) - Replace
with your Storage Account name, this can be found from the overview page of the Storage resource in Azure portal - Repace
with the folder name created above (in my case *network-logs*)
- Review each command and run one by one and monitor the results of each command
Congrats! you are now been able to learn how easy-it-is to create an ML model using Azure Databricks Notebooks :)
Implement Batch Predictions: Save and Load the ML Model Pipeline from Azure Storage
The detailed steps are listed in the GitHub Repository created by Mahesh Balija please refer to below link :) Azure Databricks - Batch Predictions Lab
Documentation & Links
| Link | Description |
| ————- |:————-:|
| Azure Databricks - Microsoft | Azure Databricks Microsoft Documentation |
| Databricks Official Documentation | Azure Databricks official documentation from Databricks |
| Azure Databricks Sample Labs | Sample Labs in GitHub repository from Mahesh Balija |
——————————————————————
Leave a comment