
Overview
This guide will step you through deploying a multi part application which demonstrates using serverless compute with Azure Functions combined with the pre-built machine learning models of Cognitive Services
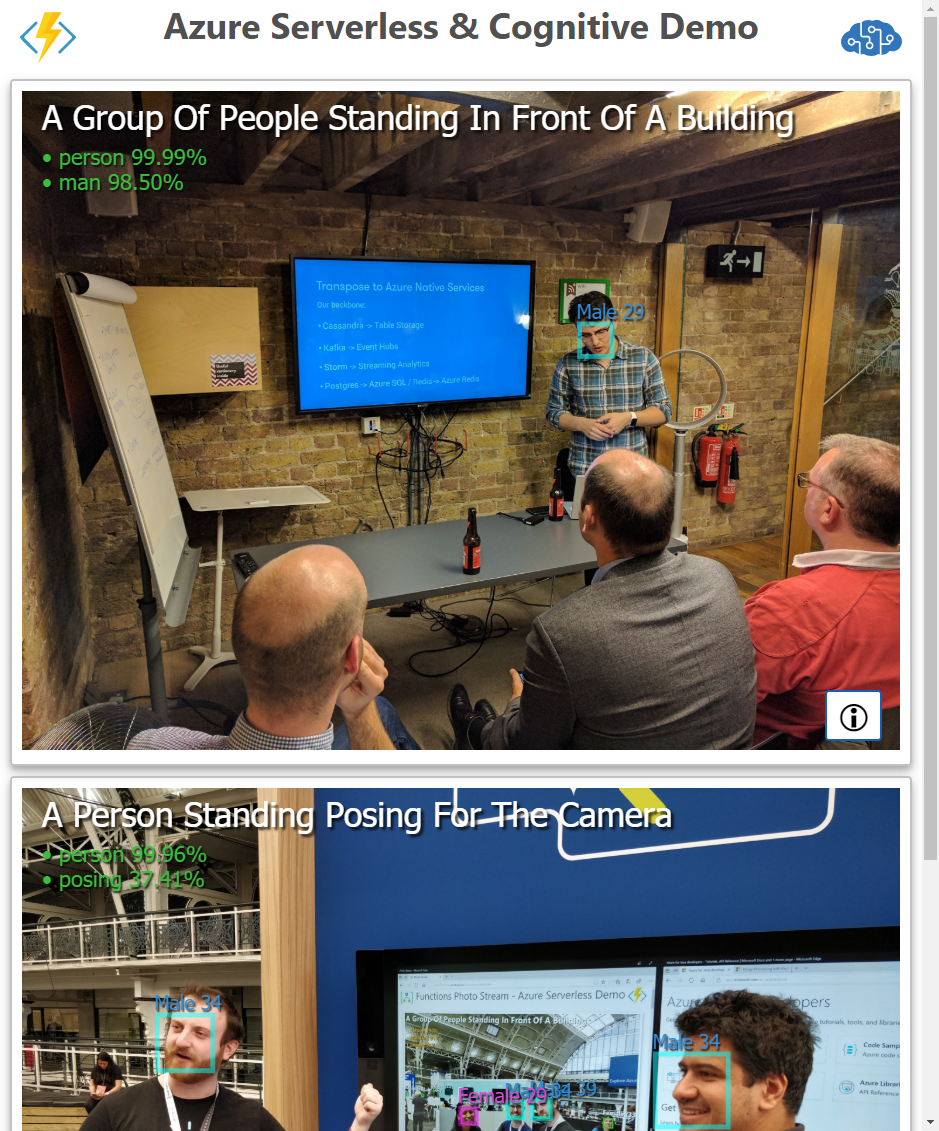
With this application users can take photos using their phone, these photos are analysed using computer vision. The results have a description of the image, people’s faces and also a set of tags. The demo app updates the photo with information and the results are dynamically updated on a web page
The system consists of four main parts:
- Camera web app
- Two Azure Functions
- Computer Vision Cognitive Service
- Viewer web app
Architecture
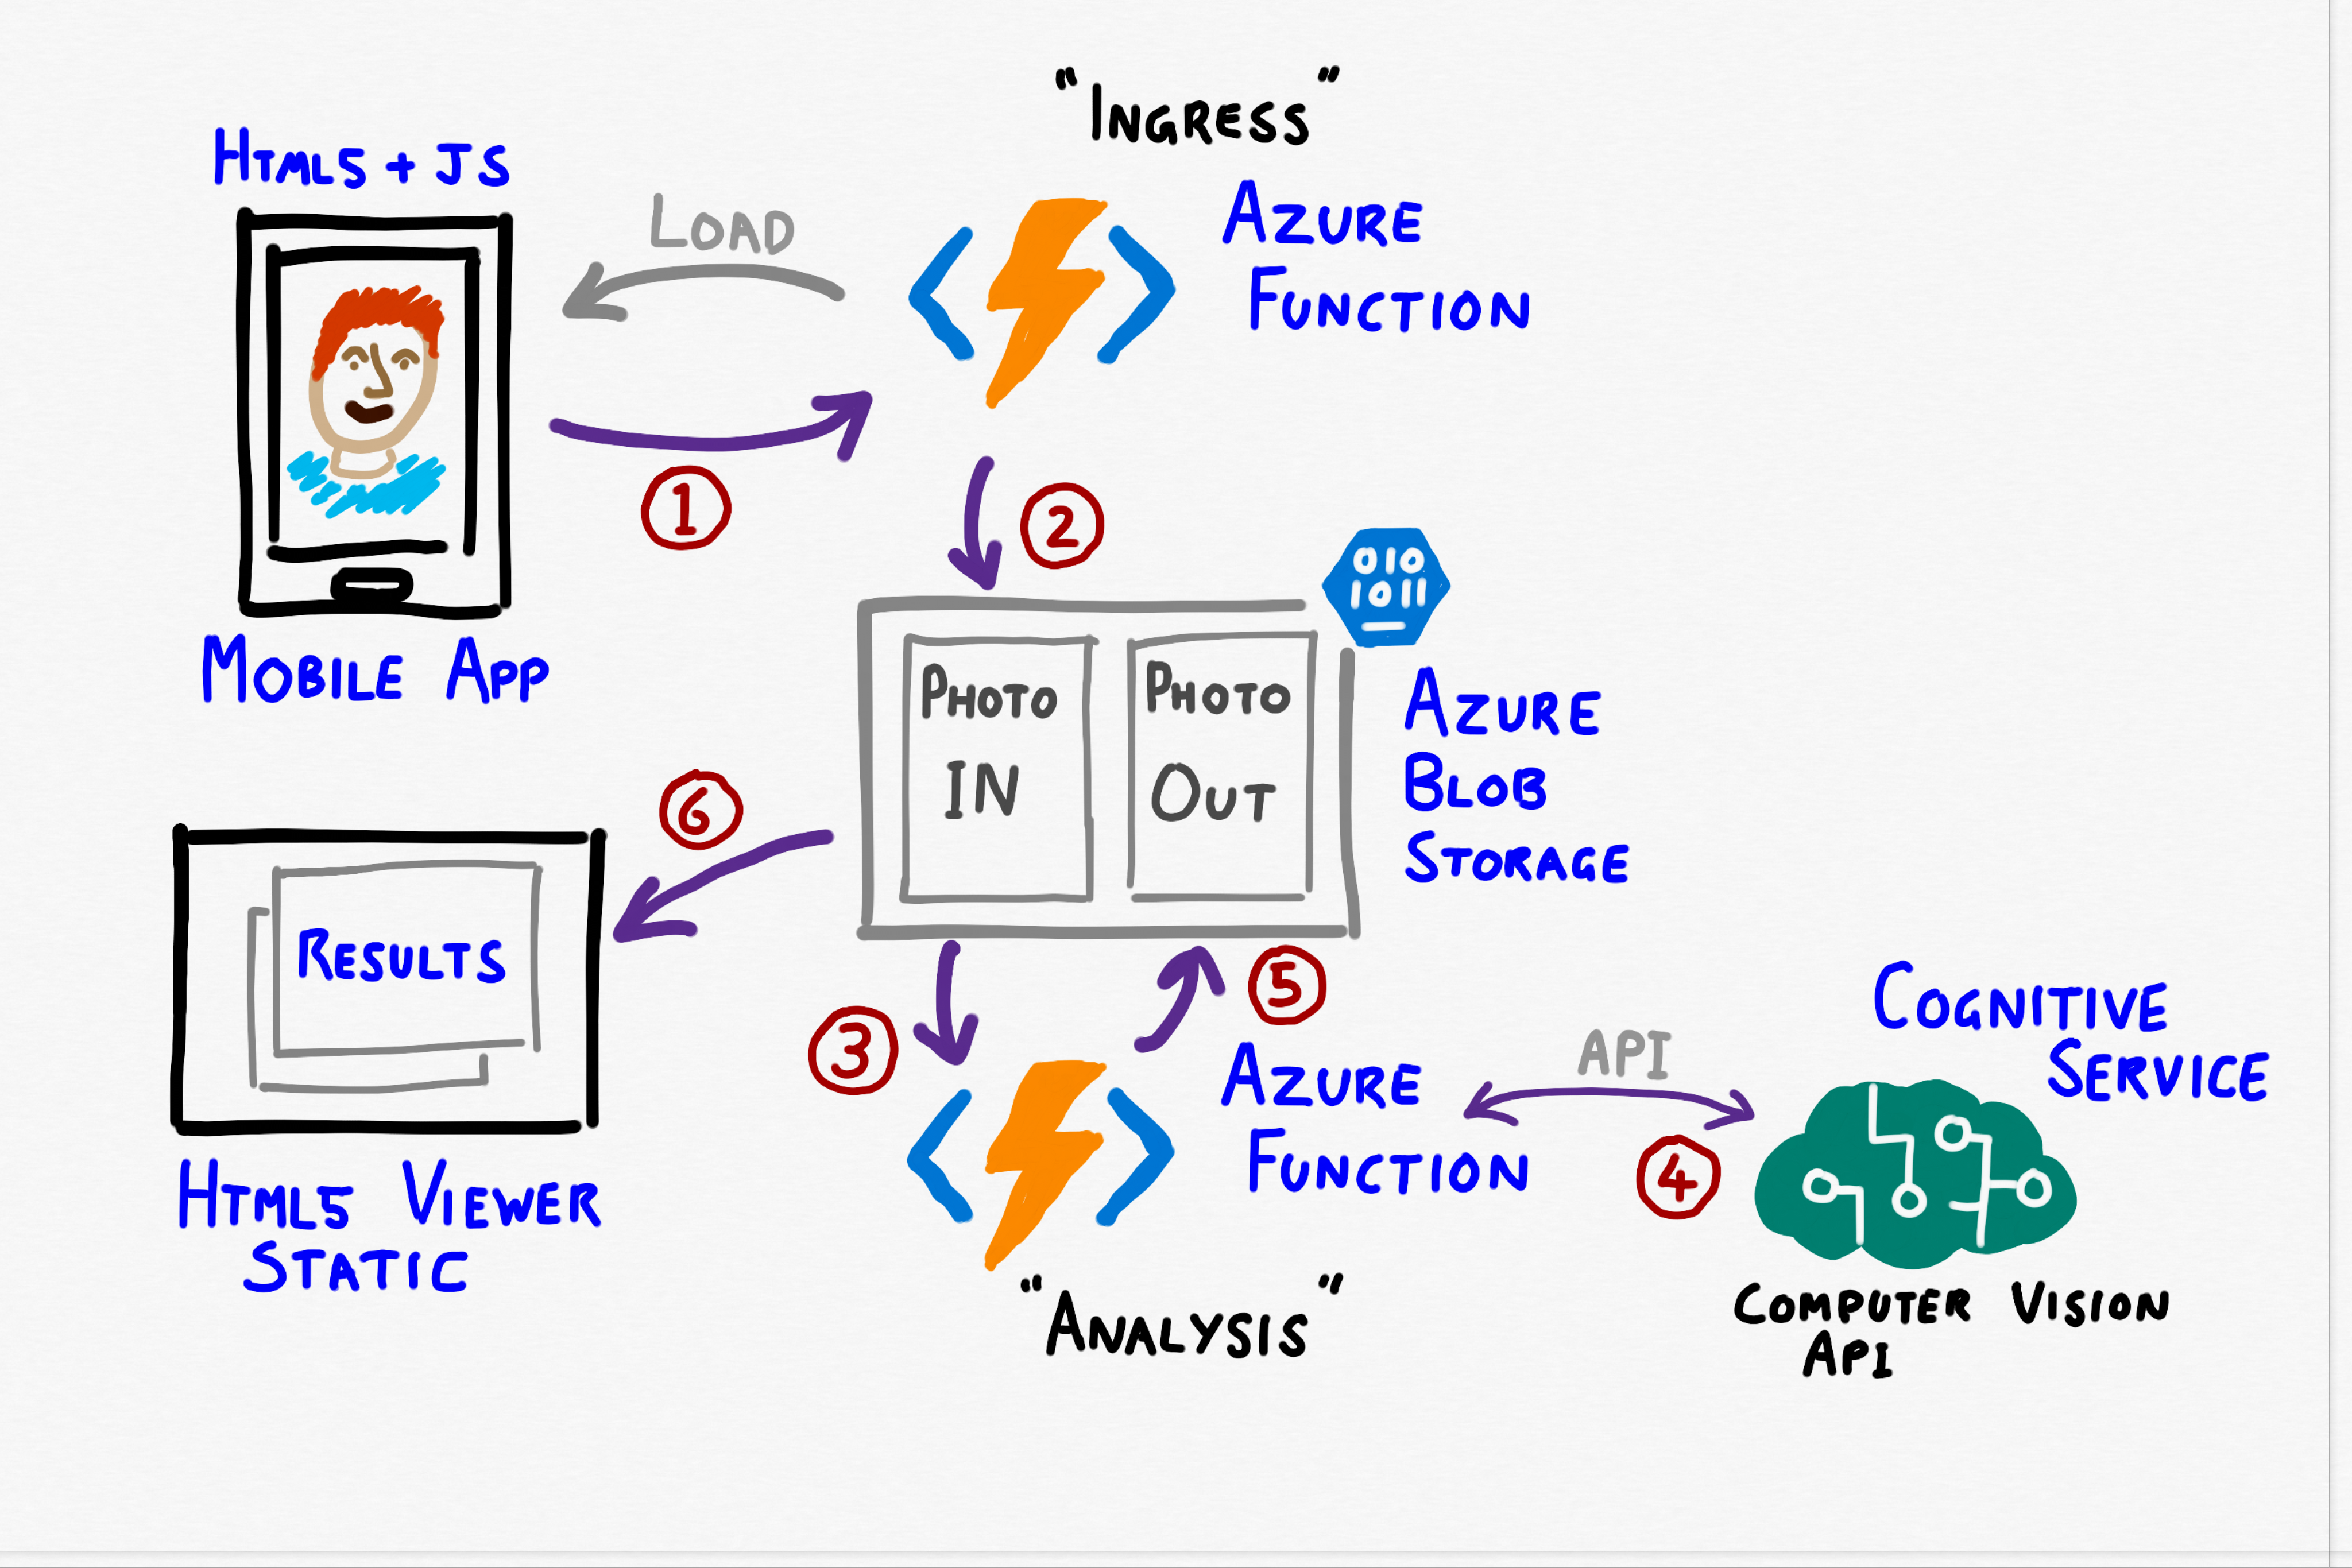
Application Flow
- User loads camera web app on mobile device, via public URL of an Azure Function and takes photo
- Image is HTTP POSTed from camera app as Base64 string back to same Azure Function
- Azure Function decodes Base64 data and stores resulting image in Blob Storage, into photo-in container
- Second Azure Function is triggered on a new blob arriving at photo-in
- Function sends image to Cognitive Service API (REST call) and gets the JSON result
- Result is stored in photo-out container as a blob of JSON
- Static HTML/Javascript viewer ‘app’ polls photo-out for new blobs and updates page dynamically by fetching and reading the JSON. Details are shown as overlays on the images, such as the caption, tags and location of faces (using HTML5 Canvas API)
Example (Viewer Results)
Deployment & Setup
The system requires a single Function App, storage account and Cognitive Services account. Using a consumption plan for the Function App means the costs for deploying the system are extremely small.
Option 1. Automated Deployment Script
A bash script deploy.sh for fully automated deployment is provided in the etc directory. This script will create everything and deploy all the Functions code. The default resource group is called **Demo.ServerlessVision** and deploys to North Europe, you can modify the script to change these defaults.
To run the script you will need the Azure CLI installed and configured and either run the script locally under WSL bash or simply use the Azure Cloud Shell
- Step 1 Go to shell.azure.com and login
- Step 2 Run
curl -s https://raw.githubusercontent.com/benc-uk/serverless-cognitive/master/etc/deploy.sh | bash
Option 2. Manual Deployment
If you want to learn a little bit more about Functions and how the parts integrate together, then you can manually deploy the solution. All these steps use the Azure Portal, and assume you already have an Azure subscription
1. Deploy a new Azure Function App using the Portal
- Click; New ➔ Compute ➔ Function App
- Pick any unique name for your app
- Pick Windows as the OS
- Opt to create a new resource group, give it any name that you wish
- For the Hosting Plan select “Consumption Plan”
- For the Runtime Stack select “JavaScript”
- Opt to create a new storage account, and make a note of the name
- Use of Application Insights is optional, it will provide monitoring and diagnostics if you are interested in seeing them
2. Deploy Computer Vision Cognitive Service
- Click; New ➔ AI + Machine Learning ➔ Computer Vision
- You must pick West Europe as the location, and also F0 (free) as the pricing tier
- Place in same resource group used for the Function App
- Once the Computer Vision Cognitive Service is deployed, click into the resource and click on keys. Copy “Key 1” somewhere, e.g. into a text file.
3. Deploy & code to Functions & configure
- We will deploy the function code from the main source GitHub repo:
- Click into your new Function App from the Portal, you will be taken to the Functions Portal
- Click: Platform Features ➔ Deployment Center (It is listed under CODE DEPLOYMENT)
- Click: External Repository in the Source Control view, then click ‘Continue’.
- Enter
https://github.com/benc-uk/serverless-cognitive.gitas the Repository URL, and for the branch enter “master”. Click ‘Continue’ - Click ‘Finish’ on the summary page.
- The view will refresh and you will see a page displaying the status of the deployment. Be patient and wait until the status changes to “Success (Active)”
- Click the list of Functions on the left side, and two functions; cameraFunction and cognitiveFunction should appear
- Get the URL of the camera app, click: on the cameraFunction then click on “</> Get function URL” at the top. Copy this URL somewhere, as you will need to open it on your mobile, creating a short link or sending it over to your phone as a message/email will save you typing it in
- Configure the functions to access your Cognitive Service:
- Return to the Function App level view by clicking on the Function App name (with the yellow lighting bolt icon) on the left
- Click on “Overview” tab in the top of the Function Portal and into “Application settings”
- Scroll down & click “+ Add new setting”
- Call the setting VISION_API_KEY and paste the key you copied previously as the value
- Remember to scroll back up & click “Save”
4. Setup Blob Storage
- Return to the resource group. You can do this via the breadcrumb trail at the top of the Portal view
- Click into the storage account that was created in step 1 with the Function App
- Click on “Blob Service / Browse blobs”
- Click “+ Container”, call it photo-in and set the access level to ‘Blob’
- Click “+ Container”, call it photo-out and set the access level to ‘Container’
- Click on “Blob Service / CORS”, and click “+ Add”
- Set the rule up with asterisk ‘*’ (no quotes) for allowed origins, allowed headers and exposed headers, select GET as the allowed verbs and leave the max age as 0
Usage
- Open the camera web app on your phone using the URL you got earlier, it will be of the form
https://{function-app-name}.azurewebsites.net/api/cameraFunction - Tap the button & icon to take a photo (or pick existing photo on your device) and upload to Azure triggering the whole flow described above
- Open the viewer:
- The viewer is currently hosted publicly on GitHub pages
- If you have cloned or downloaded the source repo, just open
viewer/index.htmllocally in your browser - You will need to point the viewer at your storage account, so enter your storage account name and click OK
- Note. The viewer automatically fetches new photos every 10 seconds and displays them, so do not reload or refresh the page
Viewer
If you want to host the viewer yourself in Azure, you can:
- Upload the viewer folder of this repo to blob storage give the container anonymous access and load the pages using the blob endpoint URL, e.g. https://mystoreaccount.blob.core.windows.net/viewer/index.html
- Create an Azure App Service web app and upload the contents of the viewer folder to the root of your web app
Leave a comment