
What this is for
The focus of this walk through is to guide you through the process of setting up a Twitter bot with Azure Serverless and GitHub actions from a standing start to full ‘Continuous Delivery’ (CD). Because the focus is on CD we will start with setting up the code repository in GitHub. We will then move on to creating the Azure Function in code making sure we have everything connected to Azure. We will then test the Logic App for posting to Twitter and then create the automated CD workflow in GitHub. At the end you will have a foundation for which to continue on to either build out the Twitter Bot or use a CD methodology on future projects with Azure Functions and GitHub actions.
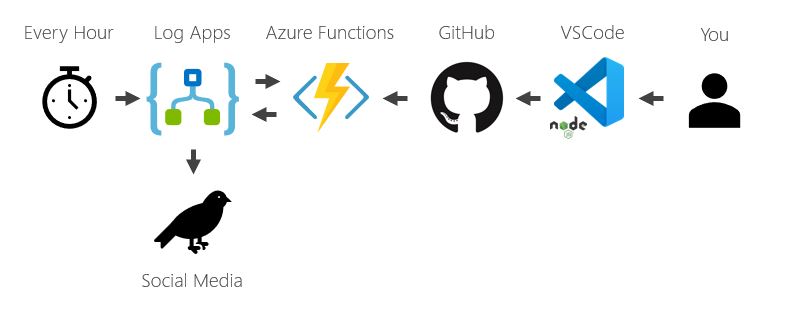
Architecture
We are looking to create this…
Who is this for?
Primary Audience
Those with some development experience. You have an idea about what Serverless is and that Continuous Integration/Continuous Deployment is useful in the overall code workflow. You are interested in how modern low-code/no-code solutions can be set up in a cloud native way to accelerate the delivery of ideas to production. You would rather not write boilerplate code for auth and glue.
For this audience, this walk through will be ‘straightforward’ but will give you a thin slice through the full stack to a live result.
Each step has a TL;DR step for you at the top if you know how to do these things.
Secondary Audience
Those who are early in the code/tech/cloud journey and want to stretch themselves on a project that allows them to experience cloud native low-code/no-code tools for the automation of tasks - such as posting on Social Media.
For this audience, this walk through will be ‘hard’ because there are a lot of concepts covered in a short space of time. However, if you want to stretch yourself I hope I have covered all the details for you to follow to actually make it work!
Prerequisites
To be able to build along with this tutorial you will need.
-
An Azure account (find out more). This walk through expects some level of Azure experience. While I have given a lot of detail and screen grabs of the various stages your experience will help you move through much quicker. If you are setting up a Free Azure account for the first time you may wish to do some general tutorials first to understand how the portal works and some base terminology (for example, ‘resource’ and ‘resource group’).
-
A GitHub account (find out more). It is very straightforward to set up a Github account but the concepts of source control are only covered in passing in this walk through. I hope to have covered ‘what you need’ here but you may wish to explore other learning materials, like First Day On GitHub if you want more context.
-
A Twitter account (find out more). You can use your personal Twitter account if you want to. To create a new Twitter account will require it’s own associated email address. If you don’t have a second account you could look at signing up for one at Outlook.com
-
Visual Studio Code (find out more).
-
Node.js (find out more). This walk through can be completed with any language that Azure Functions supports but I will be using Node.js because JavaScript is my favourite. There is extremely minimal actual code in the main body of this walk through. So if you are not a confident coder, never fear!
The Visual Studio Code Azure Functions Extension (find out more). and Azure Functions core tools (find out more) will also be required but we’ll set the these up in step 2 below
At the time of writing, Azure Functions support either node.js v8.x or 10.x. If you are installing node then go with 10.x. If you have 12.x installed then you should be absolutely fine for this lab. If you have an odd numbered version (e.g. 13.x) then you will have issues as non-LTS versions are not supported by the Azure Functions extension. (Node.js release schedule.)
Steps
-
Set up GitHub Repo (details)
This is the repository for the project. It is where the code will be stored but also where the CI/CD GitHub actions will run.
-
Install the Functions Extension for VSCode (details).
This extension allows you to easily work with Azure Functions from within VSCode.
-
Create the Function locally (details)
In this step we learn how we can test everything works without having to use the cloud. It shortens the development cycle feedback loop.
-
Push the Function to Azure (details)
In this step we make the function live so it can be used by the Logic App.
-
Build the Logic App (details)
In this step we learn how to use Logic App to automate the calling of our Function without code.
-
Set up a GitHub Action (details)
In this step we learn how to set up a GitHub action in our repo from step 1 to automate the release of our code.
-
Live Twitter Bot! (details)
Reactivate your logic app and generate unique tweets!
Leave a comment