
Introduction
As developers, we all know that to get your application in the hands of your customers quickly you need to establish a DevOps (CI/CD) pipeline to manage your code, spin up the resources your app needs in the cloud, run some automated tests, and deploy it to the cloud. Then to get feedback on how your app is performing and how your customers are using it you need to estabish a way to monitor your app. All this can take a lot of time & effort to establish.
Azure DevOps Projects looks to simplify this process by automating these setup tasks with just a few clicks, whether you’re starting a new project from scratch, or bringing your codebase with you. Creating a DevOps Project provisions Azure resources and comes with a Git code repository, Application Insights integration and a continuous delivery pipeline setup to deploy to Azure. The DevOps Project dashboard lets you monitor code commits, builds, and deployments from a single view in the Azure portal.
💬 Note. As at the time of authoring this lab (June 2018) Azure DevOps Projects in in Public Preview, so some of the information given may be subject to change.
Key benefits of a DevOps Project:
- Get up and running with a new app and a full DevOps pipeline in just a few minutes
- Support for a wide range of popular frameworks such as .NET, Java, PHP, Node, and Python
- Start fresh or bring your own application from GitHub
- Built-in Application Insights integration for instant analytics and actionable insights
- Cloud-powered CI/CD using Visual Studio Team Services (VSTS)
Pre-Reqs
There are several things you will need before starting this lab:
-
Azure Subscription
Either an existing Azure subscription you have access to (with ‘contributor’ rights) or Azure Pass or free account. -
VSTS Account
Since DevOps Projects creates a Visual Studio Team Services (VSTS) project, you will need access to a VSTS account. However, if you do not have one, you will have the option to create one during the lab.
Creating your first DevOps Project
In this lab we’ll create a new DevOps Project from scratch. You can create a new project using a number of common technologies such as ASP.NET Core, Java, Node.js, Ruby, Python, Go etc. If you already have your application code in a GitHub or external Git repository you can point your project to this codebase.
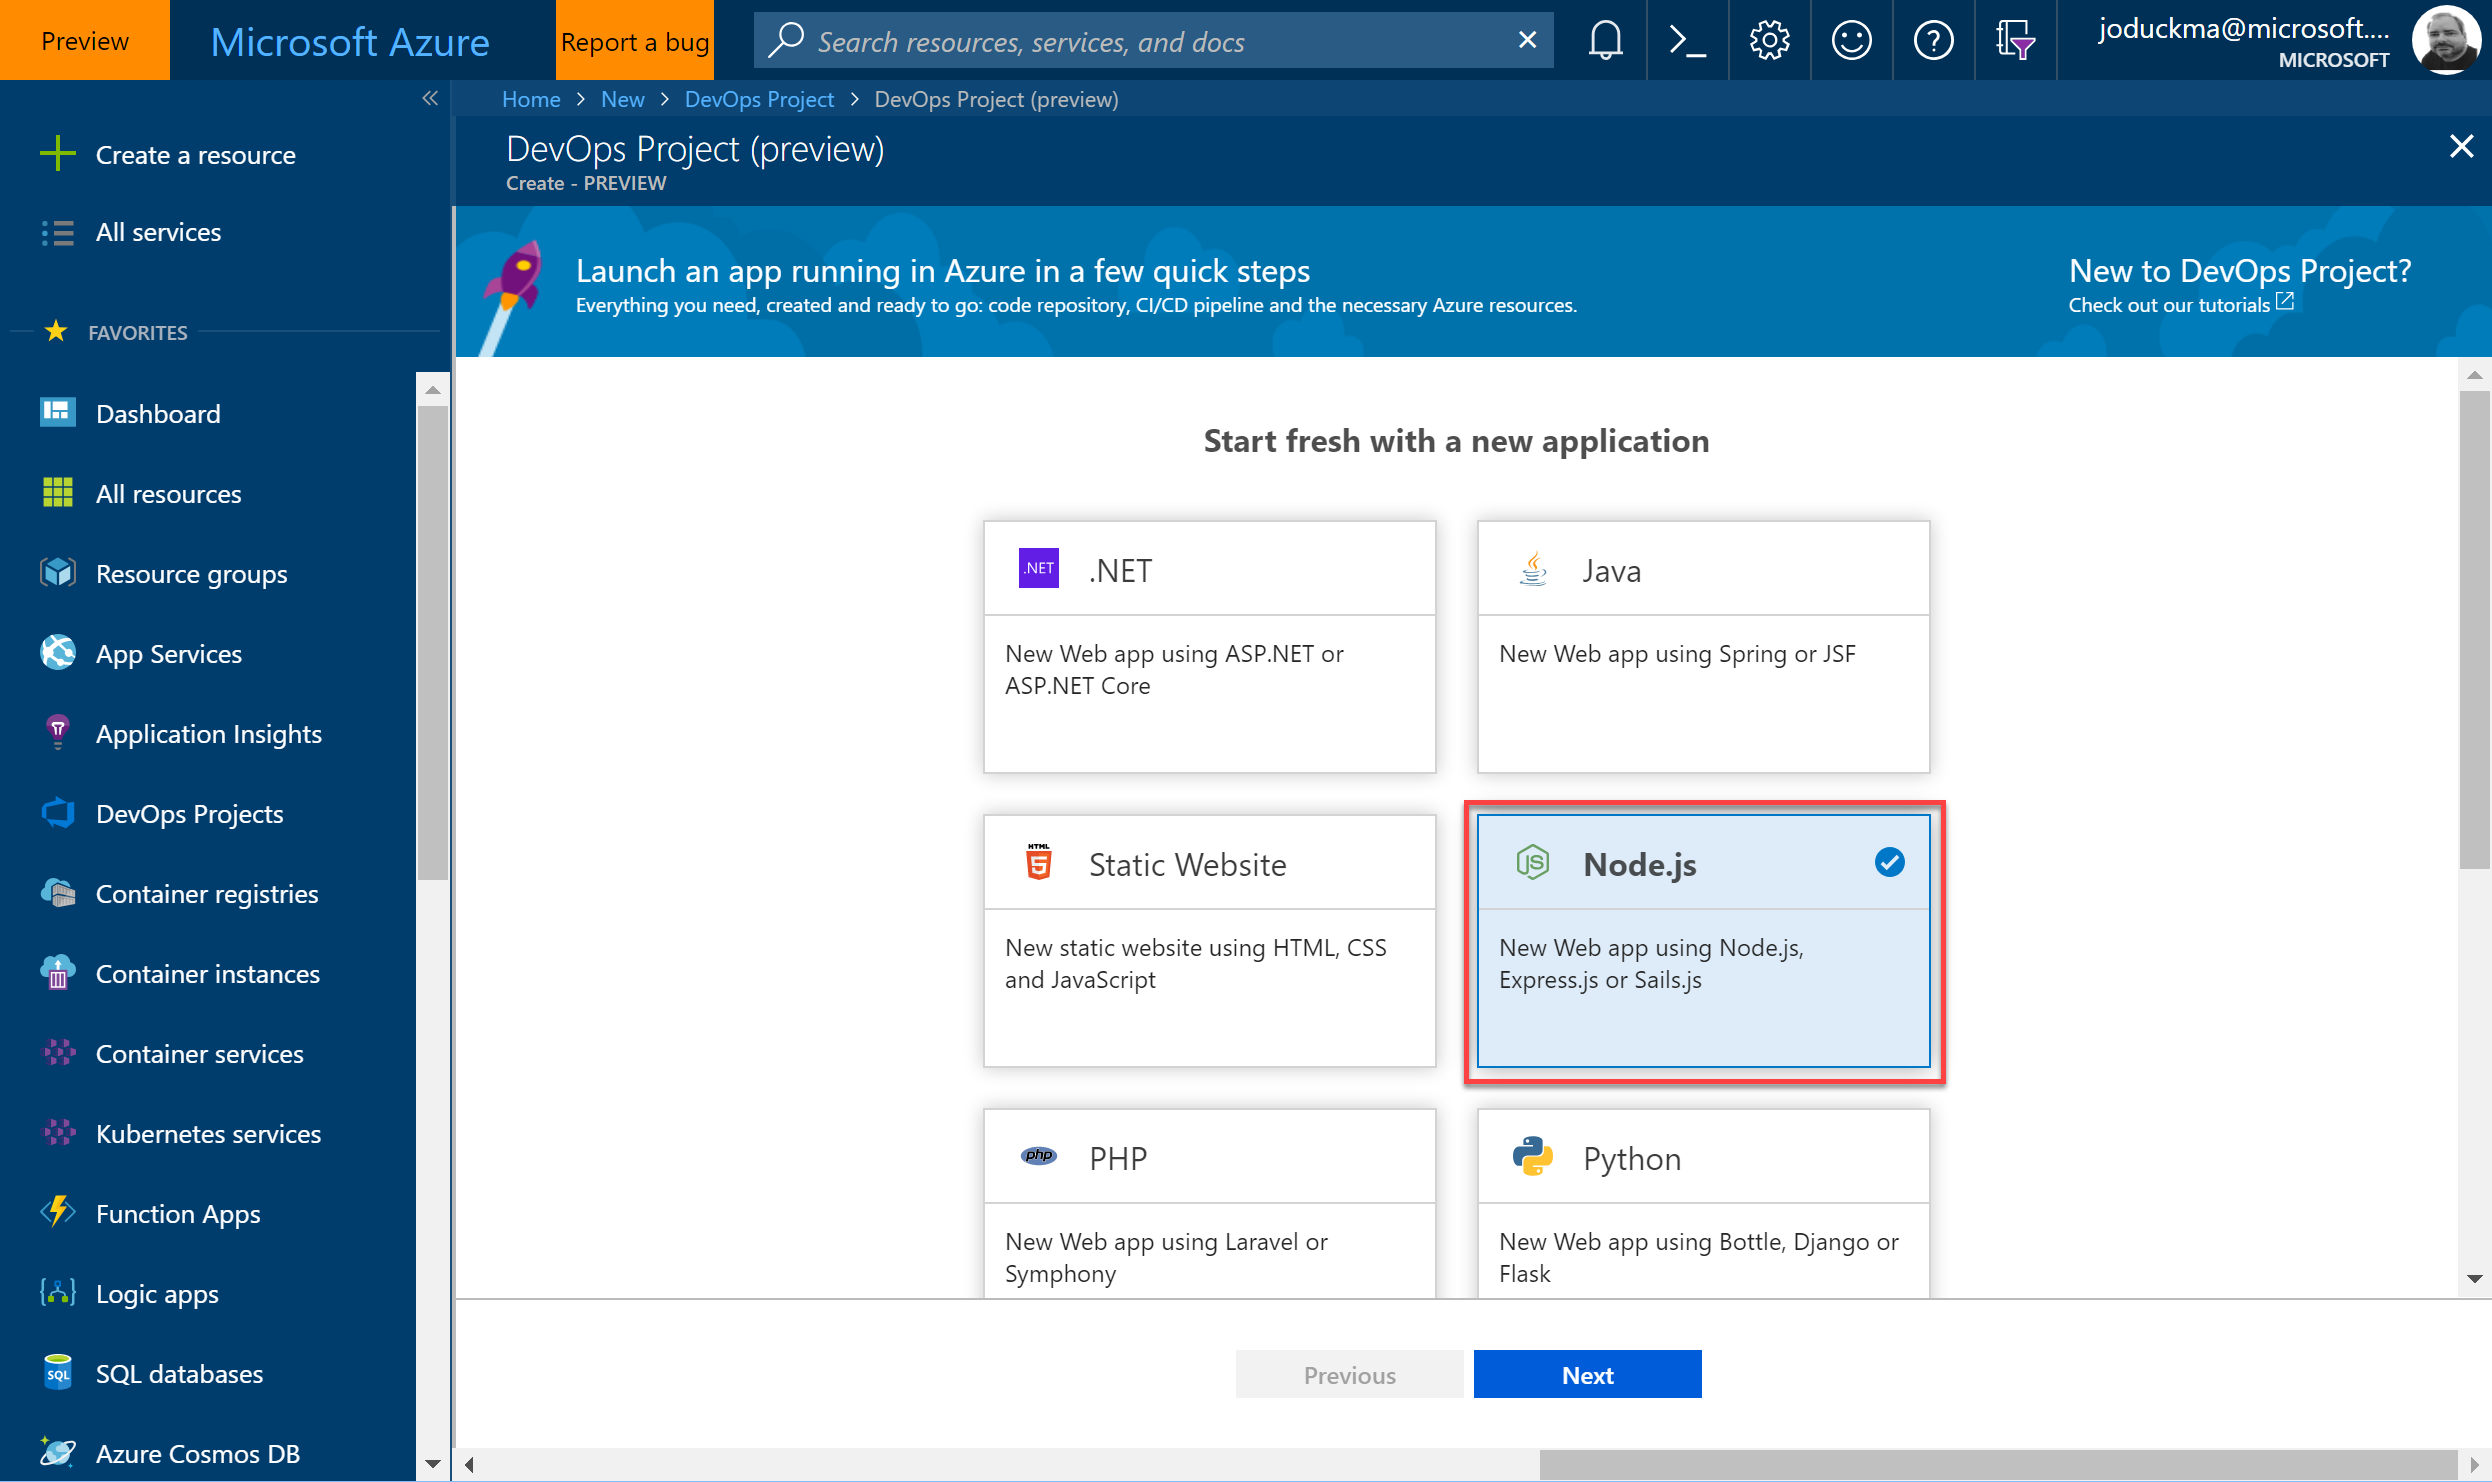
For this lab we’ll create a sample Node.js application and deploy it to Azure App Service as a standard web app.
- Open the Azure Portal.
- Click on the + Create a resource icon (or press G+N), search for DevOps Project and choose Create.
- Select Node.js and click Next
- Select Express.js application framework and click Next
-
Select the Web App Azure Service and click Next
-
When you create a DevOps Project the project is created in a Visual Studio Team Services (VSTS) account. If you already have a VSTS account select Use Existing and select your account. If you don’t have an account, click Create New and enter a unique name for your account
-
Enter a unique name for your new project. For example ‘myfirstdevopsproject’
-
Select your Azure Subscription from the dropdown list
-
Under Web App Name enter a unique name for your web application. For example ‘myfirstdevopsproject-<initials>’
-
Select an Azure region to deploy your app into. For example ‘West Europe’
- Click Done
Once your entries have been validated, your DevOps Project will be created. This will take a few minutes. When it’s ready you will receive a notification. On the notification, click Go to resource. If you don’t see this option, you can find your project by clicking DevOps Projects in the left-hand navigation menu. You should see your project listed here.
Explore your project
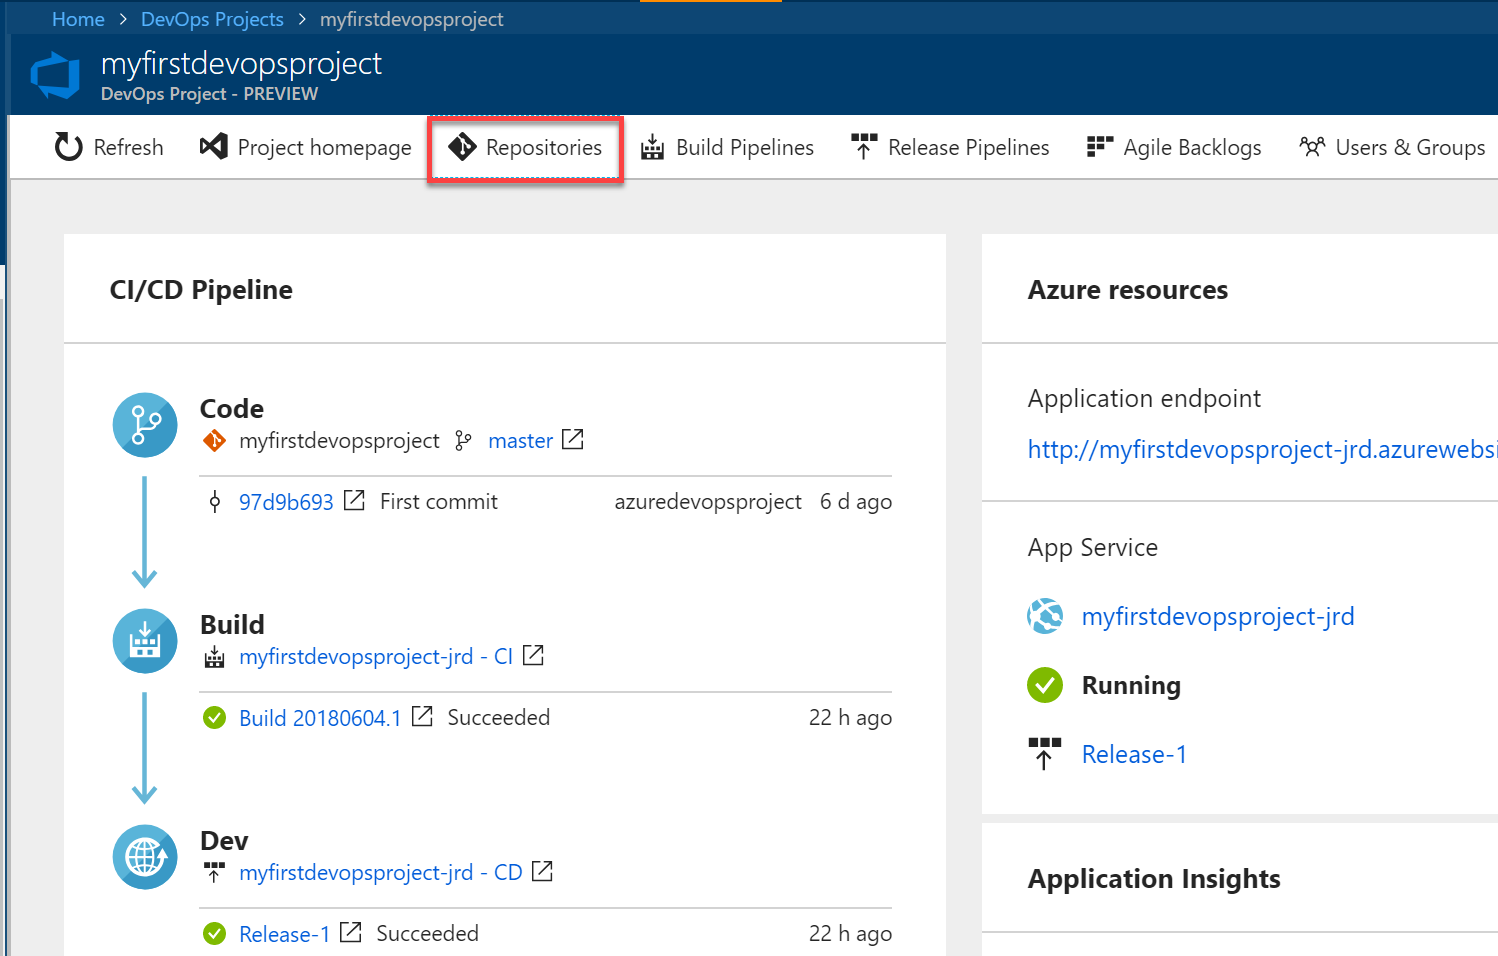
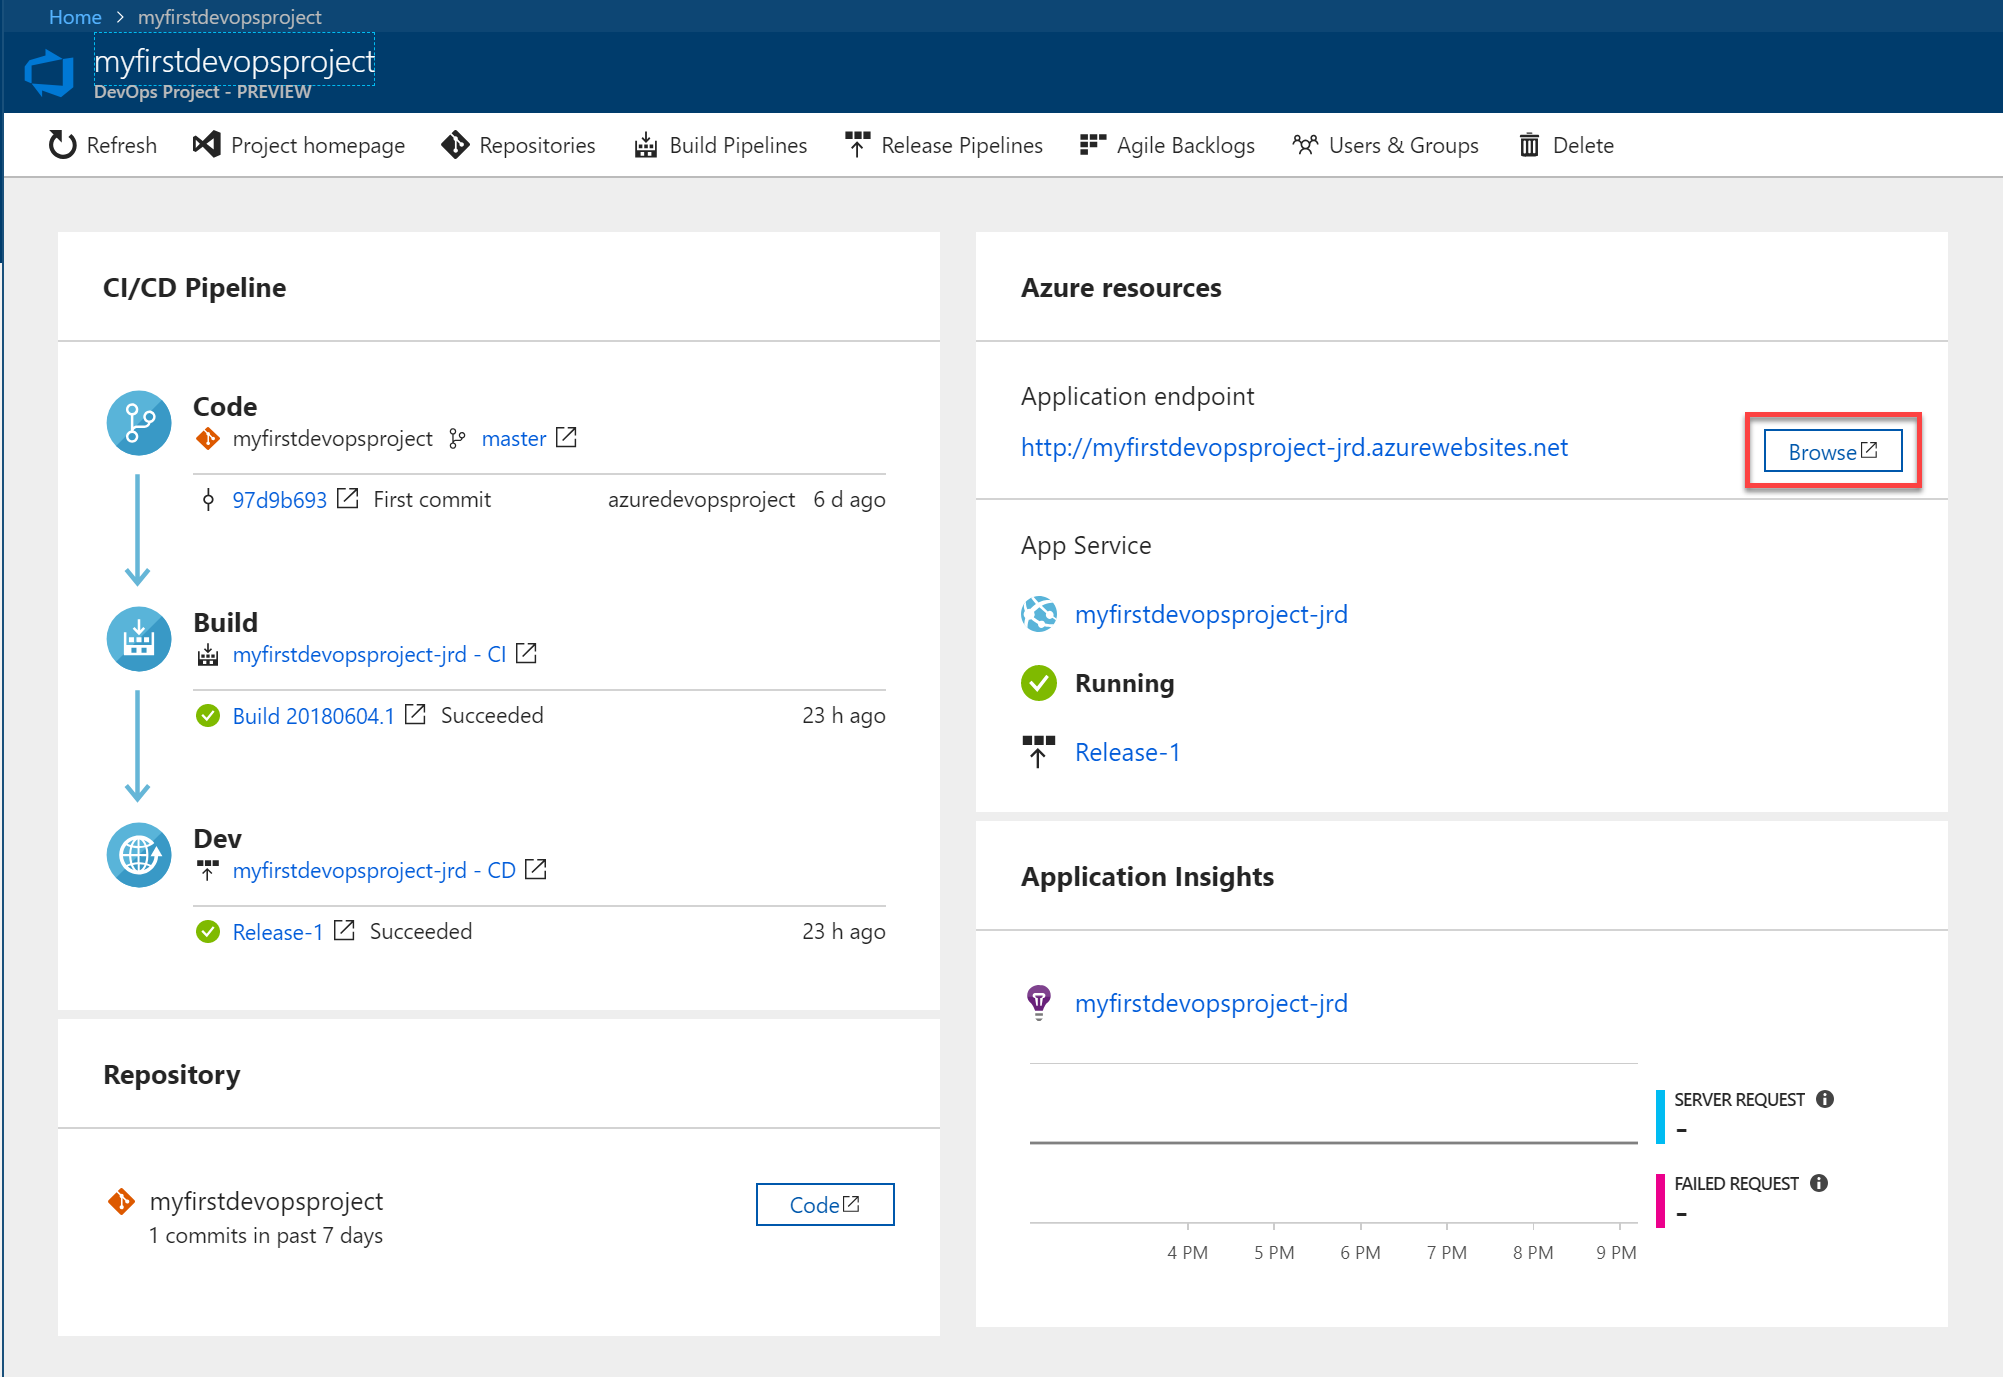
As a part of creating the DevOps project, a CI/CD pipeline has been created including a private Git repository with an initial commit of the sample application code; a continuous integration build task to build the project in VSTS; and a deployment task that will create the App Service resource in Azure for your web app and deploy the build onto it. Additionally an Application Insights instance has been created for your application.
You can see all these elements along with their status under your project as shown in the example below:

Review the code repository
Your project will have been initialized with sample source code. You can view your code repository directly from your project dashboard.
- From your Azure DevOps Project dashboard, select Repositories from the top of the Azure DevOps project dashboard. This link opens your VSTS project and navigates to the Git repository.
- Browse the code. When you are finished close the browser tab.
Examine the build definition
The Azure DevOps Project automatically configures a full VSTS CI/CD pipeline in your VSTS project. You can explore and customize the pipeline. Follow the steps below to familiarize yourself with the VSTS build definition.
-
Select Build Pipelines from the top of the Azure DevOps project dashboard. This link opens the VSTS build definition for your project in a new browser tab.
-
Move your mouse cursor to the right of the build definition next to the Status field. Select the ellipsis that appears. This action opens a menu where you can perform several activities such as queue a new build, pause a build, and edit the build definition.
-
Select Edit.
-
From this view, examine the various tasks for your build definition. The build performs various tasks such as fetching sources from the VSTS Git repository, restoring dependencies, and publishing outputs used for deployments.
-
At the top of the build definition, select the build definition name.
-
Change the name of your build definition to something more descriptive. Select Save & queue, then select Save.
-
Under your build definition name, select History. You see an audit trail of your recent changes for the build. VSTS keeps track of any changes made to the build definition and allows you to compare versions.
-
Select Triggers. The Azure DevOps project automatically created a CI trigger, and every commit to the repository initiates a new build. You can optionally choose to include or exclude branches from the CI process.
Review the Release Pipeline
The Azure DevOps Project automatically creates and configures the necessary steps to deploy from your VSTS account to your Azure subscription. These steps include configuring an Azure service principal to authenticate VSTS to your Azure subscription and creating a VSTS Release Definition to deploy your code to Azure.
Follow the steps below to review the VSTS Release Definition.
-
Select Release Pipelines from the top of the Azure DevOps project dashboard. This link opens the VSTS release definition for your project in a new browser tab.
-
On the left-hand side of the browser, select the ellipsis next to your release definition, then choose Edit.
-
The release definition contains a pipeline, which defines the release process. Under Artifacts, select Drop. The build definition you examined in the previous steps produces the output used for the artifact.
To the right-hand side of the Drop icon, select the Continuous deployment trigger icon (which appears as a lightning bolt). This release definition has an enabled CD trigger. The trigger initiates a deployment every time there is a new build artifact available. Optionally, you can disable the trigger, so your deployments will then require manual execution.
On the left-hand side of the browser, select Tasks, and then choose your environment.
The tasks are the activities your deployment process performs, and they are grouped in Phases. There is a single phase for this release definition. The phase contains a Deploy Azure App Service task.
Select the Deploy Azure App Service task and examine the various properties.
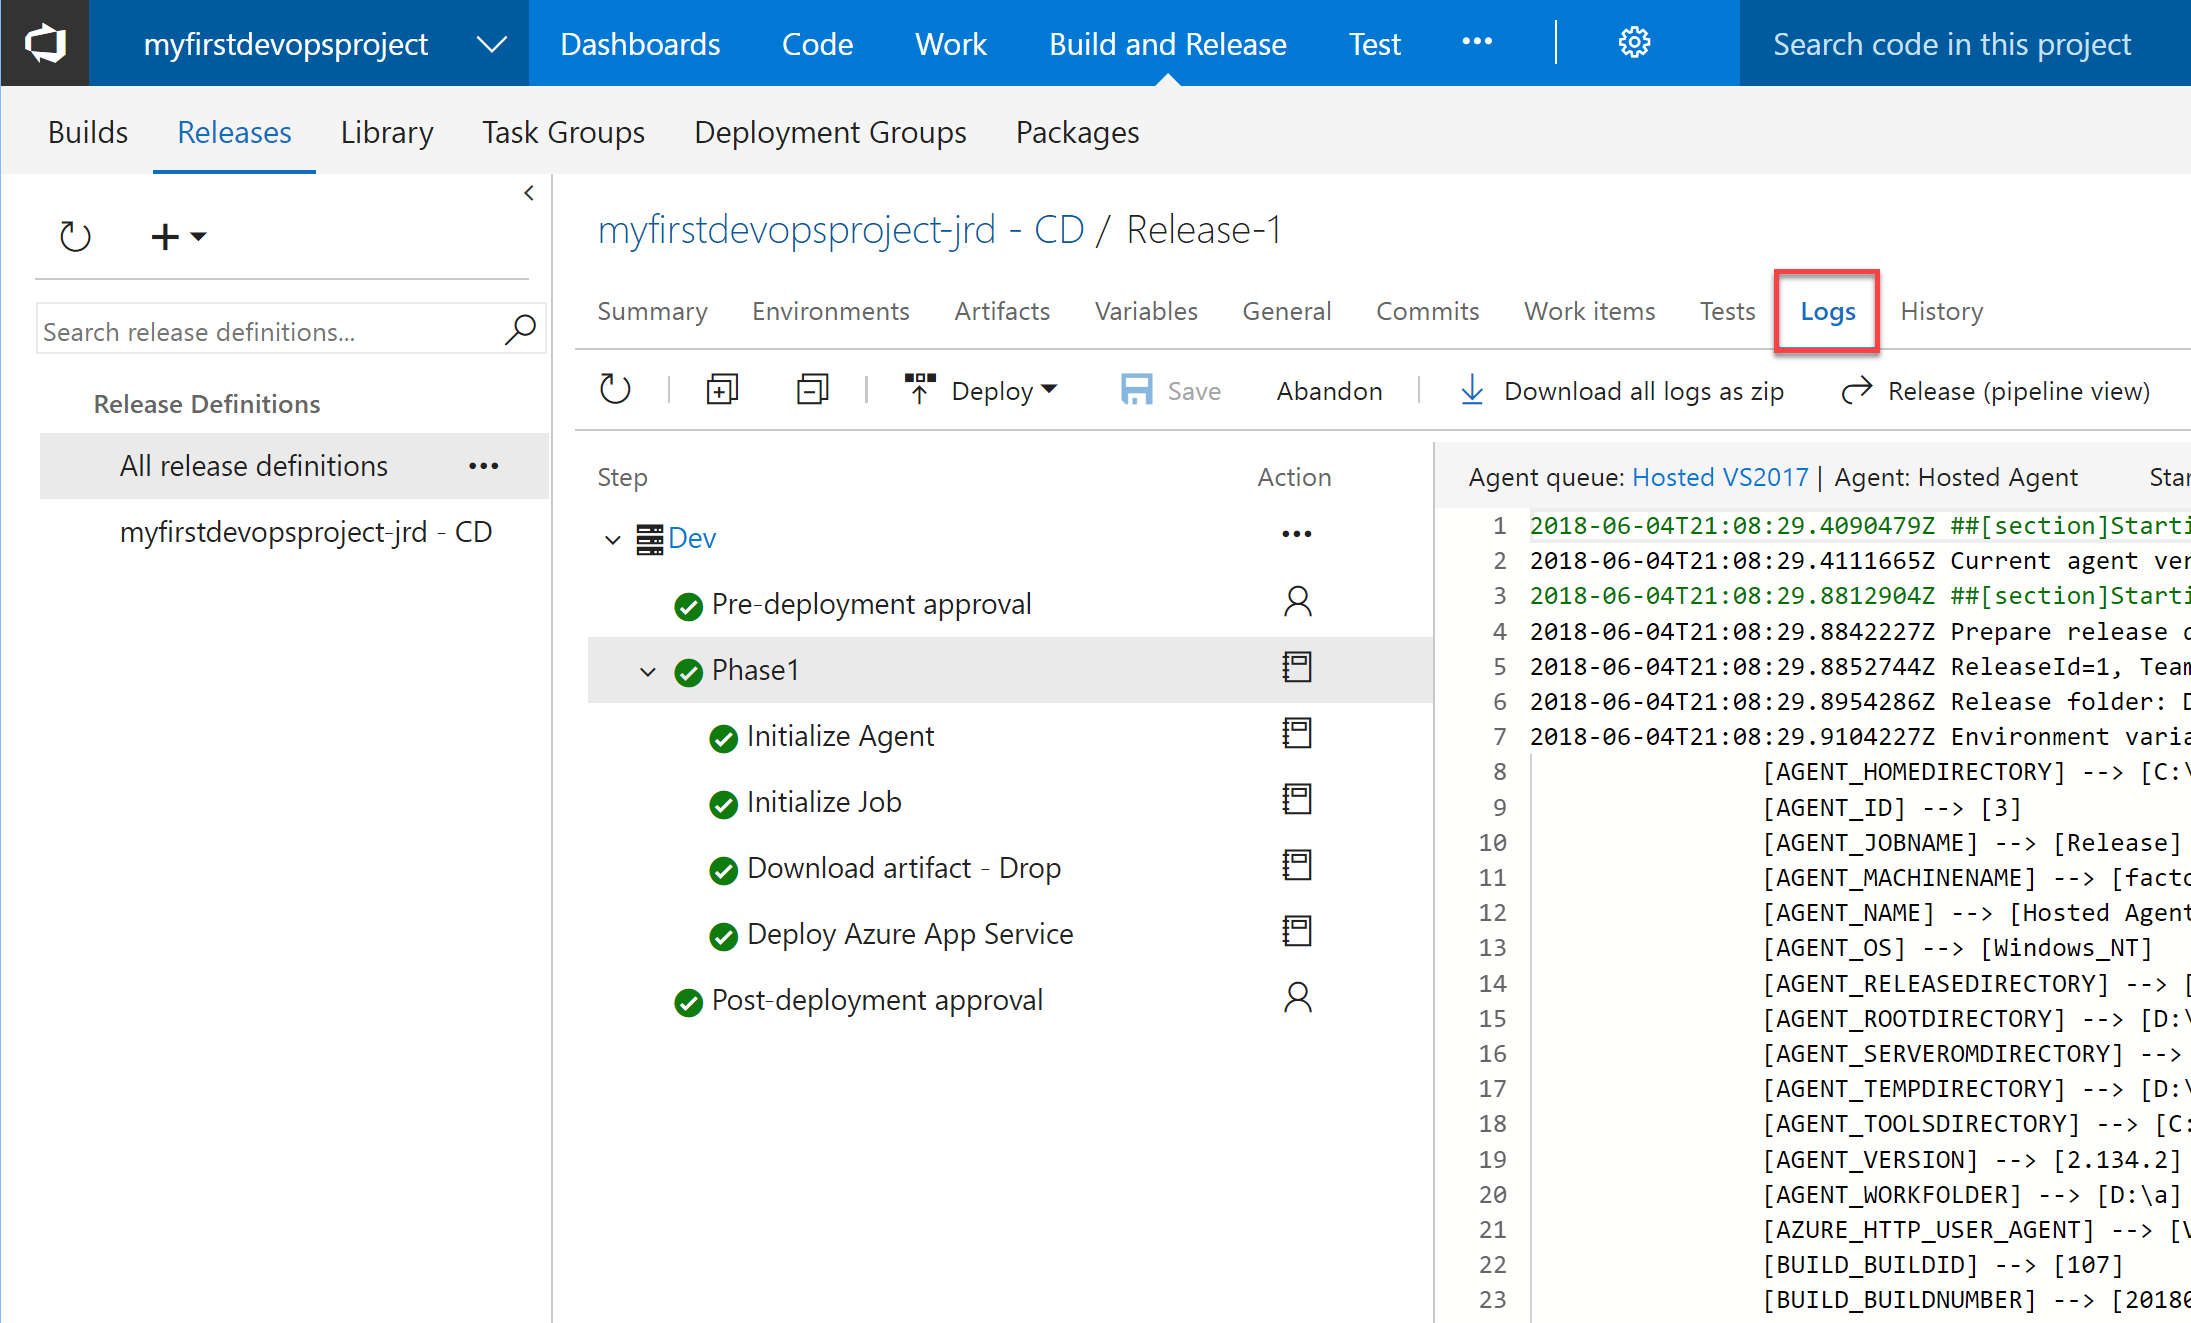
On the right-hand side of the browser, select View releases. This view shows a history of releases.
Click on the name of the release (or select the ellipsis next to one of your releases, and choose Open).

There are several menus to explore from this view such as a release summary, associated work items, and Tests.
Select Logs. The logs view shows each step that was executed as part of the release along with a visual indicator of whether the task completed succesfully. You can also see the log output from each task.
Review your App
In addition to configuring your CI/CD pipeline in VSTS, the DevOps Project has provisioned your Azure App Service resource to run your web app.
You can see the app service name on the right-hand side of the window. The current status of the service is shown, along with the name of the release currently deployed.
- To navigate to your the app service, click on the app service name.
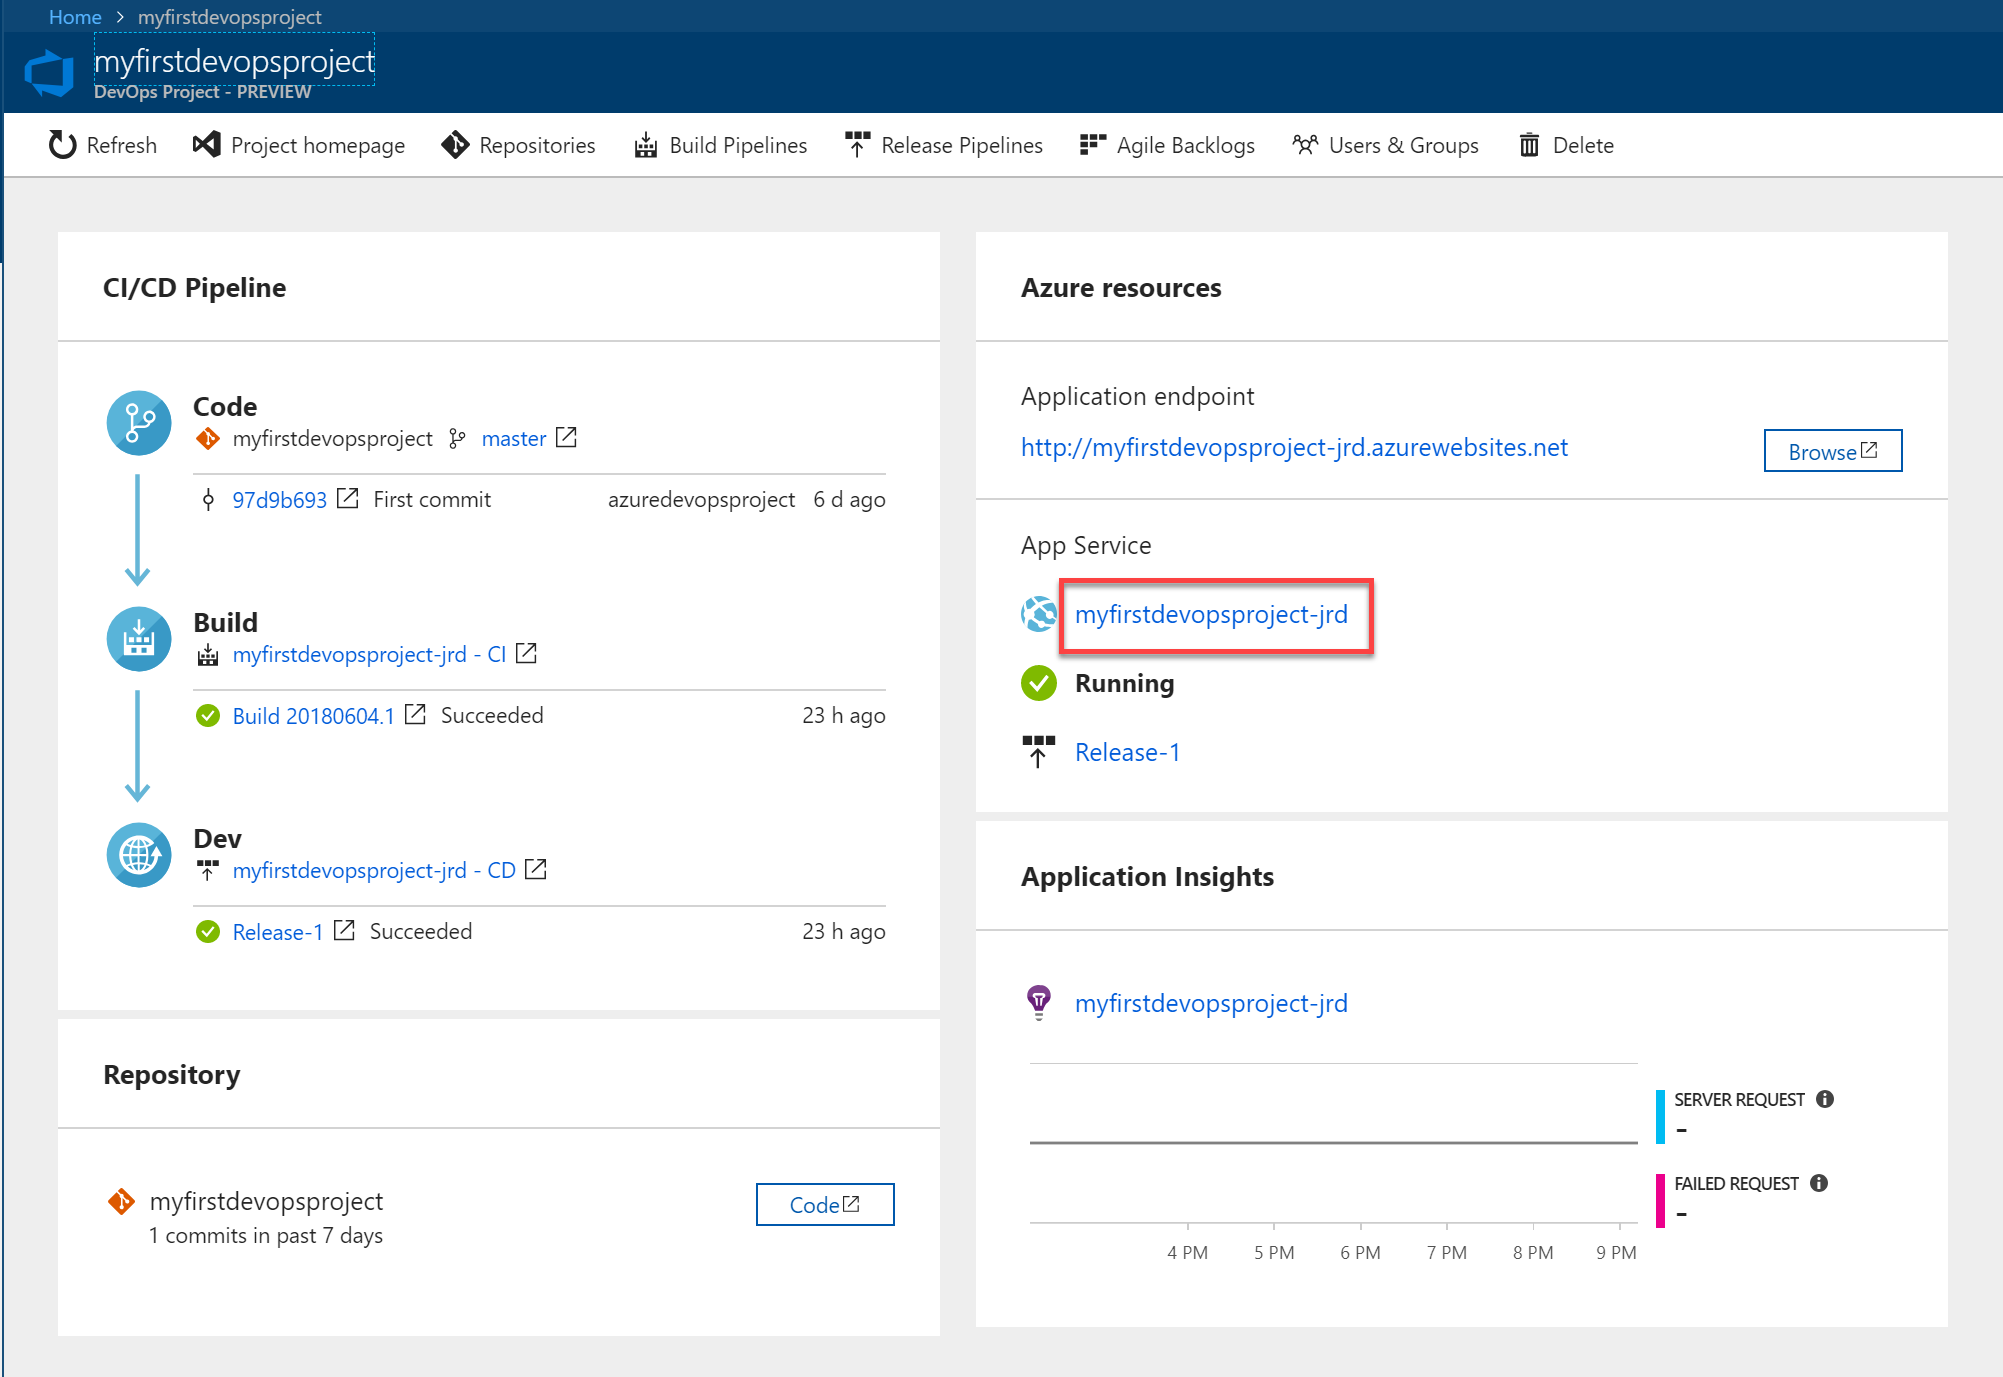
- To view your running application, click Browse.
Monitor your application
The Azure DevOps Project has also created an Application Insights instance for your project to enable you to monitor the application.
- Open your Application Insights instance by clicking on the link on your DevOps Project dashboard.
Cleanup your resources
To ensure you don’t get billed for resources you don’t need, if don’t want to use your new project after this lab, delete the project:
-
In the portal, go to DevOps Projects in the left-hand navigation menu.
-
On the top right side of the dashboard, select Delete. After reading the prompt, select Yes to permanently delete the resources. This will also delete your VSTS project.
Hopefully this lab has given you a brief insight into DevOps Projects and how they automate much of the setup required to configure your VSTS project and provision the resources you need in Azure to get your app up-and-running quickly.
To find out more about the technologies we touched in this lab click on the links below:
Leave a comment