
Introduction
In this lab we will look at simple Ansible playbook and also the wealth of playbooks available in Ansible Galaxy. We will then set up a compatible area, converting our simple playbook into a reusable role, and then calling it in a master playbook.
Ansible playbooks
The combination of playbooks and dynamic inventories is very powerful. The Ansible playbooks allow you to declaratively define the roles and customisation that you want to see on groups of servers, and the Ansible will ensure that the servers match the playbook definitions.
Playbooks can look deceptively simple but can become very accomplished. They support multi steps deployments, each with multiple steps, and working with multiple groups of machines. Playbooks are defined as YAML, and can be nested, modularised, and can includes variables, loops, conditionals, return values from other playbooks or tasks etc.
They are very powerful, declarative and if defined correctly then they should also be idempotent, i.e. they always give the same end result.
This lab is intended as an introduction to this whole area and some of the documentation and resources available.
Before we get going, get a grasp of the basics by reading the intro page.
Simple playbooks
We will create a simple playbook to install the Azure CLI. The install instructions should match the Install the Azure CLI page using apt, suitable for Debian based systems such as our Ubuntu VMs.
Think of
~/ansibleas your personal working area for test and development. Over the labs we will create and test playbooks and custom modules in the~/ansiblearea, add them to GitHub and then install them to/etc/ansibleas our production area. In real life your production system would usually be a separate config management server, or set of servers.
-
Create a file called az_cli.yml
Move you to the ansible working area, create an empty az_cli.yml file and then opens the current directory in Visual Studio Code, and starts editing the file.
 umask 077
 cd ~/ansible
 touch az_cli.yml
 code --goto az_cli.yml .
If you aren’t using vscode then feel free to use your own preferred editor.
-
Copy and paste the following playbook into the file
 ---
 # Simple playbook to install the Azure CLI
 # Based on <https://docs.microsoft.com/en-us/cli/azure/install-azure-cli-apt?view=azure-cli-latest>

 - hosts: localhost
   become: yes
   tasks:
     - name: Get packages needed for the install process
       apt:
         name: "{{ packages }}"
         state: present
         update_cache: yes
       vars:
         packages:
           - aptitude
           - curl
           - apt-transport-https
           - lsb-release
           - gnupg
     - name: Import the Microsoft signing key into apt
       apt_key:
         url: "https://packages.microsoft.com/keys/microsoft.asc"
         state: present
     - name: Add the Azure CLI software repository
       apt_repository:
         repo: "deb [arch=amd64] https://packages.microsoft.com/repos/azure-cli/ {{ansible_distribution_release}} main"
         filename: azure-cli
         state: present
     - name: Update the apt cache and install the Azure CLI
       apt:
         name: azure-cli
         update_cache: yes
 ...
OK, let’s take a few minutes to look at the format of the file. The YAML files always start with three hyphens and ends with three periods. Everything else sits inbetween. With YAML the indentation dictates the level of nesting. Dictionary or map elements are standard name:value pairs, and lists are denoted by hyphens.
The playook has a list of sections at the top level. We only have one section. Within that section we have
hosts: localhostas the first element, determining the scope of servers the playbook section will apply to. The become setting will run the tasks under root using sudo.The tasks are nested underneath, as a list, with a description, module and arguments, and any variables. There are far more configuration options for the sections and tasks, but we won’t go into that right now.
The playbook steps through the tasks in order so
- Install the pre-req packages
- Add the Microsoft signing key needed for the software repository
- Adding the software repo
- Update the cache and install the azure-cli package
We’ll check the playbook works as expected, but only against one of the VMs. We’ll change the localhost in the file to one of our VMs
-
Change the host from localhost to your first VM
Open the CLI and list out the hosts. (If you are in vscode then you can bring up the Terminal window using
CTRL+'.)ansible all --list-hostsExample output:
   hosts (3):
     vm1_cf1d
     vm2_1e76
     vm3_aa09
Change the hostname to your first host. For example:
<snip> - hosts: vm1_cf1d become: yes tasks: - name: Get packages needed for the install process <snip> -
Save the file and exit vscode
CTRL+Swill saveCTRL+Wwill close the current tabCTRL+Wwill close the window if no tabs are open
-
Check the YAML syntax using linting
You can check the syntax of your YAML files with the following command:
ansible-lint az_cli.ymlAny error codes thrown up by the command may be referenced against the linter’s default rules.
-
Check which hosts will be affected by a playbook run
The playbooks are invoked using
ansible-playbook. You can use the--list-hoststo confirm which hosts the playbook will apply to.Our example is very simple, but for more complex playbooks then this is a useful check.
ansible-playbook az_cli.yml --list-hostsExample output:
playbook: az_cli.yml play #1 (vm1_cf1d): vm1_cf1d TAGS: [] pattern: [u'vm1_cf1d'] hosts (1): vm1_cf1d -
Run the playbook
ansible-playbook az_cli.ymlExample output:
 PLAY [vm1_cf1d] *****************************************************************************************************

 TASK [Gathering Facts] **********************************************************************************************
 ok: [vm1_cf1d]

 TASK [Get packages needed for the install process] ******************************************************************
 changed: [vm1_cf1d]

 TASK [Import the Microsoft signing key into apt] ********************************************************************
 changed: [vm1_cf1d]

 TASK [Add the Azure CLI software repository] ************************************************************************
 changed: [vm1_cf1d]

 TASK [Update the apt cache and install the Azure CLI] ***************************************************************
 changed: [vm1_cf1d]

 PLAY RECAP **********************************************************************************************************
Playbooks are declarative, i.e they describe the required end result. Good playbooks are configured to be idempotent, i.e. they will always achieve the same end result. Feel free to rerun the playbook and you will see if will successfully complete, but will have ok under each task as the host is already compliant.
Reuse within Ansible
Your first VM should now have the Azure CLI working and we know that the playbook is functioning properly. You can do a lot with simple playbooks like this, but it is more scalable and manageable when you start reusing parts of code. There are a two key ways of doing this:
- imports
- includes
Imports and includes can bring import playbooks, files of tasks or roles. The difference between them is that imports are static whilst includes are dynamic. The documentation covers the differences well. The dynamic includes are better when nested within looping, but have some other restrictions.
We will focus on importing roles, which will allow us to modularise our configurations better, and also leverage the amazing community contributions available in Ansible Galaxy.
Ansible Galaxy
The best way to understand roles is to use them. Take a look at Ansible Galaxy and browse around. In Search you can filter based on platforms and tags etc. as well as searching based on keywords.
-
Search for Ubuntu roles
Search for the most popular roles, filtered to the Ubuntu platform. You will see that Jeff Geerling’s roles are pretty damn popular. He’s been busy.
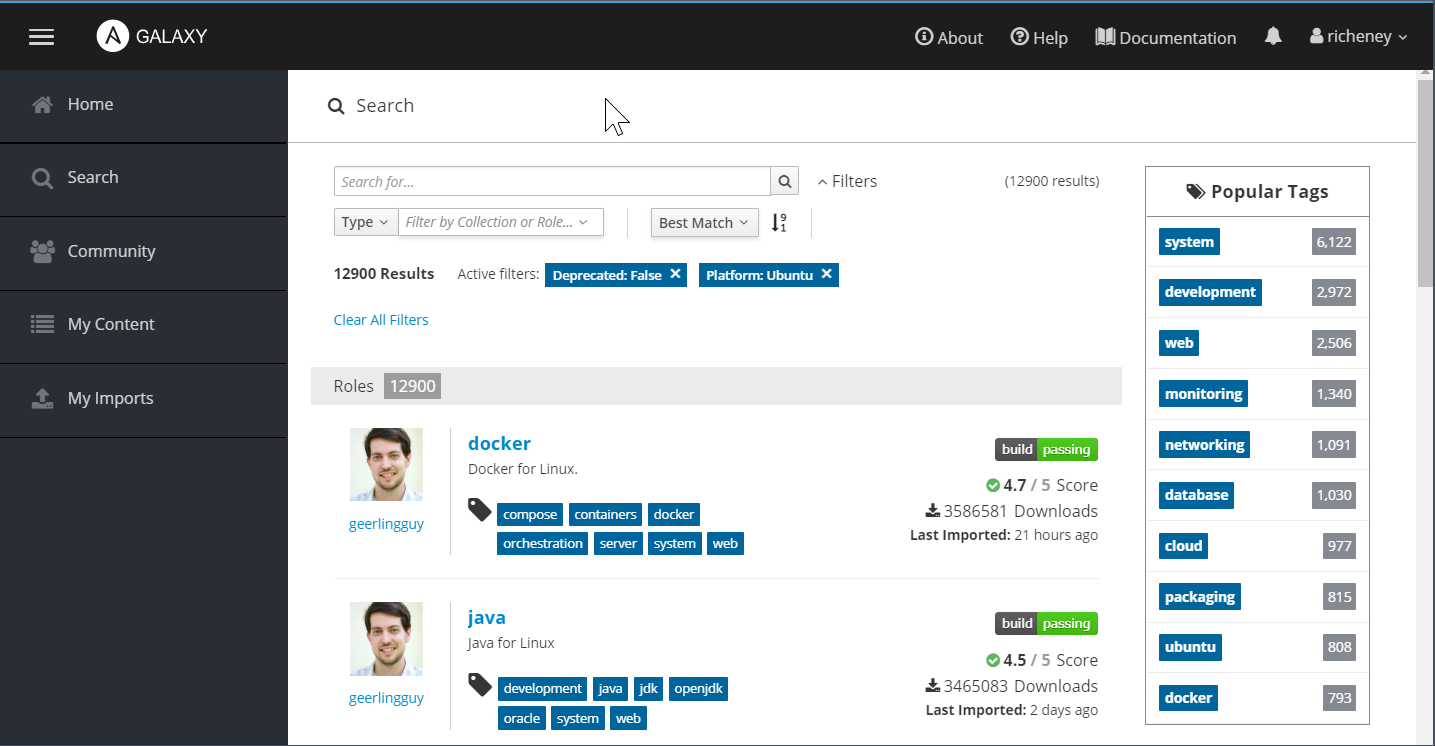
We will use his docker and pip roles. Click into the docker role to see the installation command. When you run Ansible commands then Ansible defaults to finding roles in
- a
./rolesdirectory, relative to the playbook file - the roles_path, which defaults to
/etc/ansible/roles
You can override the /etc/ansible/roles default by defining a
roles_pathin your config file. Note that you can have multiple directories in the roles_path, e.g.roles_path = ~/ansible/roles:/usr/share/ansible/roles:/etc/ansible/rolesWhen you install roles (without being explicit about the destination roles directory) then Ansible will install into the first directory for which you have write permissions.
In our working area config file we have kept it very simple and defined only one directory.
roles_path = ~/ansible/roles - a
-
Create the roles directory in your ansible working area:
 mkdir -m 755 ~/ansible/roles
 cd ~/ansible
Working in your ~/ansible area is great for these labs, but if you are working on a production system with multiple admins then you will need to consider shared areas and configuring your ansible.cfg files differently.
-
Manually install a Ansible Galaxy role
ansible-galaxy install geerlingguy.dockerThe install command is taken directly from the Ansible Galaxy docker page.
Example output:
 - downloading role 'docker', owned by geerlingguy
 - downloading role from https://github.com/geerlingguy/ansible-role-docker/archive/2.5.3.tar.gz
 - extracting geerlingguy.docker to /home/richeney/ansible/roles/geerlingguy.docker
 - geerlingguy.docker (2.5.3) was installed successfully
View the resulting role using
tree ~/ansible/roles. We’ll dig into the structure and contents a little more once we’ve used them. -
Remove the geerlingguy.docker role
Rather than manually installing roles, you can use a requirements.yml file to automatically download the roles. This is preferable, especially when you are using a repo of control files to quickly stand up your configuration management VMs with a centralised roles are such as /etc/ansible/roles.
FIrst, clear up the role you just manually downloaded.
rm -fR ~/ansible/roles/geerlingguy.docker -
Create a requirements.yml file
You can specify all your require roles in a requirements.yml file. Create one now, and add the following:
 ---
 - src: geerlingguy.pip
   name: pip
 - src: geerlingguy.docker
   name: docker
 ...
Note that we are renaming the roles once they’ve downloaded.
-
Download the set of roles using the requirement.yml file as input
ansible-galaxy install -r requirements.ymlExample output:
 - downloading role 'pip', owned by geerlingguy
 - downloading role from https://github.com/geerlingguy/ansible-role-pip/archive/1.3.0.tar.gz
 - extracting pip to /home/richeney/ansible/roles/pip
 - pip (1.3.0) was installed successfully
 - downloading role 'docker', owned by geerlingguy
 - downloading role from https://github.com/geerlingguy/ansible-role-docker/archive/2.5.3.tar.gz
 - extracting docker to /home/richeney/ansible/roles/docker
 - docker (2.5.3) was installed successfully
Again, view the roles structure using
tree ~/ansible/roles. -
Create a playbook called master.yml
We will create a master playbook. We will run it against the first VM again.
Create a file called master.yml and add in the following text.
Don’t forget to change the
hosts:value to the Ansible name for your first VM.For example:
 ---
 # Master playbook pulling in roles

 - hosts: vm1_cf1d
   become: yes
   roles:
     - pip
     - docker
   vars:
     pip_install_packages:
       - name: numpy
         state: latest
 ...
This should install both pip and docker for the host, and then use pip to install the NumPy Python package.
Reminder: you can list your hosts using
ansible all --list-hosts -
Run the master playbook
ansible-playbook master.ymlYou will see a large number of tasks being run as the two roles are installed, along with numpy.
There is a huge amount of value in all of the contributed roles held in Ansible Galaxy, and using them will make your Ansible files smaller and more powerful.
Azure Modules and Ansible Facts
We mentioned facts in an earlier lab. These are very useful for generating dynamic lists or filtering within roles and tasks. You’ll remember that leveraging the Azure dynamic lists automatically added some of the instance metadata into the Ansible facts.
You may find that you want to access Ansible facts that aren’t in the current list. This is where the set of Azure modules for Ansible can help. Look through the list and you will see that pretty much half of the modules are to drive the ARM layer to create Azure resources, and then there are matching modules suffixed with _facts that can extend the Ansible facts with resource attributes for that resource type.
Need to dig into Azure Key Vault secrets? Get information about log analytics workspaces? Find the public IP address for a managed MariaDB PaaS instance? Add a virtual machine to a load balancer’s backend pool? A DNS record linked to the NIC and PIP you’ve just created? We have concentrated on virtual machine images and management in this lab, but Ansible provides plenty of scope for integration into the wider set of Azure services.
Finally, if you want to add your own application specific Ansible facts to the /etc/ansible/facts.d folder of your server and Ansible will then extend the facts with that information into the ansible_local context. This information can be in JSON or INI format, or can be an executable returning JSON. See the local facts documentation for examples.
Take the Instance Metadata as an example. If you had a large number of servers in an availability set then you could group them by a combination of availability set and updatee domain. You could then loop through those groups if you were running something disruptive yourself. It would be simple to have a crontab command that updated a JSON file periodically and then create a dynamic group keyed on that data. (Or create a small binary in that directory and then whenever Ansible polls that host then the binary would return the current metadata.) This is outside of the scope of the current lab, but post a comment if you would like to see that in action.
Coming up
In the next lab we will expand on what we have learnt in this lab, create our own custom role and use it within our master.yml playbook file.
References
- https://docs.ansible.com/ansible/latest/user_guide/playbooks.html
- https://docs.ansible.com/ansible/latest/user_guide/playbooks_intro.html
- https://docs.ansible.com/ansible/latest/user_guide/playbooks_variables.html
- https://github.com/ansible/ansible-examples
- https://docs.ansible.com/ansible/latest/user_guide/playbooks_reuse_roles.html
- https://docs.ansible.com/ansible/latest/user_guide/playbooks_variables.html
- https://docs.ansible.com/ansible/latest/modules/list_of_cloud_modules.html#azure
Leave a comment