
Introduction
The number of in built policies and initiatives is vast, and keeps on growing. You will find most use case scenarios have been covered as Azure leverages policies to meet compliancy and regulatory requirements.
However, it is still common to come up against requirements from partners and customers that are not catered for. This is where custom policies come in. This lab will run through a real life requirement I had from a partner.
After the scenario has been described we will run through the basics of the policy structure and make sure you have a good set of links. We’ll then step through the process to create the custom policy.
Creating custom policies is a dark art and much of the text is to help you understand some of the nuances. Don’t just fly through the lab by copying the code blocks out!
Pre-reqs
You will need:
- Azure subscription
- Azure CLI
- jq
This lab uses Visual Studio Code, with the Azure Policy extension installed.
It is recommended to read through the documentation for:
Scenario
Before we start, let’s spend a little time understanding the scenario that the customer was trying to prevent.
The customer uses Just In Time access (JIT) to minimise the attack surface of their management VMs. When you use JIT, the service creates a rule on the NSG to deny traffic on ports 22 (SSH), 3389 (RDP) and 5985/5986 (WinRM). (This is the default list of ports and can be customised.)
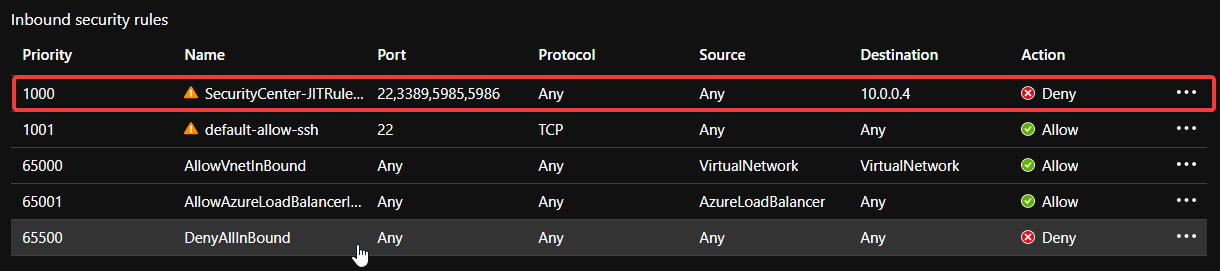
When you connect to a protected VM you have the option of using your internet IP address as the source, specifying one or more addresses or allowing any source IP.
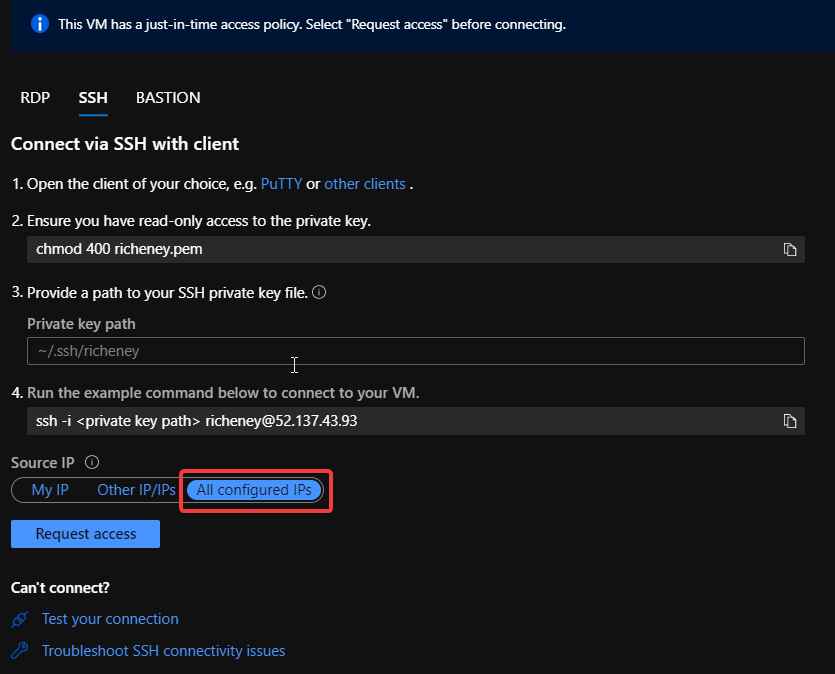
All configured IPs is the current default. If that default is used and accepted then a new rule goes in with a higher priority.

Note the Source: Any. This rule will be automatically removed after a period of time - usually three hours - but in the meantime there is a greater risk of a brute force attack against the public IP.
The customer has asked whether it is possible to use policy to deny any JIT created rules with the All configured IPs option.
Challenge accepted!
Discovering aliases
In this lab section you will use the vscode extension to create a policy to meet the customer requirement in the scenario above. The lab will highlight the functionality of the extension, as well as understanding how aliases work.
We’ll be initally working in Bash before moving to vscode, but feel free to use similar PowerShell commands or the portal as long as you get to the same point.
Create an NSG
Start by creating an NSG containing an offending rule.
Log into Azure and select the correct subscription before starting.
-
Create a resource group
az group create --name custom_policy_lab --location uksouth -
Create a network security group
az network nsg create --name offender --resource-group custom_policy_lab --location uksouth -
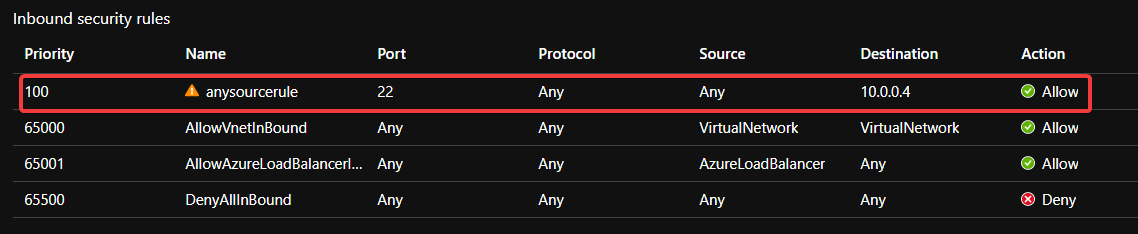
Add a rule similar to the any source JIT rule
 az network nsg rule create --name anysourcerule \
   --nsg-name offender \
   --resource-group custom_policy_lab \
   --direction Inbound \
   --priority 100 \
   --destination-address-prefix 10.0.0.4 \
   --destination-port 22
You will now have an NSG with an offending rule that matches those created by JIT.
Find aliases with the Policy extension
Before creating a custom policy it is important to understand which aliases to use. These will be used as fields in the policyRule. We then need to determine the logic we want to create.
The Azure Policy extension in vscode helps to view resources and policies and to discover the right aliases to use in your policy rules, but also be aware that it is a preview extension and does not always include the full set of available aliases.
-
Create a working folder for the lab
mkdir ~/custom_policy_lab -
Open the folder in vscode
code ~/custom_policy_lab - Open the extension side bar (‘CTRL’+’SHIFT’+’E’)
- Click on Azure Policy
- Install the extension if you haven’t done so already
- Log in to Azure if the toast notification prompts you
- It takes a couple of minutes to discover your resources and policy information
- Browse the policy section to view the policies, initiatives and assignments
-
Browse the Resource Groups and click on your NSG
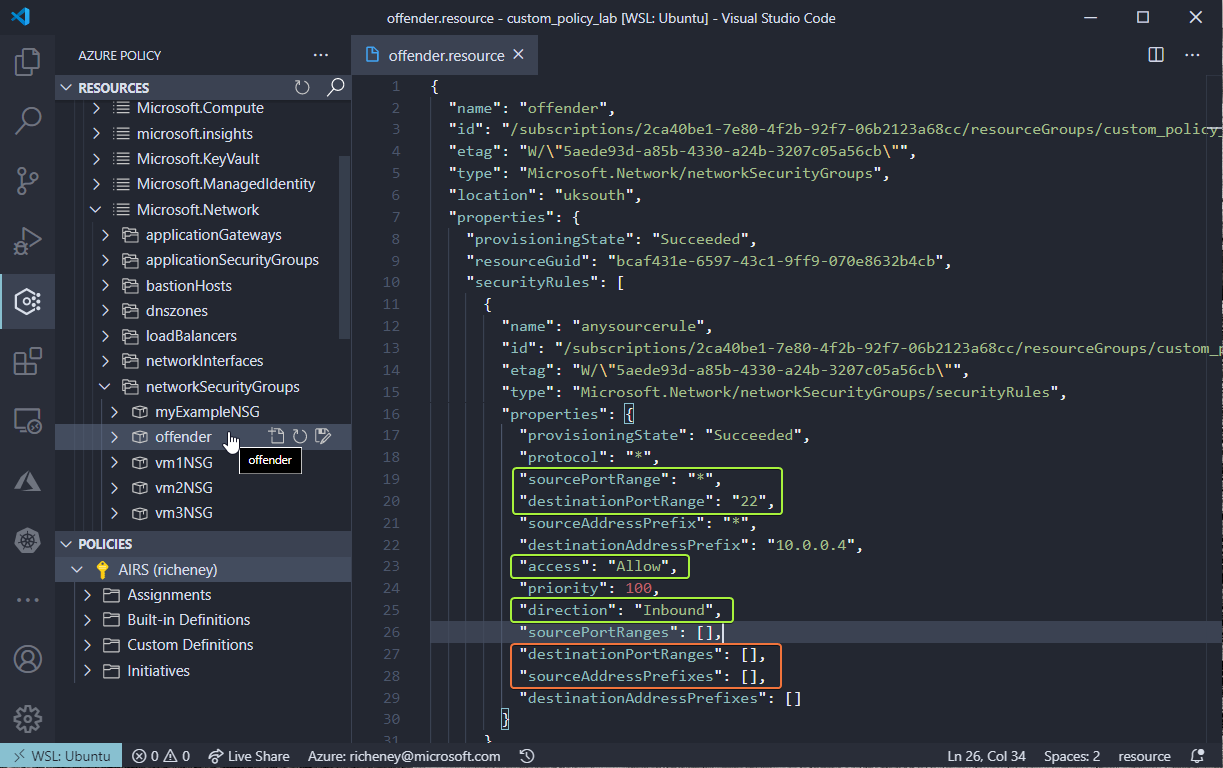
The resource type is Microsoft.Network/networkSecurityGroups.
The destinationPortRange and sourceAddressPrefix are the two properties that were populated. We should also check the rule to ensure that the direction is Inbound and access is Allow.
NSG rules also allow you to specify either source address prefixes and destination port ranges as arrays, so should we also check the destinationPortRanges and sourceAddressPrefixes as well to make sure nothing slips through the net?
-
Browse the Resource Providers and drill into Microsoft.Network and then networkSecurityGroups
- If you click on the offender NSG then you’ll see the same resource info as before
-
Hover over the destinationPortRange and copy the alias
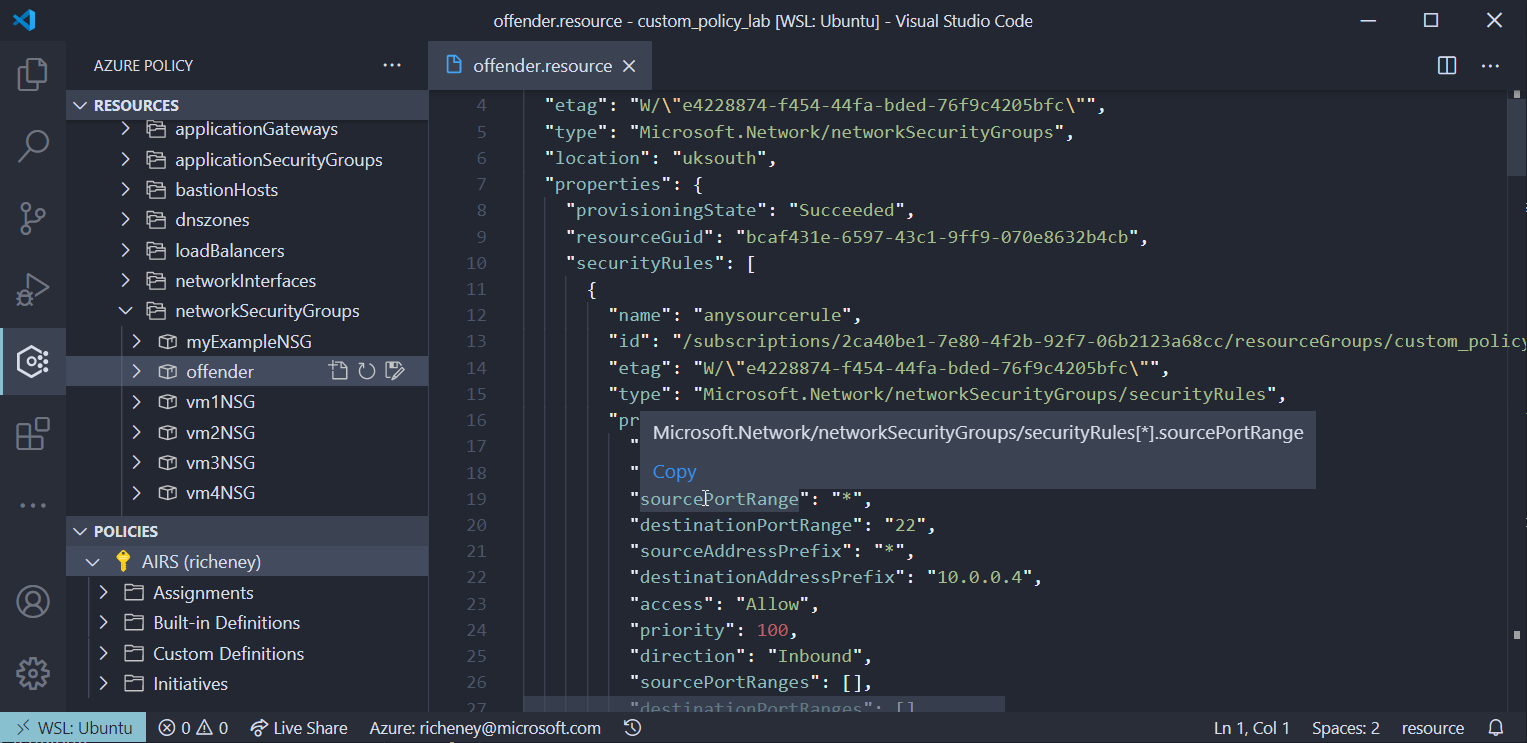
- Create a new file called aliases
- Paste in the alias
- Repeat the process for sourceAddressPrefix
Your list of aliases from the resource level should be:
Microsoft.Network/networkSecurityGroups/securityRules[*].destinationPortRange Microsoft.Network/networkSecurityGroups/securityRules[*].sourceAddressPrefix -
Hover over the destinationPortRanges and sourceAddressPrefixes arrays
Note that the vscode extension does not display aliases for these.
As already mentioned, the extension is in preview and has not yet been updated to include all aliases.
We will use the CLI soon to pull out all of the available aliases and to understand how they differ.
-
Explore the sub-resource
- Open the tree for the Resource Providers and you will see securityRules as a sub resource type
- Click on anysourcerule
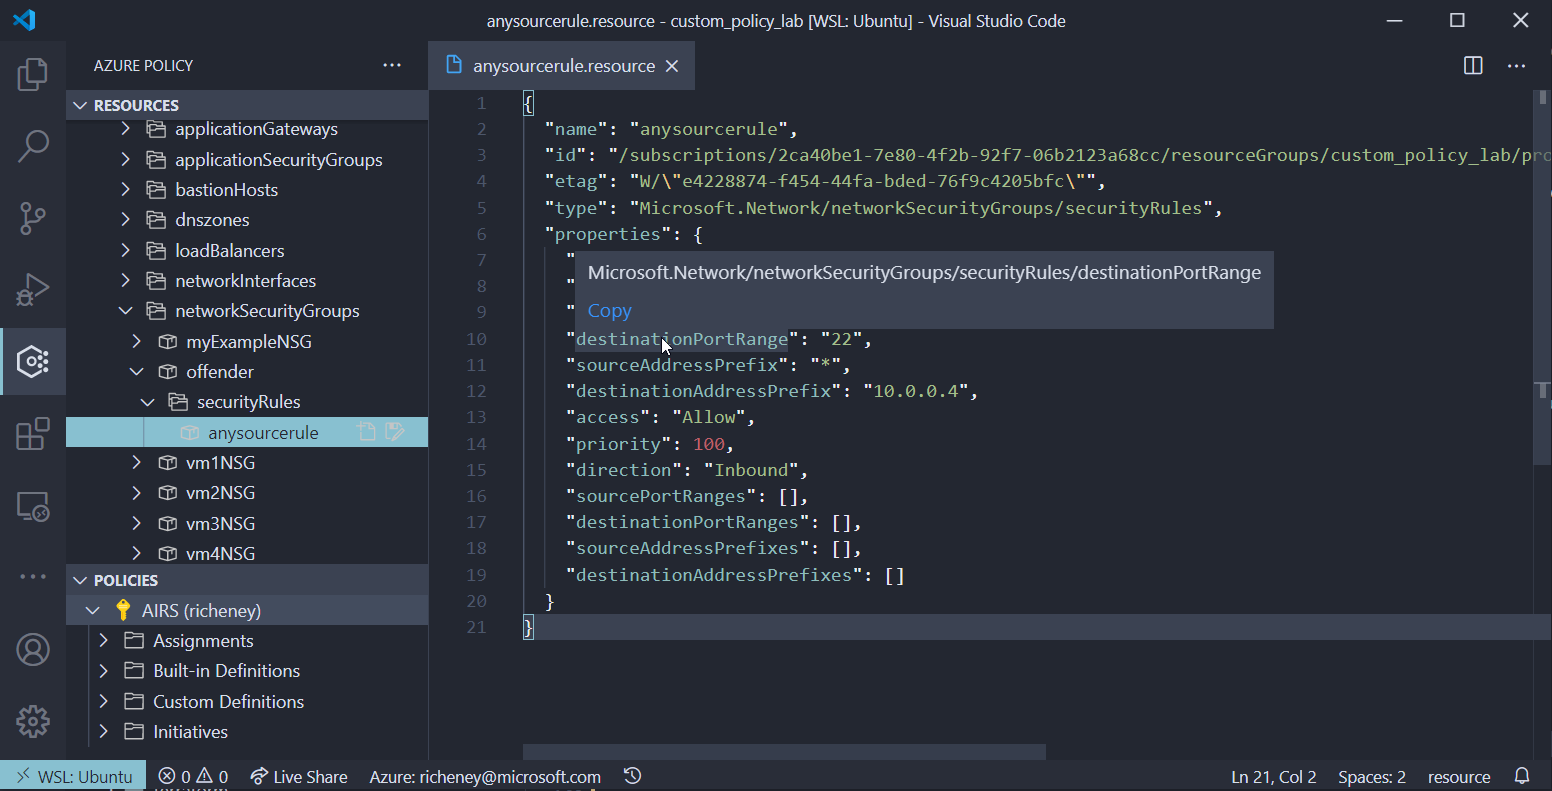
OK, now we have more aliases that we could use if we are working at the sub resource level.
 Microsoft.Network/networkSecurityGroups/securityRules.destinationPortRange
 Microsoft.Network/networkSecurityGroups/securityRules.sourceAddressPrefix
Many of the more complex resources have sub-resources and the resource provider tree is a great way of finding those.
Find aliases with the Azure CLI
We’ll use the Azure CLI to get a definitive list of the aliases as the vscode extension isn’t showing everything. Some of these commands won’t be pretty as they are using some complex JMESPATH queries to dig out the information.
Alternatively you can use the Resource Graph, PowerShell or REST API to query for aliases.
-
List the resourceTypes
We already know that we can look at the resource or sub-resource level. Let’s show those:
az provider show --namespace Microsoft.Network --expand "resourceTypes/aliases" --query "resourceTypes[?starts_with(resourceType, 'networkSecurityGroups')].resourceType" --output yamlExpected output:
- networkSecurityGroups - networkSecurityGroups/securityRules -
You can use the Azure CLI to check for all available aliases.
OK, let’s list out the possible sourceAddress aliases to test where the source address could be set to Any.
az provider show --namespace Microsoft.Network --expand "resourceTypes/aliases" --query "resourceTypes[?starts_with(resourceType, 'networkSecurityGroups')].{type: resourceType, alias:aliases[?contains(name, 'sourceAddress')].name}" --output yamlcExample output:
 - alias:
   - Microsoft.Network/networkSecurityGroups/securityRules[*].sourceAddressPrefix
   - Microsoft.Network/networkSecurityGroups/securityRules[*].sourceAddressPrefixes[*]
   - Microsoft.Network/networkSecurityGroups/securityRules[*].sourceAddressPrefixes
   type: networkSecurityGroups
 - alias:
   - Microsoft.Network/networkSecurityGroups/securityRules/sourceAddressPrefix
   - Microsoft.Network/networkSecurityGroups/securityRules/sourceAddressPrefixes[*]
   - Microsoft.Network/networkSecurityGroups/securityRules/sourceAddressPrefixes
   type: networkSecurityGroups/securityRules
(I’ve removed the defaultSecurityRules as we’re ignoring those.)
The set of aliases for destinationPortRange matches the list format above.
Determine the required logic
OK, lots of options which could result in a very complex policy if were had to deal with all the possible permutations. Having some knowledge of how the Azure Resource Manager works can help reduce that complexity. Let’s work through it.
Which resourceTypes?
We have to test the networkSecurityGroup/securityRules resourceType. The JIT process will create a single security rule against the existing NSG.
But we should also test the aliases at both the networkSecurityGroup resourceType. Our policy should also prevent the creation or update of an NSG with these securityRules within them.
Your rules should always include a "field": "type" rule so the system knows which resourceTypes to filter for testing.
{
  "field": "type",
  "equals": "Microsoft.Network/networkSecurityGroups/securityRules"
}
We’ll work through the additional test conditions for the Microsoft.Network/networkSecurityGroups/securityRules resourceType before moving on to Microsoft.Network/networkSecurityGroups.
Source Address set to Any?
The sourceAddressPrefix property will have a string value. String values are supported by a wide range of conditions.
We will use "equals": "*" to test:
{
  "field": "Microsoft.Network/networkSecurityGroups/securityRules/sourceAddressPrefix",
  "equals": "*"
}
Do we also need to test the sourceAddressPrefixes or sourceAddressPrefixes[*] aliases? The answer is no.
The Azure Resource Manager layer prevents ‘*’ being combined with other values in a sourceAddressPrefixes range. If you specify sourceAddressPrefixes with ‘*’ by itself (a single element array) then sourceAddressPrefix will be set to ‘*’ and sourceAddressPrefixes will be set to an empty array.
Sometimes you have to test a few variants to understand the behaviour.
Destination Port Ranges?
We need to test that the destination port ranges does not equal any of our Just In Time ports. The most likely are 22 and 3389, although the WinRM ports could also be requested.
The JIT request API call only allows a single destination port range value to be entered so we can forget the destinationPortRanges and destinationPortRanges[*] aliases and just test the destinationPortRange.
{
  "field": "Microsoft.Network/networkSecurityGroups/securityRules/destinationPortRange",
  "in": [
    "22",
    "3389",
    "5985",
    "5986"
  ]
}
Logical operators
There are three logical operators that you can use when nesting JSON for more complex conditions
- not
- allOf
- anyOf
You can nest allOf within not to create noneOf.
At the networkSecurityGroups/securityRules resourceType level we need all three conditions to be true, plus the direction:Inbound and access:Allow properties, so the JSON would look like this:
{
  "allOf": [
    {
      "field": "type",
      "equals": "Microsoft.Network/networkSecurityGroups/securityRules"
    },
    {
      "field": "Microsoft.Network/networkSecurityGroups/securityRules/direction",
      "equals": "Inbound"
    },
    {
      "field": "Microsoft.Network/networkSecurityGroups/securityRules/access",
      "equals": "Allow"
    },
    {
      "field": "Microsoft.Network/networkSecurityGroups/securityRules/sourceAddressPrefix",
      "equals": "*"
    },
    {
      "field": "Microsoft.Network/networkSecurityGroups/securityRules/destinationPortRange",
      "in": [
        "22",
        "3389",
        "5985",
        "5986"
      ]
    }
  ]
}
We will use a parameter for that array of ports to make the policy more flexible.
OK, that is the networkSecurityGroups/securityRules resourceType done.
Splat aliases
Now for the networkSecurityGroups resourceType. Here are the matching aliases:
- Microsoft.Network/networkSecurityGroups/securityRules[*].sourceAddressPrefix
- Microsoft.Network/networkSecurityGroups/securityRules[*].destinationPortRange
There is good documentation to help you understand the [*] alias. I’ll call them splat aliases as they are similar to the splat expressions in Terraform.
With splat aliases there is an implicit loop so that you can use the string evaluators on each iteration. It is worth understanding the effect of the implicit AND between those iterations on the evaluations. Here are a few common variants:
-
All
{ "field": "Microsoft.Network/networkSecurityGroups/securityRules[*].sourceAddressPrefix", "equals": "*" } -
None
{ "not": { "field": "Microsoft.Network/networkSecurityGroups/securityRules[*].sourceAddressPrefix", "equals": "*" } } -
Any
  {
    "not": {
      "field": "Microsoft.Network/networkSecurityGroups/securityRules[*].sourceAddressPrefix",
      "notEquals": "*"
    }
  }
If you see not and notEquals combined then it will be on a splat alias.
Count
We will need to do a compound test of all of the conditions whilst cycling through the splat aliases, and we want a true result if any of the security rules in an NSG tick all of the boxes. This is where count comes in. Count can be used to see how many of the iterations meet the condition criteria, so you can check for none or all or any, or for an exact number.
Therefore, here is the JSON for the ‘networkSecurityGroups’ level.
{
  "allOf": [
    {
      "field": "type",
      "equals": "Microsoft.Network/networkSecurityGroups"
    },
    {
      "count": {
        "field": "Microsoft.Network/networkSecurityGroups/securityRules[*]",
        "where": {
          "allOf": [
            {
              "field": "Microsoft.Network/networkSecurityGroups/securityRules[*].direction",
              "equals": "Inbound"
            },
            {
              "field": "Microsoft.Network/networkSecurityGroups/securityRules[*].access",
              "equals": "Allow"
            },
            {
              "field": "Microsoft.Network/networkSecurityGroups/securityRules[*].sourceAddressPrefix",
              "equals": "*"
            },
            {
              "field": "Microsoft.Network/networkSecurityGroups/securityRules[*].destinationPortRange",
              "in": "[parameters('ports')]"
            }
          ]
        }
      },
      "greater": 0
    }
  ]
}
Create a custom policy
OK, you now have all of the building blocks and info to create the policy, plus a selection of links. The lab will start you off with a template and then you can work through the sections to start fleshing it out. It will be more painful than just copying and pasting code blocks, but no-one learns much that way.
If you do get stuck then scroll to the example azurepolicy.json.
Policy template
- Press
CTRL+SHIFT+Eto open the Explorer - Create a new file called azurepolicy.json
-
Copy in the template below:
 {
     "properties": {
         "displayName": "<displayName>",
         "description": "<description>",
         "mode": "<mode>",
         "metadata": {
             "version": "0.1.0",
             "category": "categoryName",
             "preview": true
         },
         "parameters": {
                 <parameters>
         },
         "policyRule": {
             "if": {
                 <rule>
             },
             "then": {
                 "effect": "<effect>"
             }
         }
     }
 }
Core properties
Customise the core properties
- Update displayName to “Deny JIT requests with source Any”
- Update description to “Deny Just In Time (JIT) requests with Any as the source address prefix.”
- Set mode to “All”
Indexed mode should only be used when dealing with resources that have tags and locations.
Metadata
The metadata block is optional but can be very useful. The version, category and preview keys are known ad common properties and control where and how the policy is displayed in the portal.
-
Set the category to “Just In Time”
You can specify a pre-existing category that is already used by the inbuilt policies, or create a new category.
You can also create your own key value pairs within the metadata block to add information that is useful to you. For instance, you could add a creator name, link back to a source repo or refer back to a change request record.
Parameters
Using parameters makes your policies more flexible and can reduce the number of custom policies you have to create. Make use of the strongTypes where possible.
- Add a parameter called ports
- Add a suitable displayname and description
- Default the parameter to the standard set of Just In Time ports
Policy Rule
Modify the policyRule section to deny JIT security rules that have the source address prefix set to Any.
- Ensure the if handles either the networkSecurityGroups or securityRules resourceTypes
- Use the ports parameter
- If the condition is evaluated as true then the effect should be Deny
Create the additional files
The convention is to create a set of three files as different commands use either the full azuredeploy.json, or the azurepolicy.parameter.json and azurepolicy.rules.json.
- Create the additional files using jq
jq .properties.parameters < azurepolicy.json > azurepolicy.parameters.json
jq .properties.policyRule < azurepolicy.json > azurepolicy.rules.json
Assigning the policy
We’ll define and assign the custom policy at the subscription scope to test it out.
-
Determine your subscription scope
subscriptionId=$(az account show --query id --output tsv) -
Create the custom policy definition
az policy definition create --name jitDenySourceAny \ --display-name "Deny JIT requests with source Any" \ --description "Deny Just In Time (JIT) requests with Any as the source address prefix." \ --metadata version="0.1.0" category="Just In Time" preview=true \ --mode All \ --params "@azurepolicy.parameters.json" \ --rules "@azurepolicy.rules.json" \ --subscription $subscriptionId -
Assign the custom policy
 az policy assignment create --name jitDenySourceAny \
   --display-name "Deny Just In Time requests with All Configured Ports" \
   --policy jitDenySourceAny \
   --scope "/subscriptions/$subscriptionId"
I normally recommend bundling custom policies together into a policy initiative and assigning the initiative instead. That approach is better from a lifecycle management perspective.
If you go back into the portal you can see the definition (in the new category) and the assignment.
Test the policy
-
Remove the original rule
az network nsg rule delete --name anysourcerule --nsg-name offender --resource-group custom_policy_lab -
Add it back in
 az network nsg rule create --name anysourcerule \
   --nsg-name offender \
   --resource-group custom_policy_lab \
   --direction Inbound \
   --priority 100 \
   --destination-address-prefix 10.0.0.4 \
   --destination-port 22
Example output:
Resource ‘anysourcerule’ was disallowed by policy. Policy identifiers: ‘[{“policyAssignment”:{“name”:”Deny Just In Time requests with All Configured Ports”,”id”:”/subscriptions/2ca40be1-7e80-4f2b-92f7-06b2123a68cc/providers/Microsoft.Authorization/policyAssignments/jitDenySourceAny”},”policyDefinition”:{“name”:”Deny JIT requests with source Any”,”id”:”/subscriptions/2ca40be1-7e80-4f2b-92f7-06b2123a68cc/providers/Microsoft.Authorization/policyDefinitions/jitDenySourceAny”}}]’.
References
- Azure Policy documentation
- Azure Policy definition structure
- Azure Policy extension
- Azure Policy extension documentation
Example azurepolicy.json
For reference, here is the full azurepolicy.json for this lab
{
  "properties": {
    "displayName": "Deny JIT requests with source Any",
    "description": "Deny Just In Time (JIT) requests with Any as the source address prefix.",
    "mode": "All",
    "metadata": {
      "version": "0.1.0",
      "category": "Just In Time",
      "preview": true
    },
    "parameters": {
      "ports": {
        "type": "array",
        "metadata": {
          "description": "The list of destination ports to check. Defaults to the standard Just In Time set.",
          "displayName": "Array of ports to check for."
        },
        "defaultValue": [
          "22",
          "3389",
          "5985",
          "5986"
        ]
      }
    },
    "policyRule": {
      "if": {
        "anyOf": [
          {
            "allOf": [
              {
                "field": "type",
                "equals": "Microsoft.Network/networkSecurityGroups/securityRules"
              },
              {
                "field": "Microsoft.Network/networkSecurityGroups/securityRules/direction",
                "equals": "Inbound"
              },
              {
                "field": "Microsoft.Network/networkSecurityGroups/securityRules/access",
                "equals": "Allow"
              },
              {
                "field": "Microsoft.Network/networkSecurityGroups/securityRules/sourceAddressPrefix",
                "equals": "*"
              },
              {
                "field": "Microsoft.Network/networkSecurityGroups/securityRules/destinationPortRange",
                "in": "[parameters('ports')]"
              }
            ]
          },
          {
            "allOf": [
              {
                "field": "type",
                "equals": "Microsoft.Network/networkSecurityGroups"
              },
              {
                "count": {
                  "field": "Microsoft.Network/networkSecurityGroups/securityRules[*]",
                  "where": {
                    "allOf": [
                      {
                        "field": "Microsoft.Network/networkSecurityGroups/securityRules[*].direction",
                        "equals": "Inbound"
                      },
                      {
                        "field": "Microsoft.Network/networkSecurityGroups/securityRules[*].access",
                        "equals": "Allow"
                      },
                      {
                        "field": "Microsoft.Network/networkSecurityGroups/securityRules[*].sourceAddressPrefix",
                        "equals": "*"
                      },
                      {
                        "field": "Microsoft.Network/networkSecurityGroups/securityRules[*].destinationPortRange",
                        "in": "[parameters('ports')]"
                      }
                    ]
                  }
                },
                "greater": 0
              }
            ]
          }
        ]
      },
      "then": {
        "effect": "deny"
      }
    }
  }
}
Finishing up
Creating custom policies is thankfully rarer as the number of built in policies grows each days. And there is a growing amount of community content out there too. But if you need to create your own policies then understanding aliases and the policy structure is vital. If you think your new custom policy could be useful to others then why not contribute back?
Next we’ll use the deployIfNotExists effect to help automate compliance, using managed identities to remediate our resources.
Leave a comment