
Introduction
Logic Apps are quick plug and play “if .. then …” constructs to help developers and power users to quickly integrate systems. They complement some of the other PaaS type offerings such as serverless Functions, Event Grid and other event based services.
In this logic app lab we will create an HTTP endpoint that will be used to receive user feedback. Think of those smartphone applications that prompt you for a feedback rating out of five stars, and ask for feedback comments. This is the kind of system we are emulating. Our feedback REST API could for a simple little microservice, to be used by any number of our other fictional systems, for instance websites, mobile apps or custom applications.
We will build up the capabilities of our Logic App in three steps:
- Create the basic REST API using a JSON schema, and test that it responds
- Add on a conditional branch that emails us if the feedback rating is poor
- Insert a logging mechanism to retain all of the feedback as documents in Cosmos DB using the SQL API
We will trigger the tests by POSTing some sample JSON feedback into our REST API. The REST standard supports create, read, update and post (CRUD) actions, but we will only need to use the POST action to trigger our tests.
Deploy Cosmos DB
We won’t be using the Cosmos DB until the end of the lab, but we’ll kick off the deployment straight away as it will take a little while to be created. You can choose to either create the Cosmos DB via the portal, or deploy it via the CLI as infrastructure as code:
Portal
- Click Add in the Azure101PaaS resource group
- Add Azure Cosmos DB
- ID: <yourname>cosmosdb
- API: SQL (this is essentially DocumentDB, or NoSQL)
- Resource Group: Azure101PaaS
- Location: West Europe
CLI 2.0
You can use the CLI to deploy an ARM template to build the Cosmos DB. Copy out and run the commands in the code block below, but don’t forget to change the name=<yourname>cosmosdb parameter before submitting.
template='http://azurecitadel.github.io/fundamentals/azure101/logicapps/azuredeploy.json'
az group deployment create --parameters name=<yourname>cosmosdb --resource-group Azure101PaaS --template-uri $template --name job1  --no-wait
Feel free to click on that link in the code block above and view the ARM template if you want to. You can examine the structure, parameters and resource properties.
Once you have submitted the Cosmos DB deployment then we can forget about it for a while and let it cook in the background. Let’s go back into the Azure portal (in a new tab if need be) and continue with the next section to start defining the Logic App.
Create the Logic App
OK, let’s create an empty Logic App in the Azure101PaaS resource group. The video below shows the creation, and you’ll also find step by step instructions underneath.
- Click on New or Add
- Find Logic App and click on Create
- Name: feedbackLogicApp
- Resource Group: Azure101PaaS
- Location: West Europe
- Click into the new Logic App once deployed
- Select Blank Logic App in the Logic Apps Designer screen
Define the REST API endpoint
This section describes what we are doing before we then get on with actually doing it. If you understand REST API endpoints and schemas then you can skip straight through to creating the request.
We’ll create a REST API point, using the sample payload in the code block below. The endpoint is defined as two steps:
- the HTTP request, i.e. what we are sending in, and the expected format or schema for it, followed by
- the HTTP response sent back to confirm success
Here is a sample JSON payload:
{
    "id": 1504522921969,
    "name": "Joe Bloggs",
    "email": "joe.bloggs@outlook.com",
    "feedback": "Your website crashes when I add items to my Wish List.  Shocking.",
    "rating": 2,
    "source": "webapp"
}
This is the format that the various applications will use for feedback into our system.
- The ID would be auto-generated by the fictitious app based on something like the number of UTC milliseconds
- The rating is an integer score of 1 to 5 inclusive, i.e. based on the number of stars the fictitious user has rated it on
Request
- Search for http request and select the trigger
- Copy the sample payload below
{
    "id": 1504522921969,
    "name": "Joe Bloggs",
    "email": "joe.bloggs@outlook.com",
    "feedback": "Your website crashes when I add items to my Wish List.  Shocking.",
    "rating": 2,
    "source": "webapp"
}
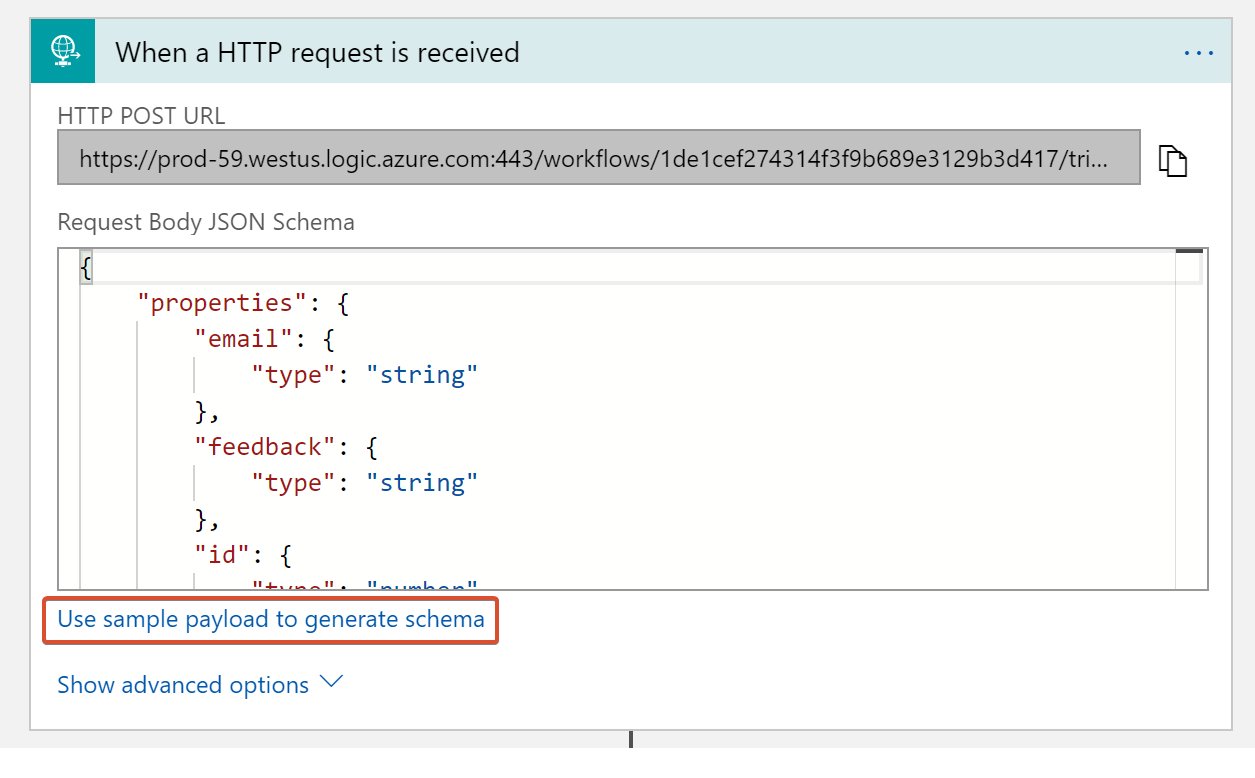
- Click on the ‘Use sample payload to generate schema’ link in the bottom half of the dialog box
- Paste the sample payload in there (
CTRL+V) - Clicking done will generate the JSON schema for the endpoint, which describes the expected format for the JSON
Note that the JSON describes the keys in order to give them titles such as email and id. We will then be able to use those as dynamic content later in the lab, much like a variable.
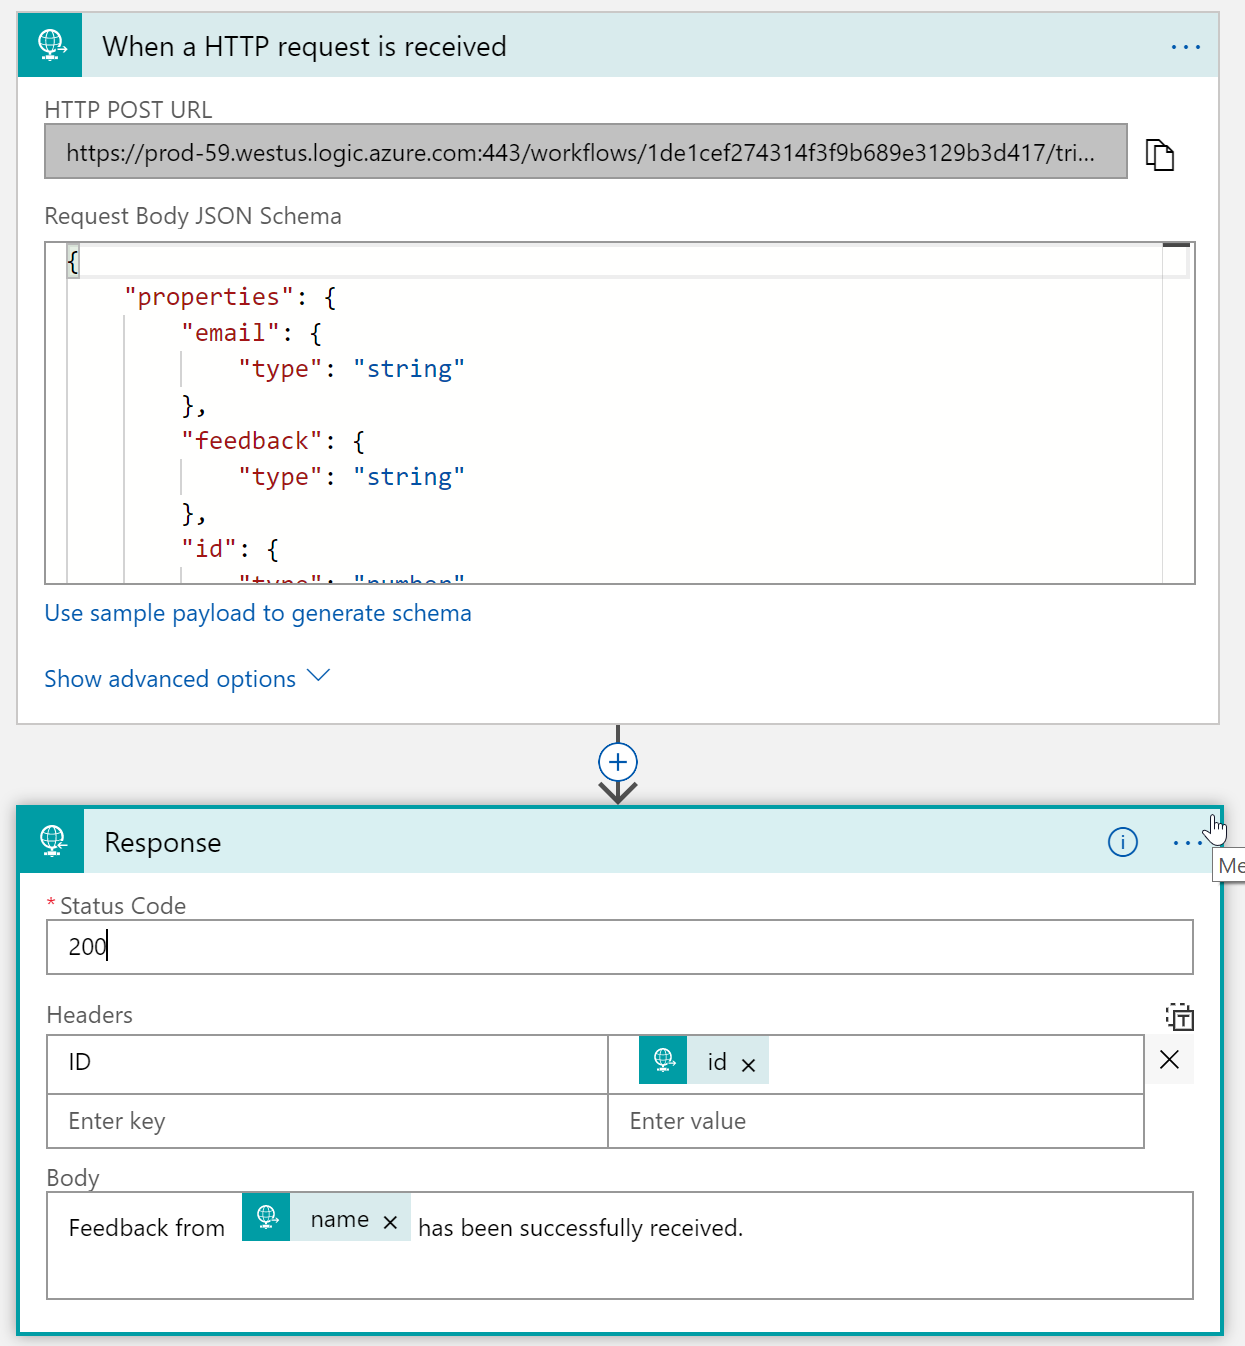
Response
- Click on the + New Step at the bottom
- Select Add an Action
- Select the corresponding response

- Use the default HTTP status code of 200
- Add a header, with ID as the key
- Click in the value field for the ID key and then select id from the selection of dynamic content
- Body: Set to Feedback from name has been successfully received (followed by a newline), again making use of the dynamic content
Once you have completed the configuration then your Logic App should look something like the picture below.
Don’t forget to Save your Logic App’s new HTTP endpoint before we test that it works in the next step.
In the steps above we generated the JSON schema on the fly, but you can also create proper schemas outside of the portal and then paste those in. As an example, I also generated a JSON schema using the excellent https://jsonschema.net website and then modified to customise the variable titles, descriptions, etc. The schema describes the expected format.
Test the endpoint
OK, let’s test the endpoint. You can test this using the bash Cloud Shell using the curl command below. Curl is a fantastic and powerful command line tool, and we will use it to POST data to our REST API.
However, if you have downloaded the Postman application then you may use this instead of curl if you are not a fan of command line interfaces. If that is what you would prefer then just open up the Postman instructions and follow those instead for the http endpoint test.
For those using curl, then first copy the HTTP POST URL from the Request step in the workflow.
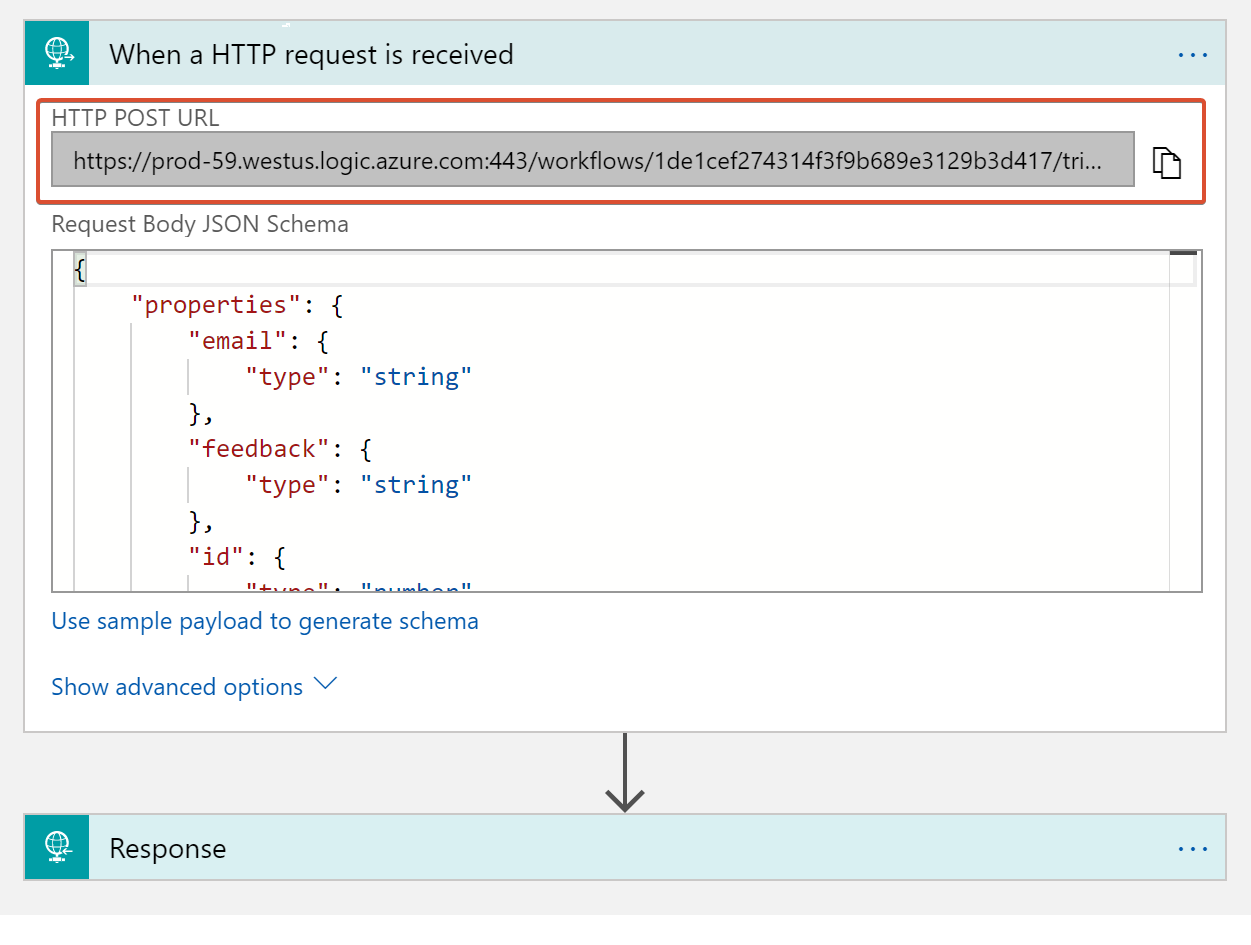
(This is the same URL you will find on the Overview blade, labelled Callback url(POST).)
Set an variable in bash called $endpoint to the URL wrapped in single quotes. Below is an example:
endpoint='https://prod-59.westus.logic.azure.com:443/workflows/1de1cef274314f3f9b689e3129b3d417/triggers/manual/paths/invoke?api-version=2016-10-01&sp=%2Ftriggers%2Fmanual%2Frun&sv=1.0&sig=Q2uyR5uipJsbzjkNdvY46v8VmFERVQnldlQuRHUmqCo'
The URL in the example above is for my Logic App, so make sure you set it to your URL instead!
Once you have done that then you can copy the following curl command and run that in the Cloud Shell to test the endpoint works:
curl -X POST $endpoint \
  --include \
  --header 'Content-Type: application/json' \
  --data '{
    "id": 1504522921969,
    "name": "Joe Bloggs",
    "email": "joe.bloggs@outlook.com",
    "feedback": "Your website keeps on crashing when I add items to my Wish List.  Shocking.",
    "rating": 2,
    "source": "webapp"
}'
The --include switch returns the headers in addition to the body of the HTTP response.
The output should look something like this:
richeney$ curl -X POST $endpoint \
> --include \
> --header 'Content-Type: application/json' \
> --data '{
> "id": 1504522921969,
> "name": "Joe Bloggs",
> "email": "joe.bloggs@outlook.com",
> "feedback": "Your website keeps on crashing when I add items to my Wish List. Shocking.",
> "rating": 2,
> "source": "webapp"
> }'
HTTP/1.1 200 OK
Cache-Control: no-cache
Pragma: no-cache
Content-Length: 57
Content-Type: text/plain; charset=utf-8
Expires: -1
ID: 1504522921969
x-ms-execution-location: westus
x-ms-workflow-id: 1de1cef274314f3f9b689e3129b3d417
x-ms-workflow-version: 08586889191402595119
x-ms-workflow-name: feedbackLogicApp
x-ms-workflow-run-id: 08586889187586098654756637615
x-ms-workflow-system-id: /locations/westus/scaleunits/prod-59/workflows/1de1cef274314f3f9b689e3129b3d417
x-ms-tracking-id: 1b0c2aae-bdae-42ee-a61d-4c773822668c
x-ms-correlation-id: 1b0c2aae-bdae-42ee-a61d-4c773822668c
x-ms-client-tracking-id: 08586889187586098654756637615
x-ms-ratelimit-burst-remaining-workflow-writes: 14999
x-ms-request-id: westus:1b0c2aae-bdae-42ee-a61d-4c773822668c
Strict-Transport-Security: max-age=31536000; includeSubDomains
Date: Thu, 07 Dec 2017 23:08:46 GMT
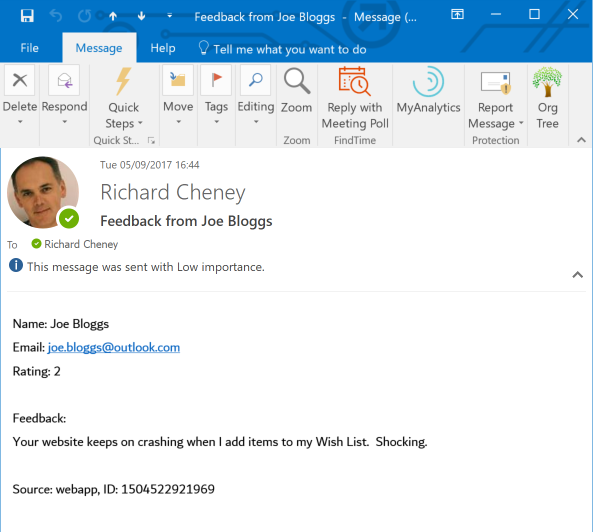
Feedback from Joe Bloggs has been successfully received.
Note the successful HTTP response code HTTP/1.1 200 OK in the headers. There are also a number of headers relating to the Logic App itself, plus our custom ID header with the value from the JSON payload.
This endpoint looks as if it is working nicely.
Checking the Logic App run
Logic Apps also has some really nice functionality to trace both successful and failed runs. Let’s take a look:
- Go to the Overview area of the Logic App
- Check that there is a new entry in the Trigger History
- Click on the new Runs History entry to view the details
- Open up the individual steps to view the inputs and outputs
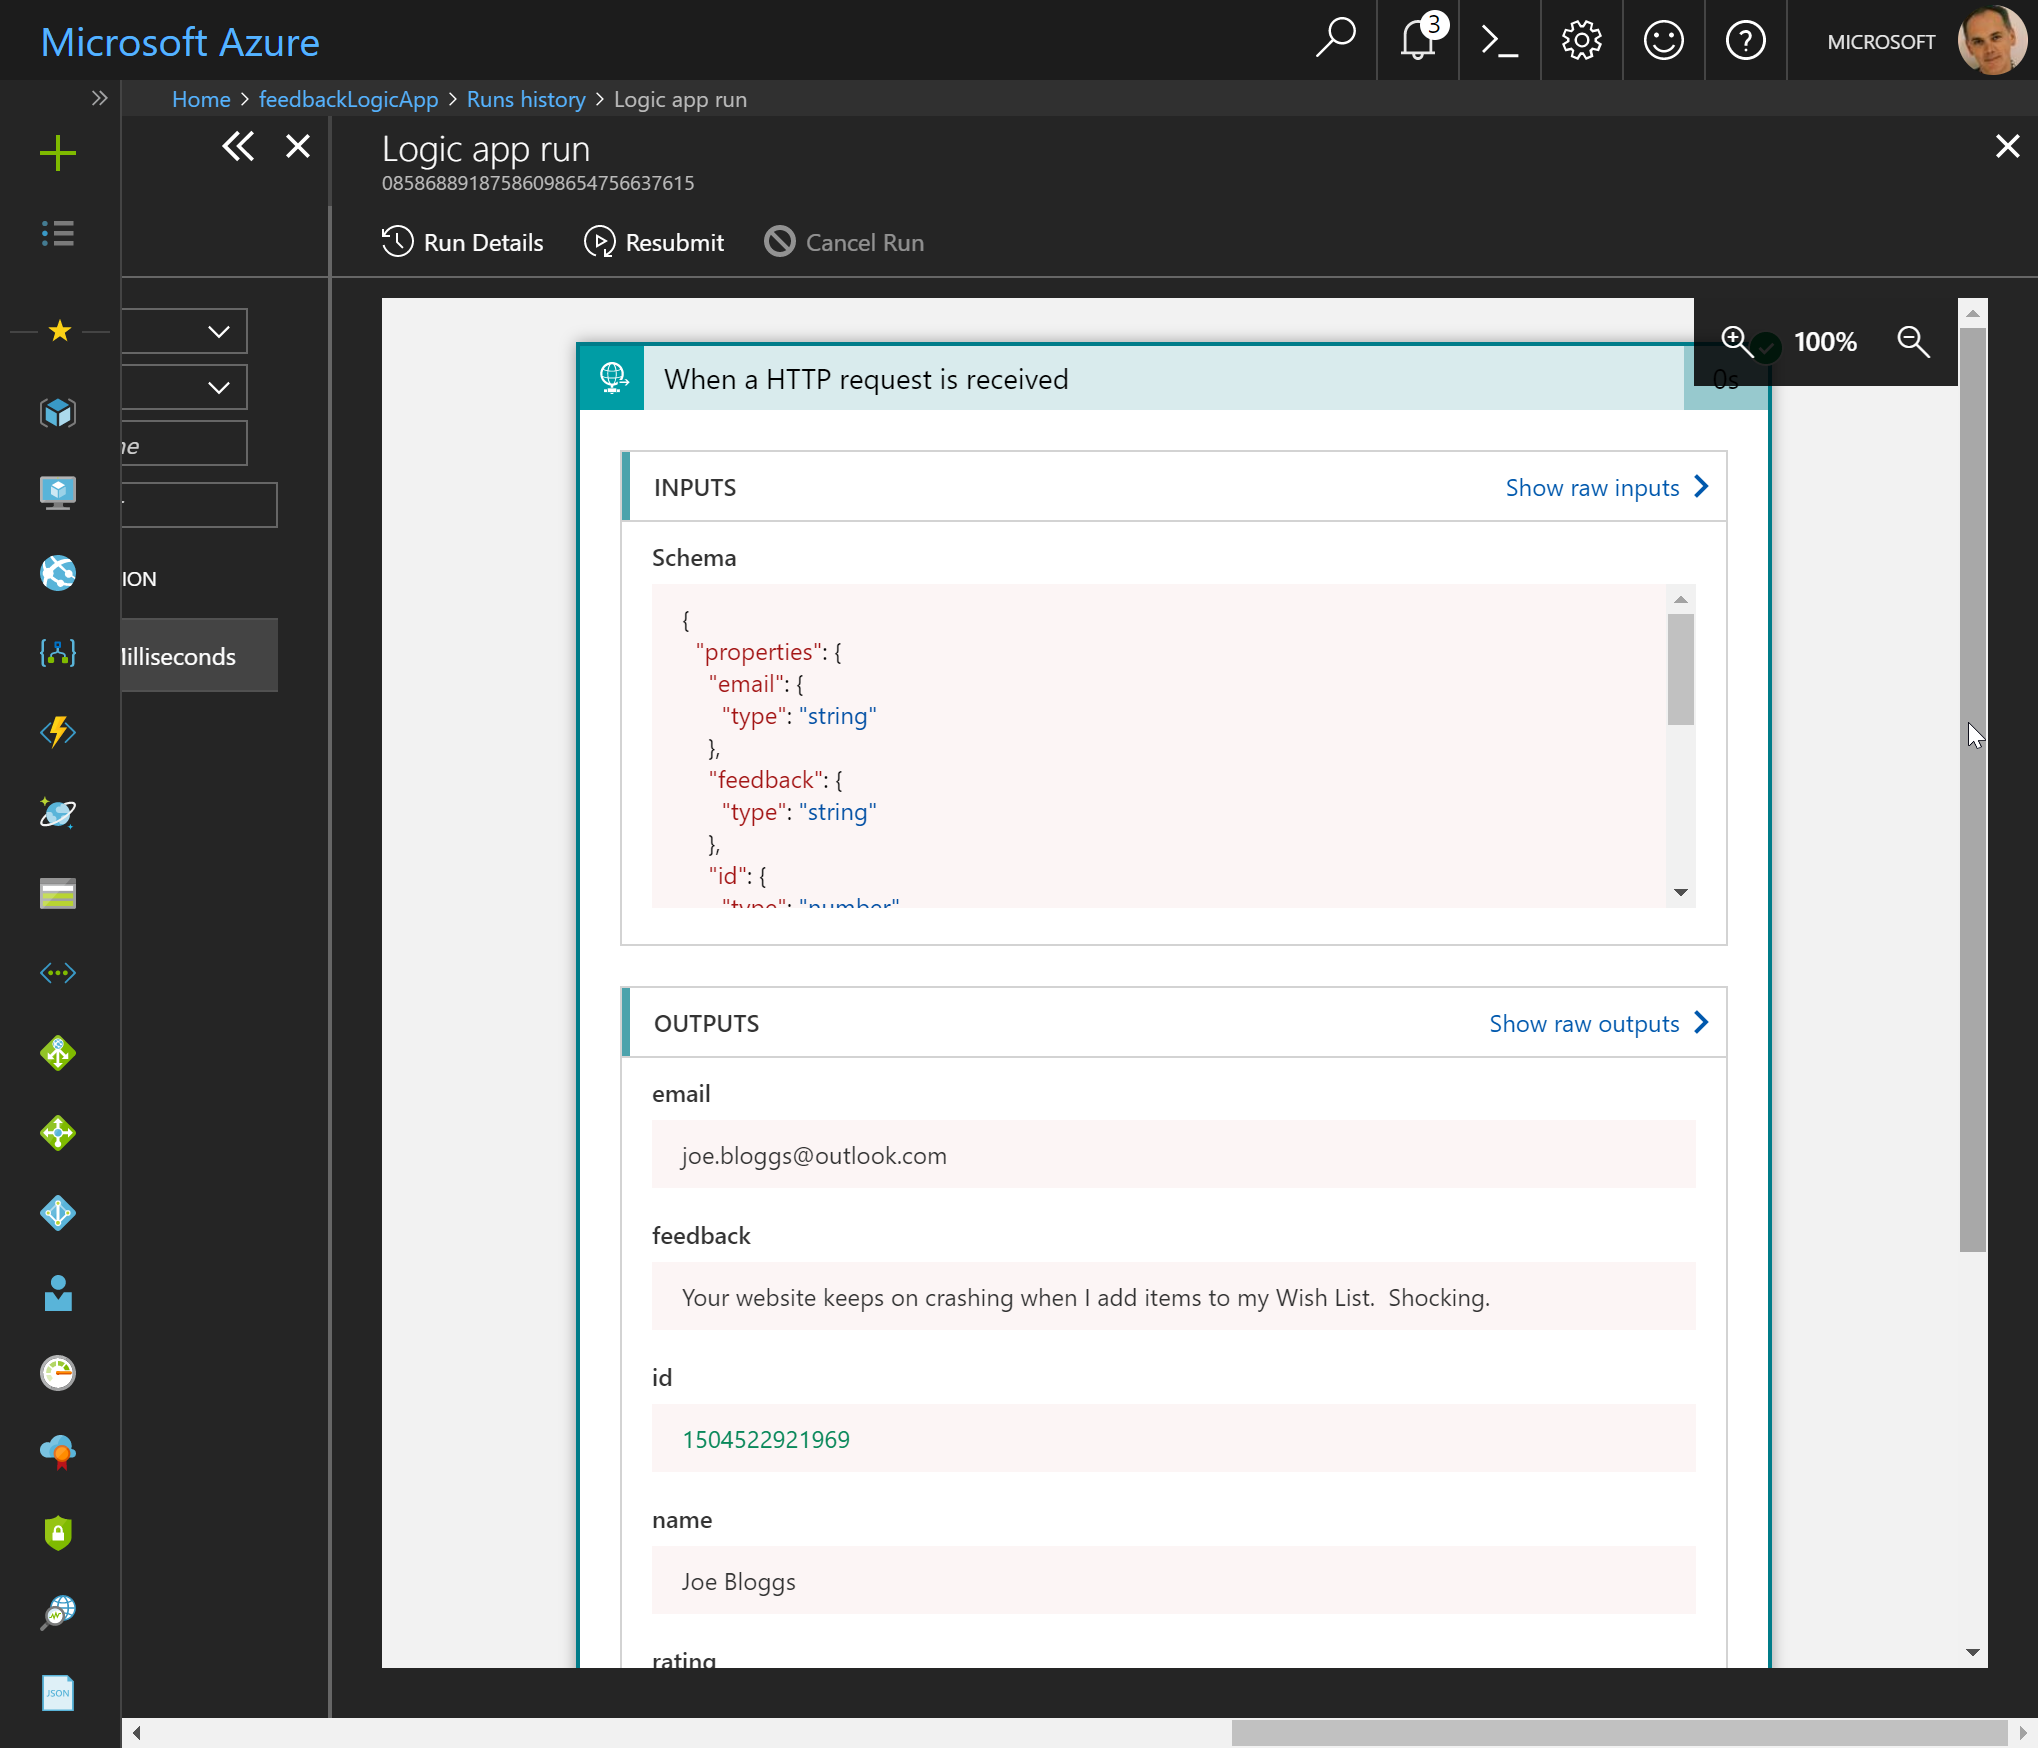
This is useful to see the values as it steps through the workflow. Our workflow is simple, but this is invaluable for more complex workflows.
Send an email if feedback rating is poor
We will now add a conditional action that will email us as an alert if the feedback rating is less than three.
PR departments proactively monitor for comments on social media platforms, notably Facebook and Twitter, that have a negative sentiment. They then quickly respond to those in order to minimise any brand damage. What we are doing here is in a similar vein.
Create the conditional action
Another video, followed by the steps:
- Return to the Logic App, and re-open the Logic App Designer
- Click on +New Step and then Add a condition
- Value: rating
- Operator: is less than
- Value: 3
- In the “If true” branch, add an action
- Search for “email” and choose a platform. The steps below are for Office 365 Outlook.
- Click on the Send an Email action
- Sign in to create the connection
- To: yourEmailAddress
- Subject: Feedback from name
- Body: Add in all of the useful information from the JSON payload to create the body of the email. The screenshot below gives an example.
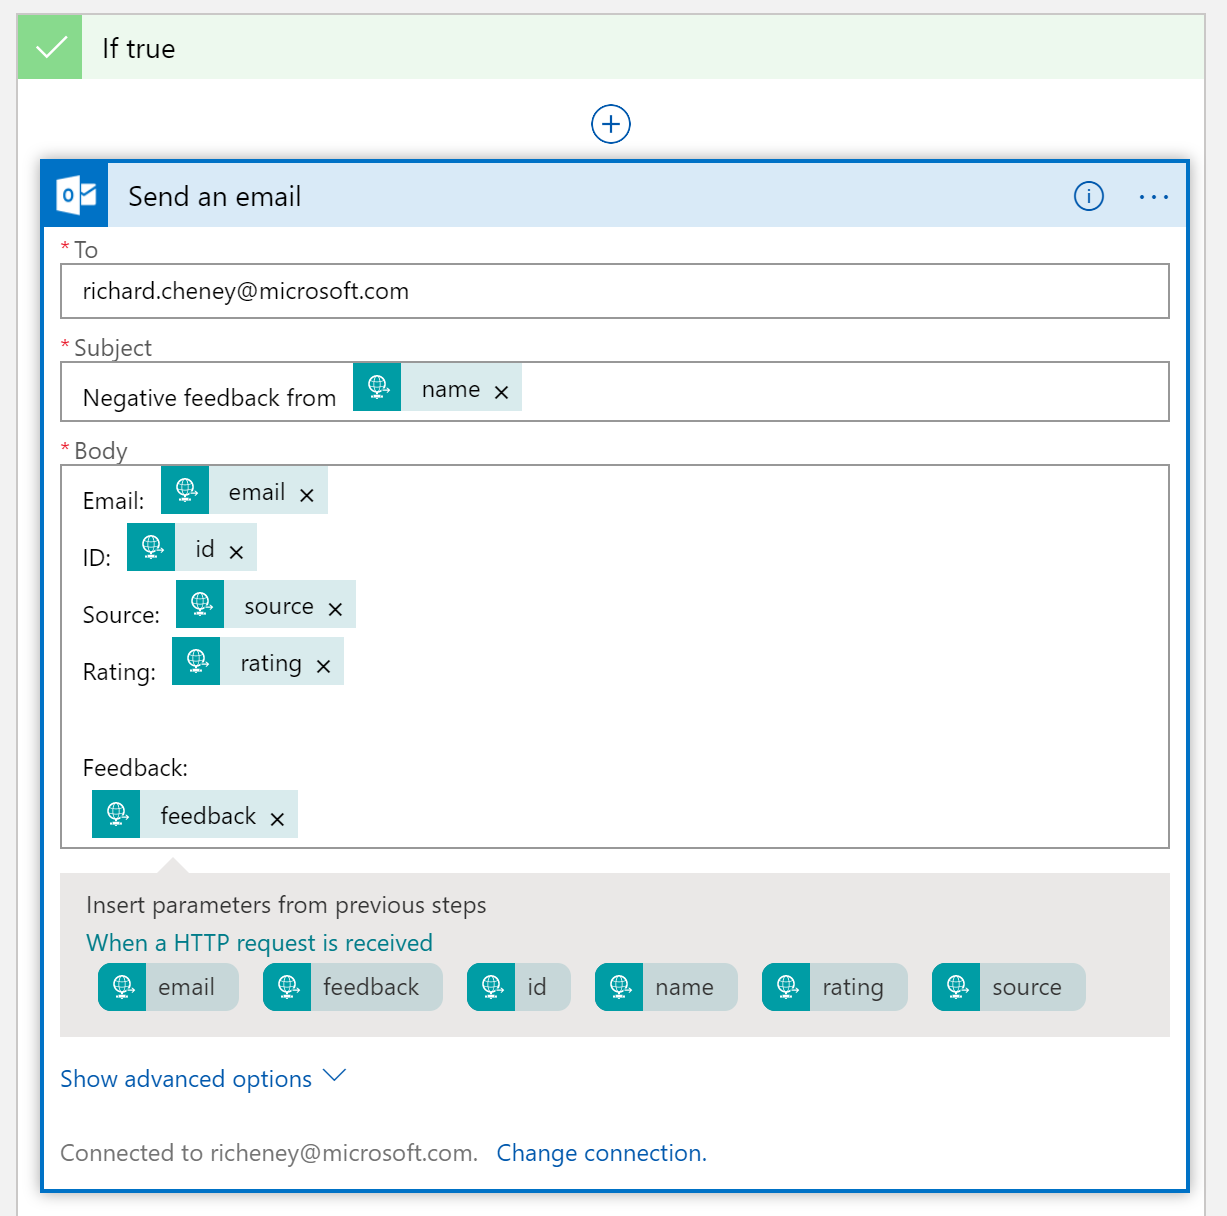
- Click on Save
Retest the Logic App
Either
- rerun the curl command (you can use the up arrow in bash to recall previously submitted commands), or
- go back to Postman and click on the blue POST button
You can then check the inbox for the email tool you selected to see if the email has been successfully received.
Adding a permanent record into Cosmos DB
We will now insert a step to retain the submitted feedback JSON documents, and store them. Cosmos DB is a globally distributed multi-model database, and the model type selected earlier in the lab was SQL (Document DB), which is perfect for storing JSON documents.
We’ll now add a collection called production into our feedback database, and we’ll partition it based on the source. Then we’ll add the step into the Logic App to add the document to the database.
Define the collection
- Go into the Cosmos DB resource
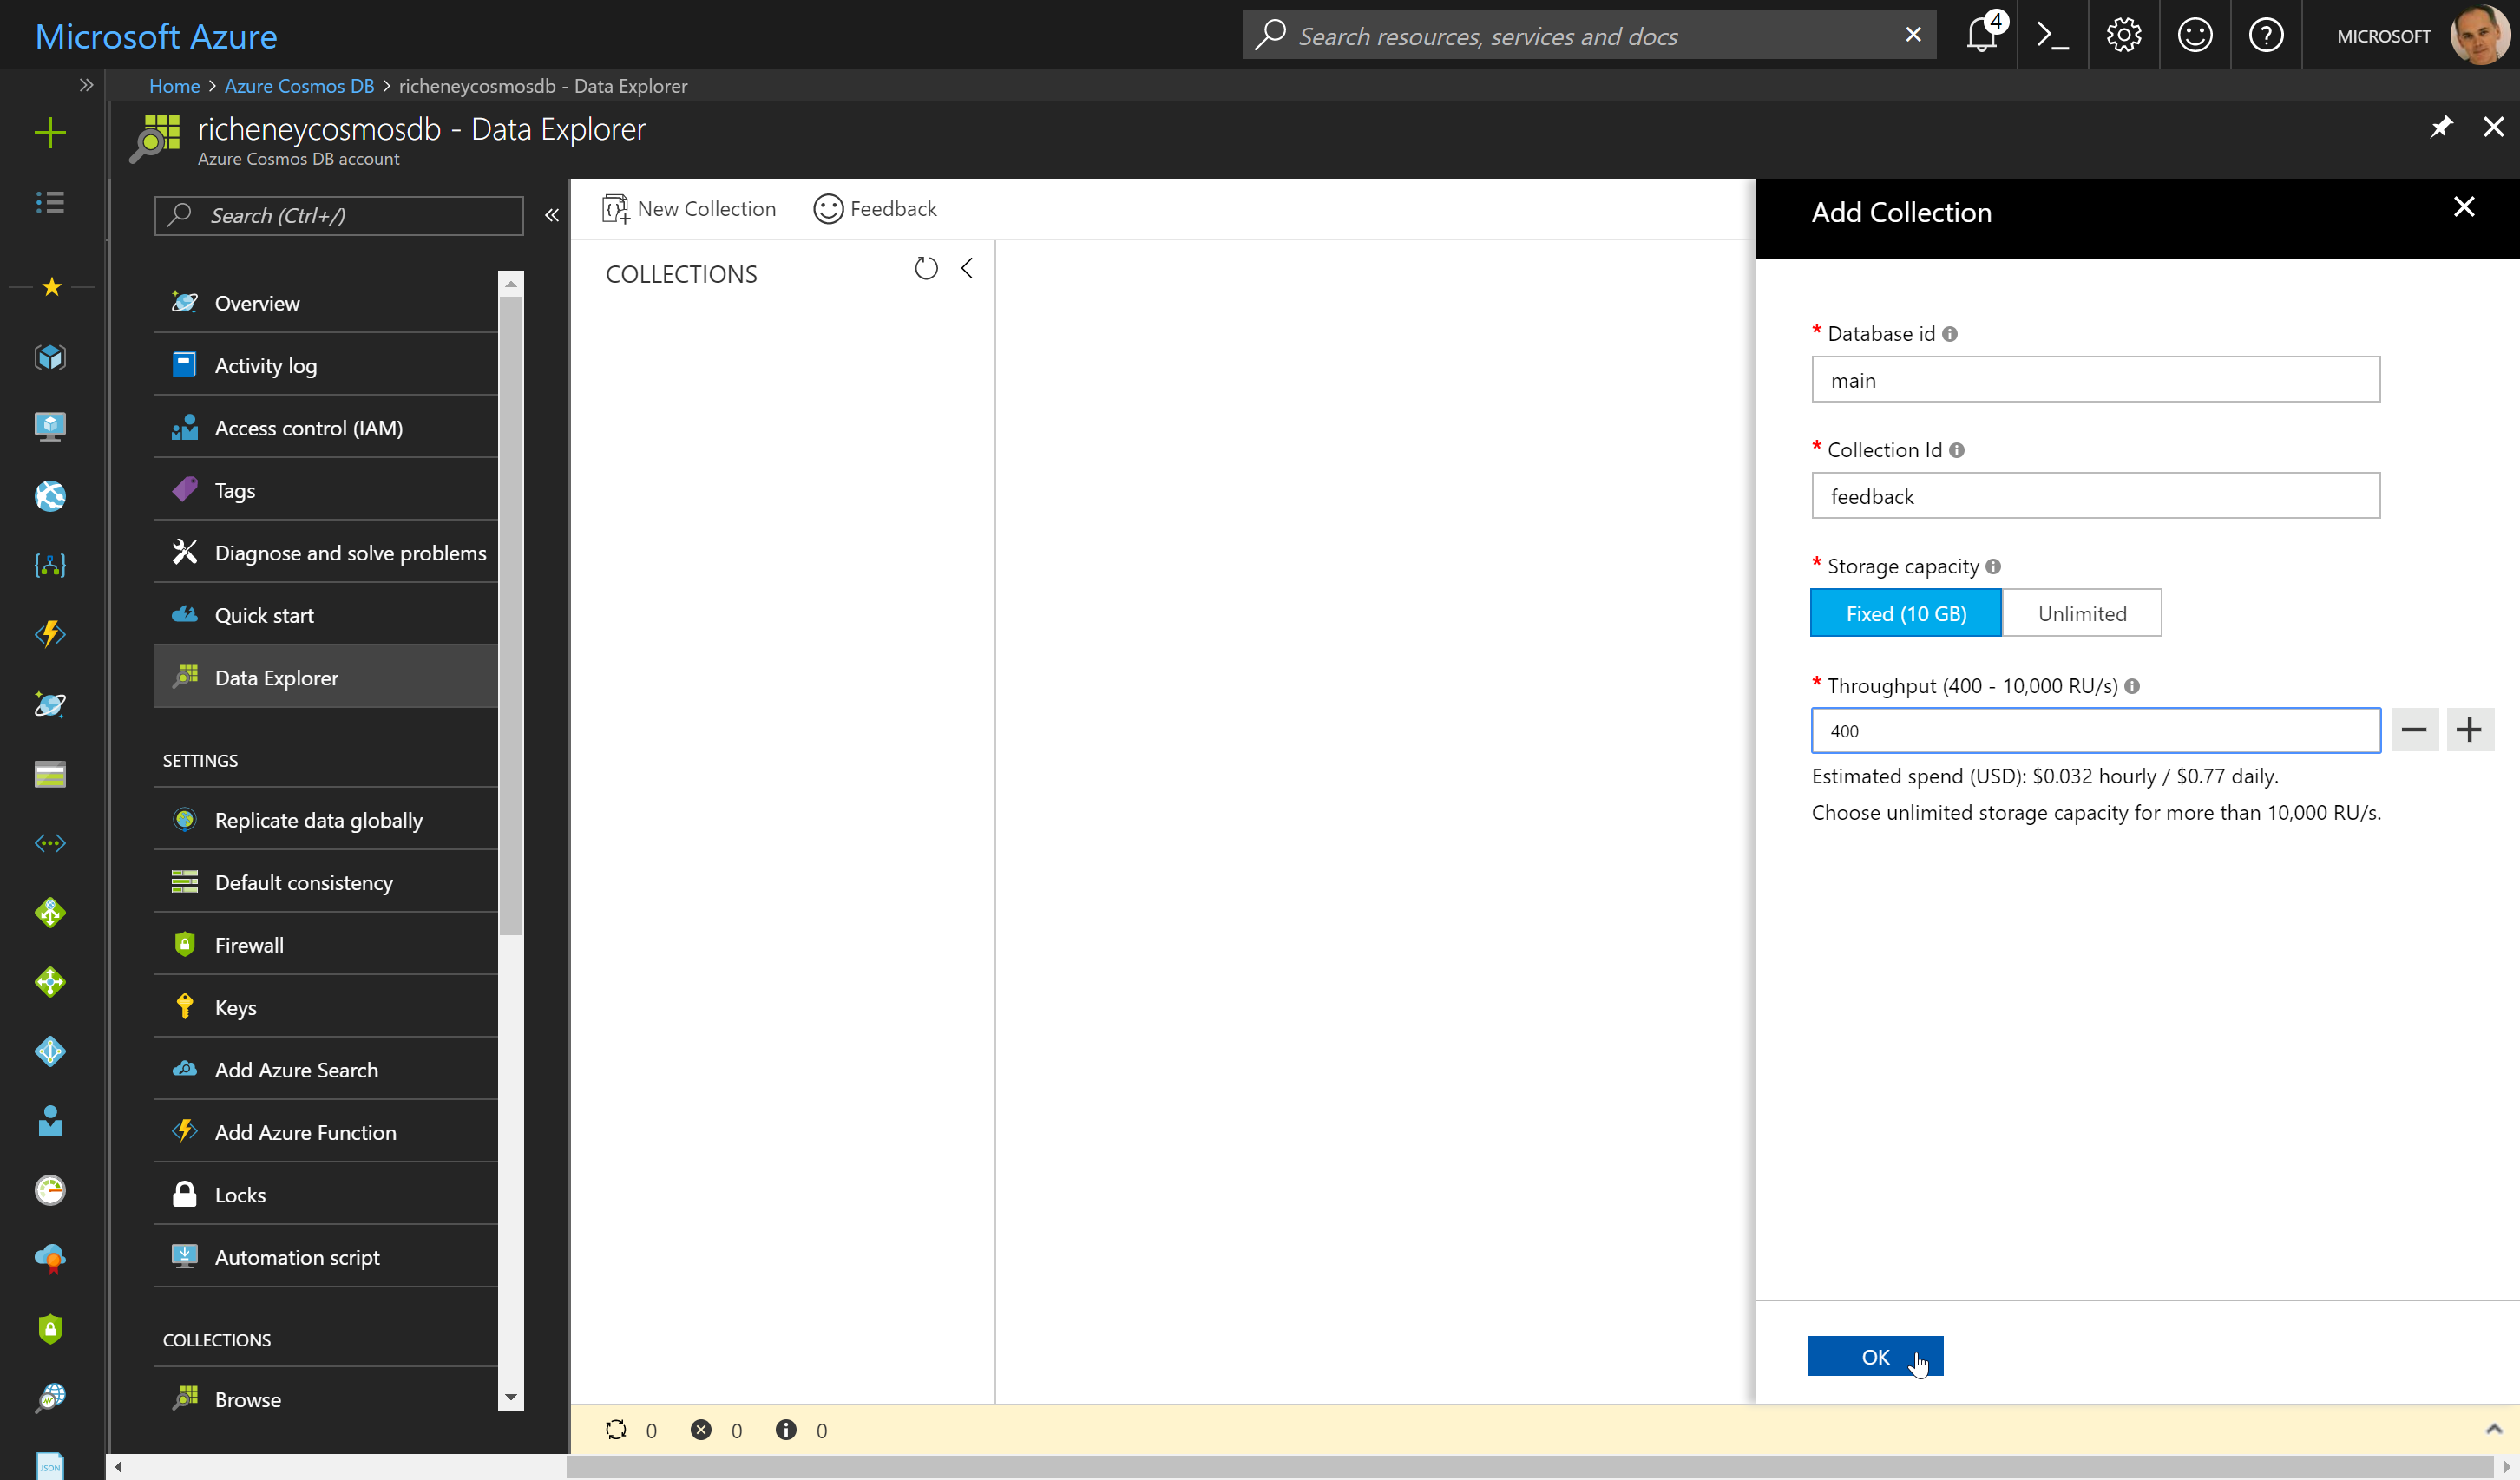
- Click on Add Collection in the Overview
- Database id: main
- Collection Id: feedback
- Storage Capacity: Fixed (10GB)
- Initial Throughput Capacity (RU/s): 400
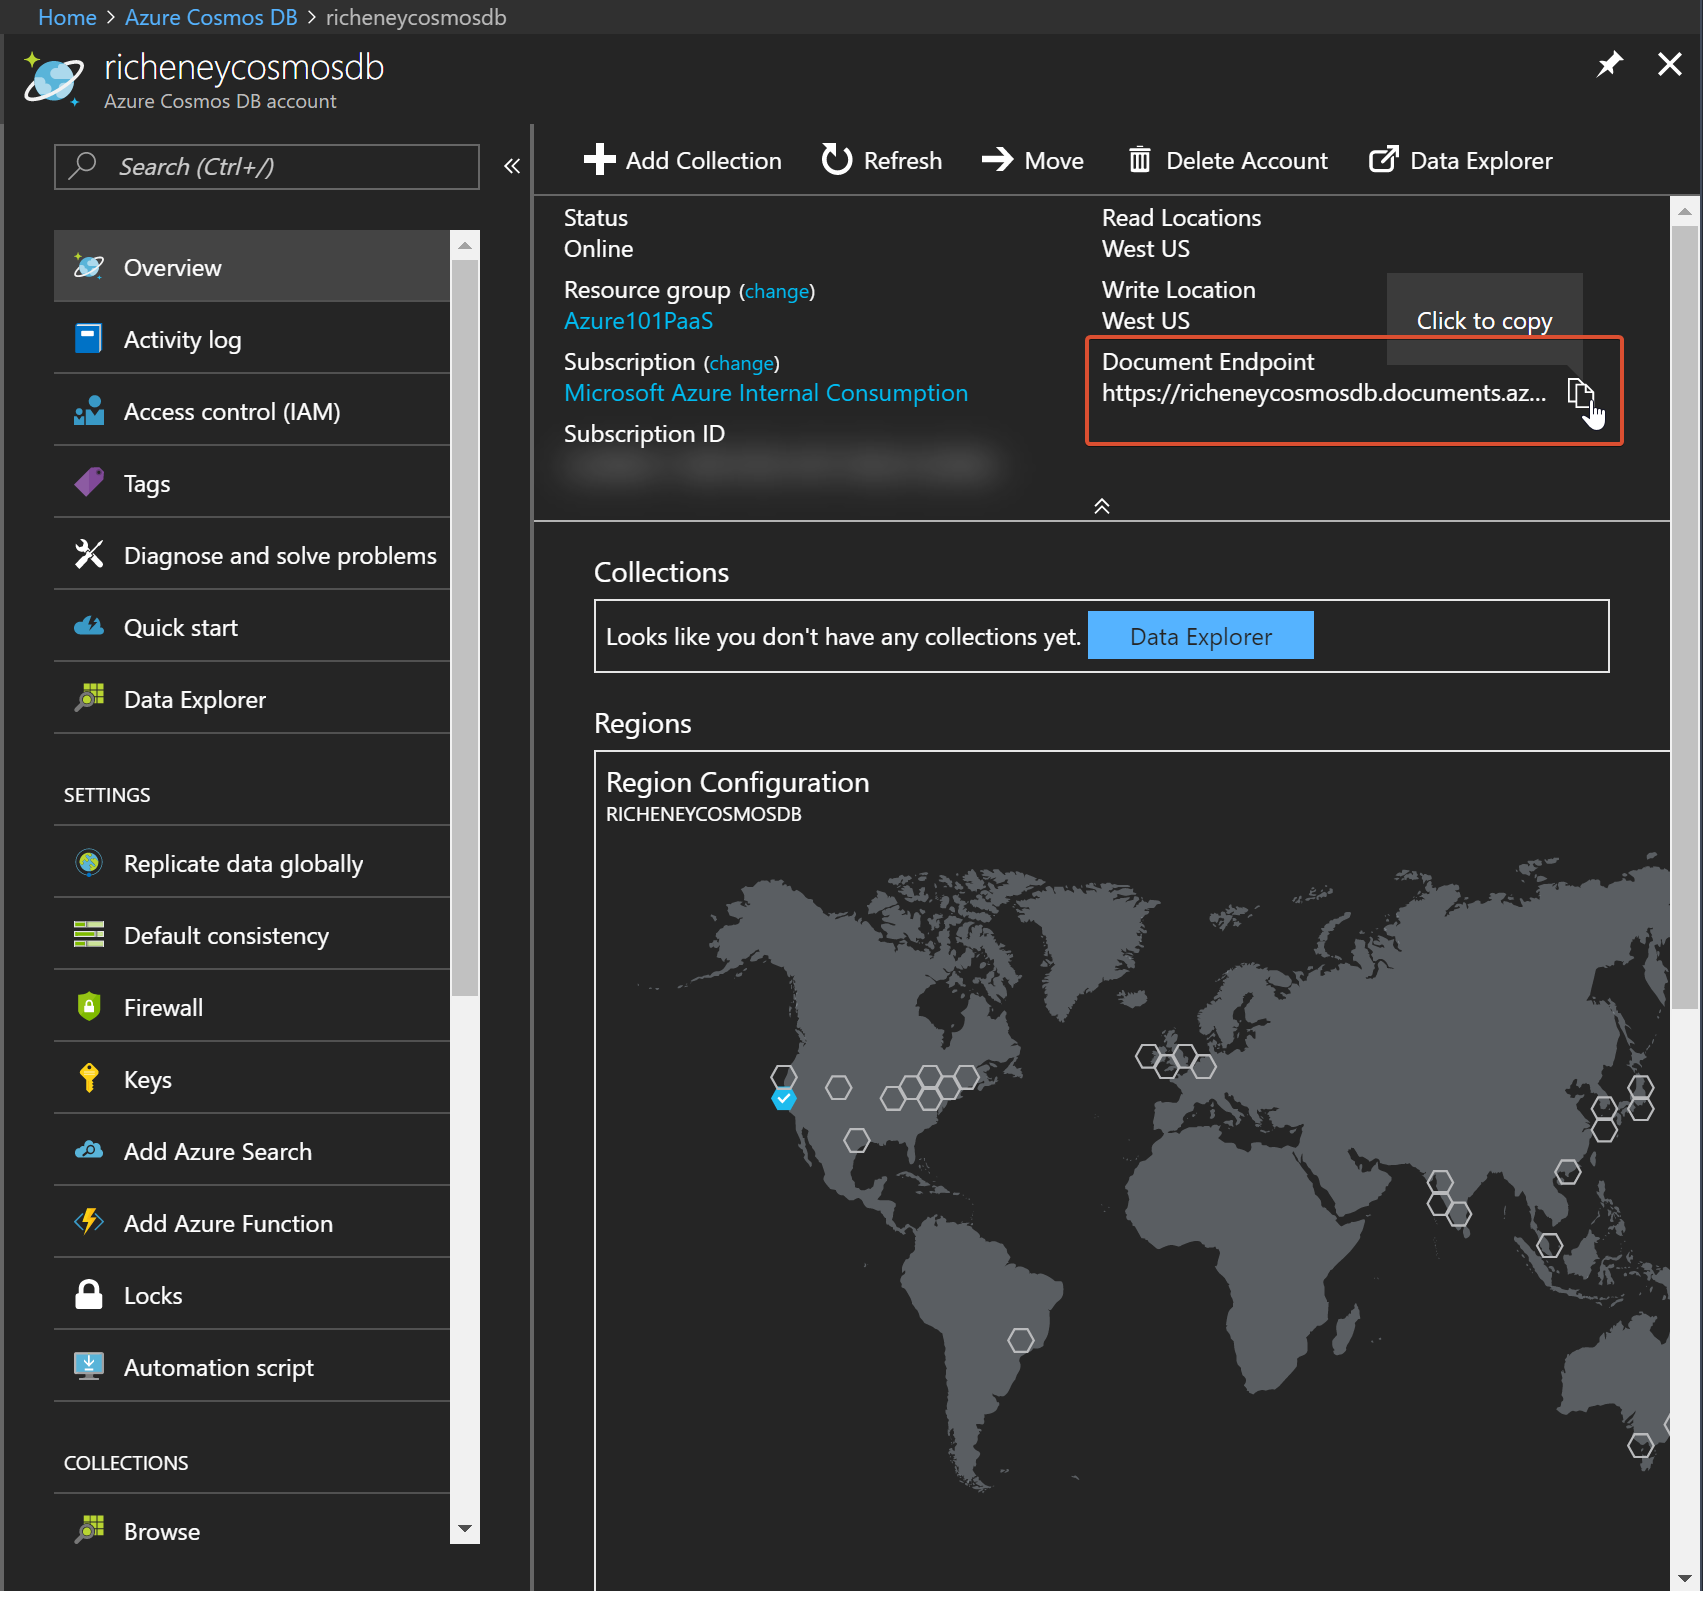
- In the Cosmos DB Overview area
- Copy the URI
The URI is in the form https://<ID>.documents.azure.com:443
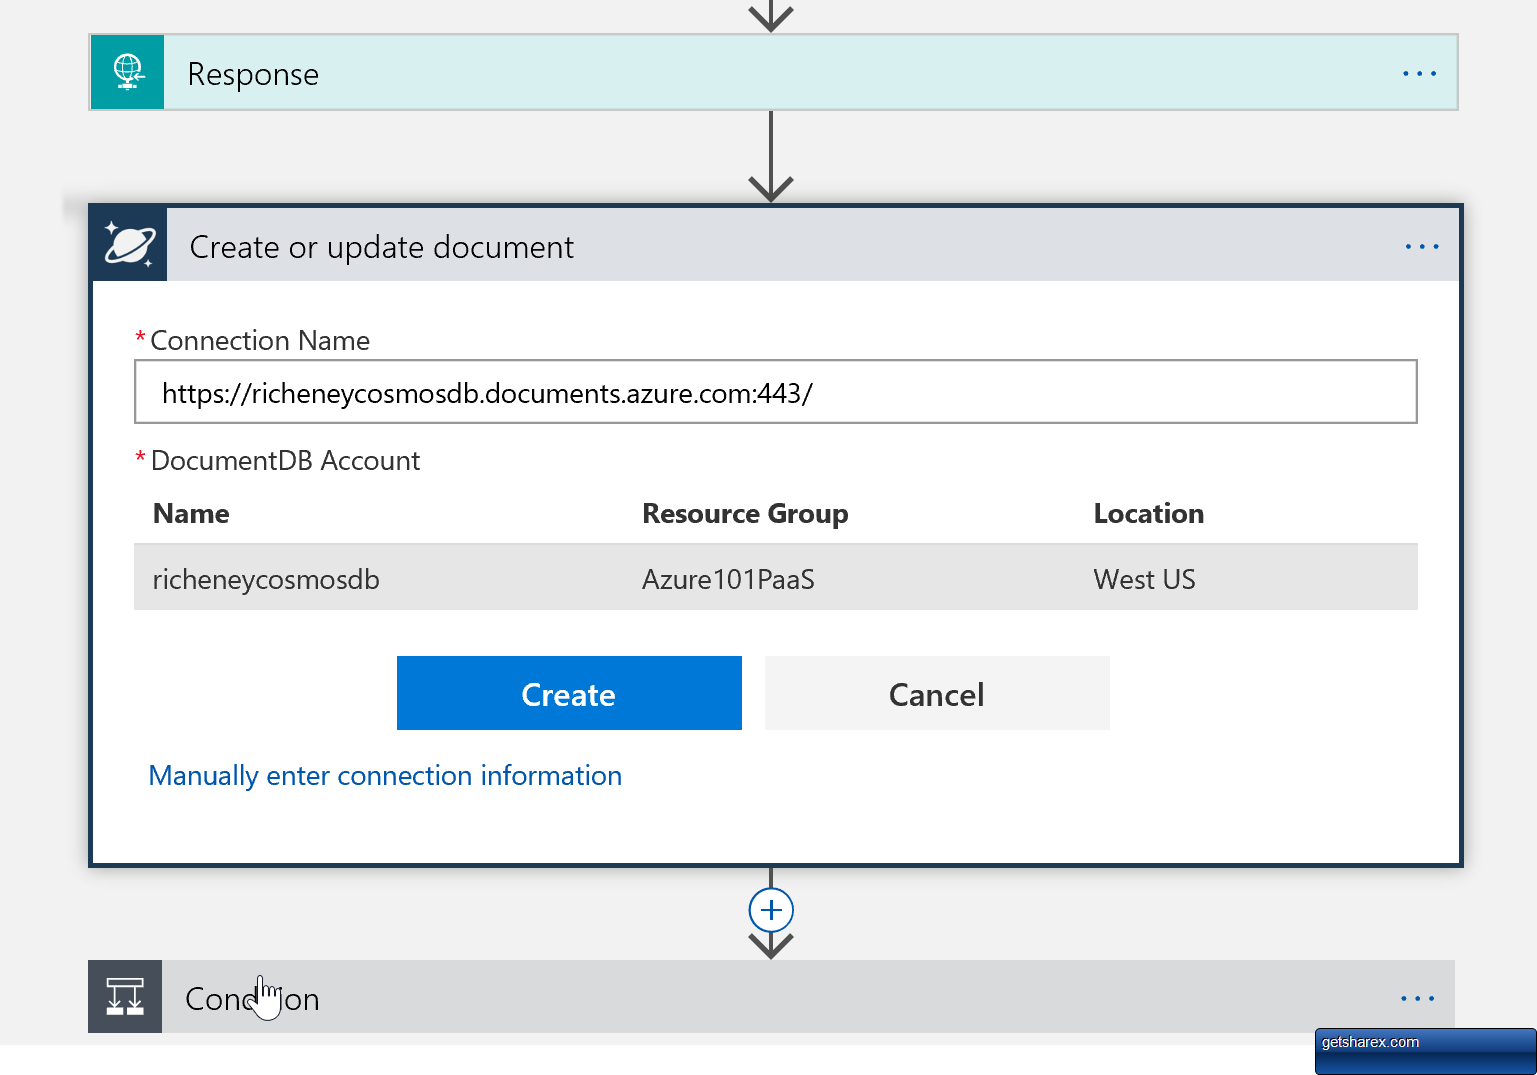
Add the Create Document step and connect to Cosmos DB
Final video, followed by the steps:
- Open up a new tab and go back into your Logic App
- Click on Edit to re-open the Logic App Designer
- Add a new action between Response and the Condition
- Hover the mouse over the arrow under Response and a + sign will appear
- Click on it and then select ‘Add an action’
- Search on ‘Cosmos DB’ and select Create or update document
- Paste in the connection string
https://<yourname>cosmosdb.documents.azure.com:443/ - Select the Cosmos DB and click on Create
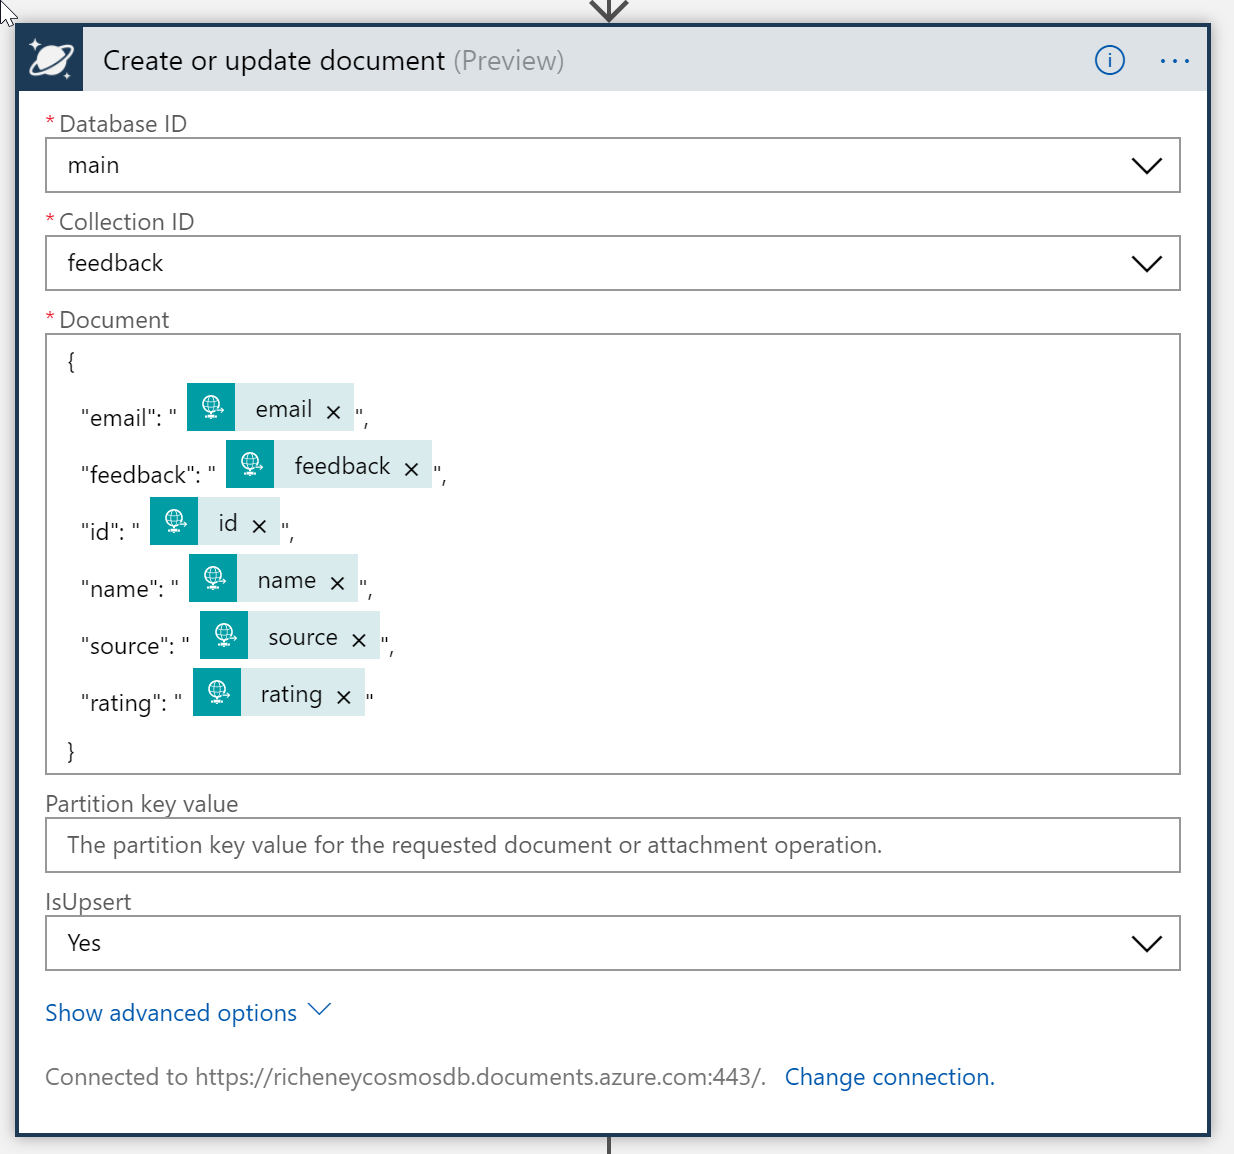
Define the document format and placement
Set the parameters for the Create or update document action:
- Database ID: Select main from the drop down
- Collection ID: Select feedback from the drop down
- Document: Enter the following, replacing
varnamewith the relevant dynamic content:
{
  "email": "email",
  "feedback": "feedback",
  "id": "id",
  "name": "name",
  "source": "source",
  "rating": "rating"
}
- Set IsUpsert to Yes, which allows both updates and inserts
- Do not set up a partition key. These are only used for the unlimited size Cosmos DBs where the partition key is import for sharding.
Below is an example of the Create or update document logic
- Save
Test the whole Logic App workflow
- Retest by POSTing the JSON payload again using either curl or Postman
- Check the Run History and view the outputs
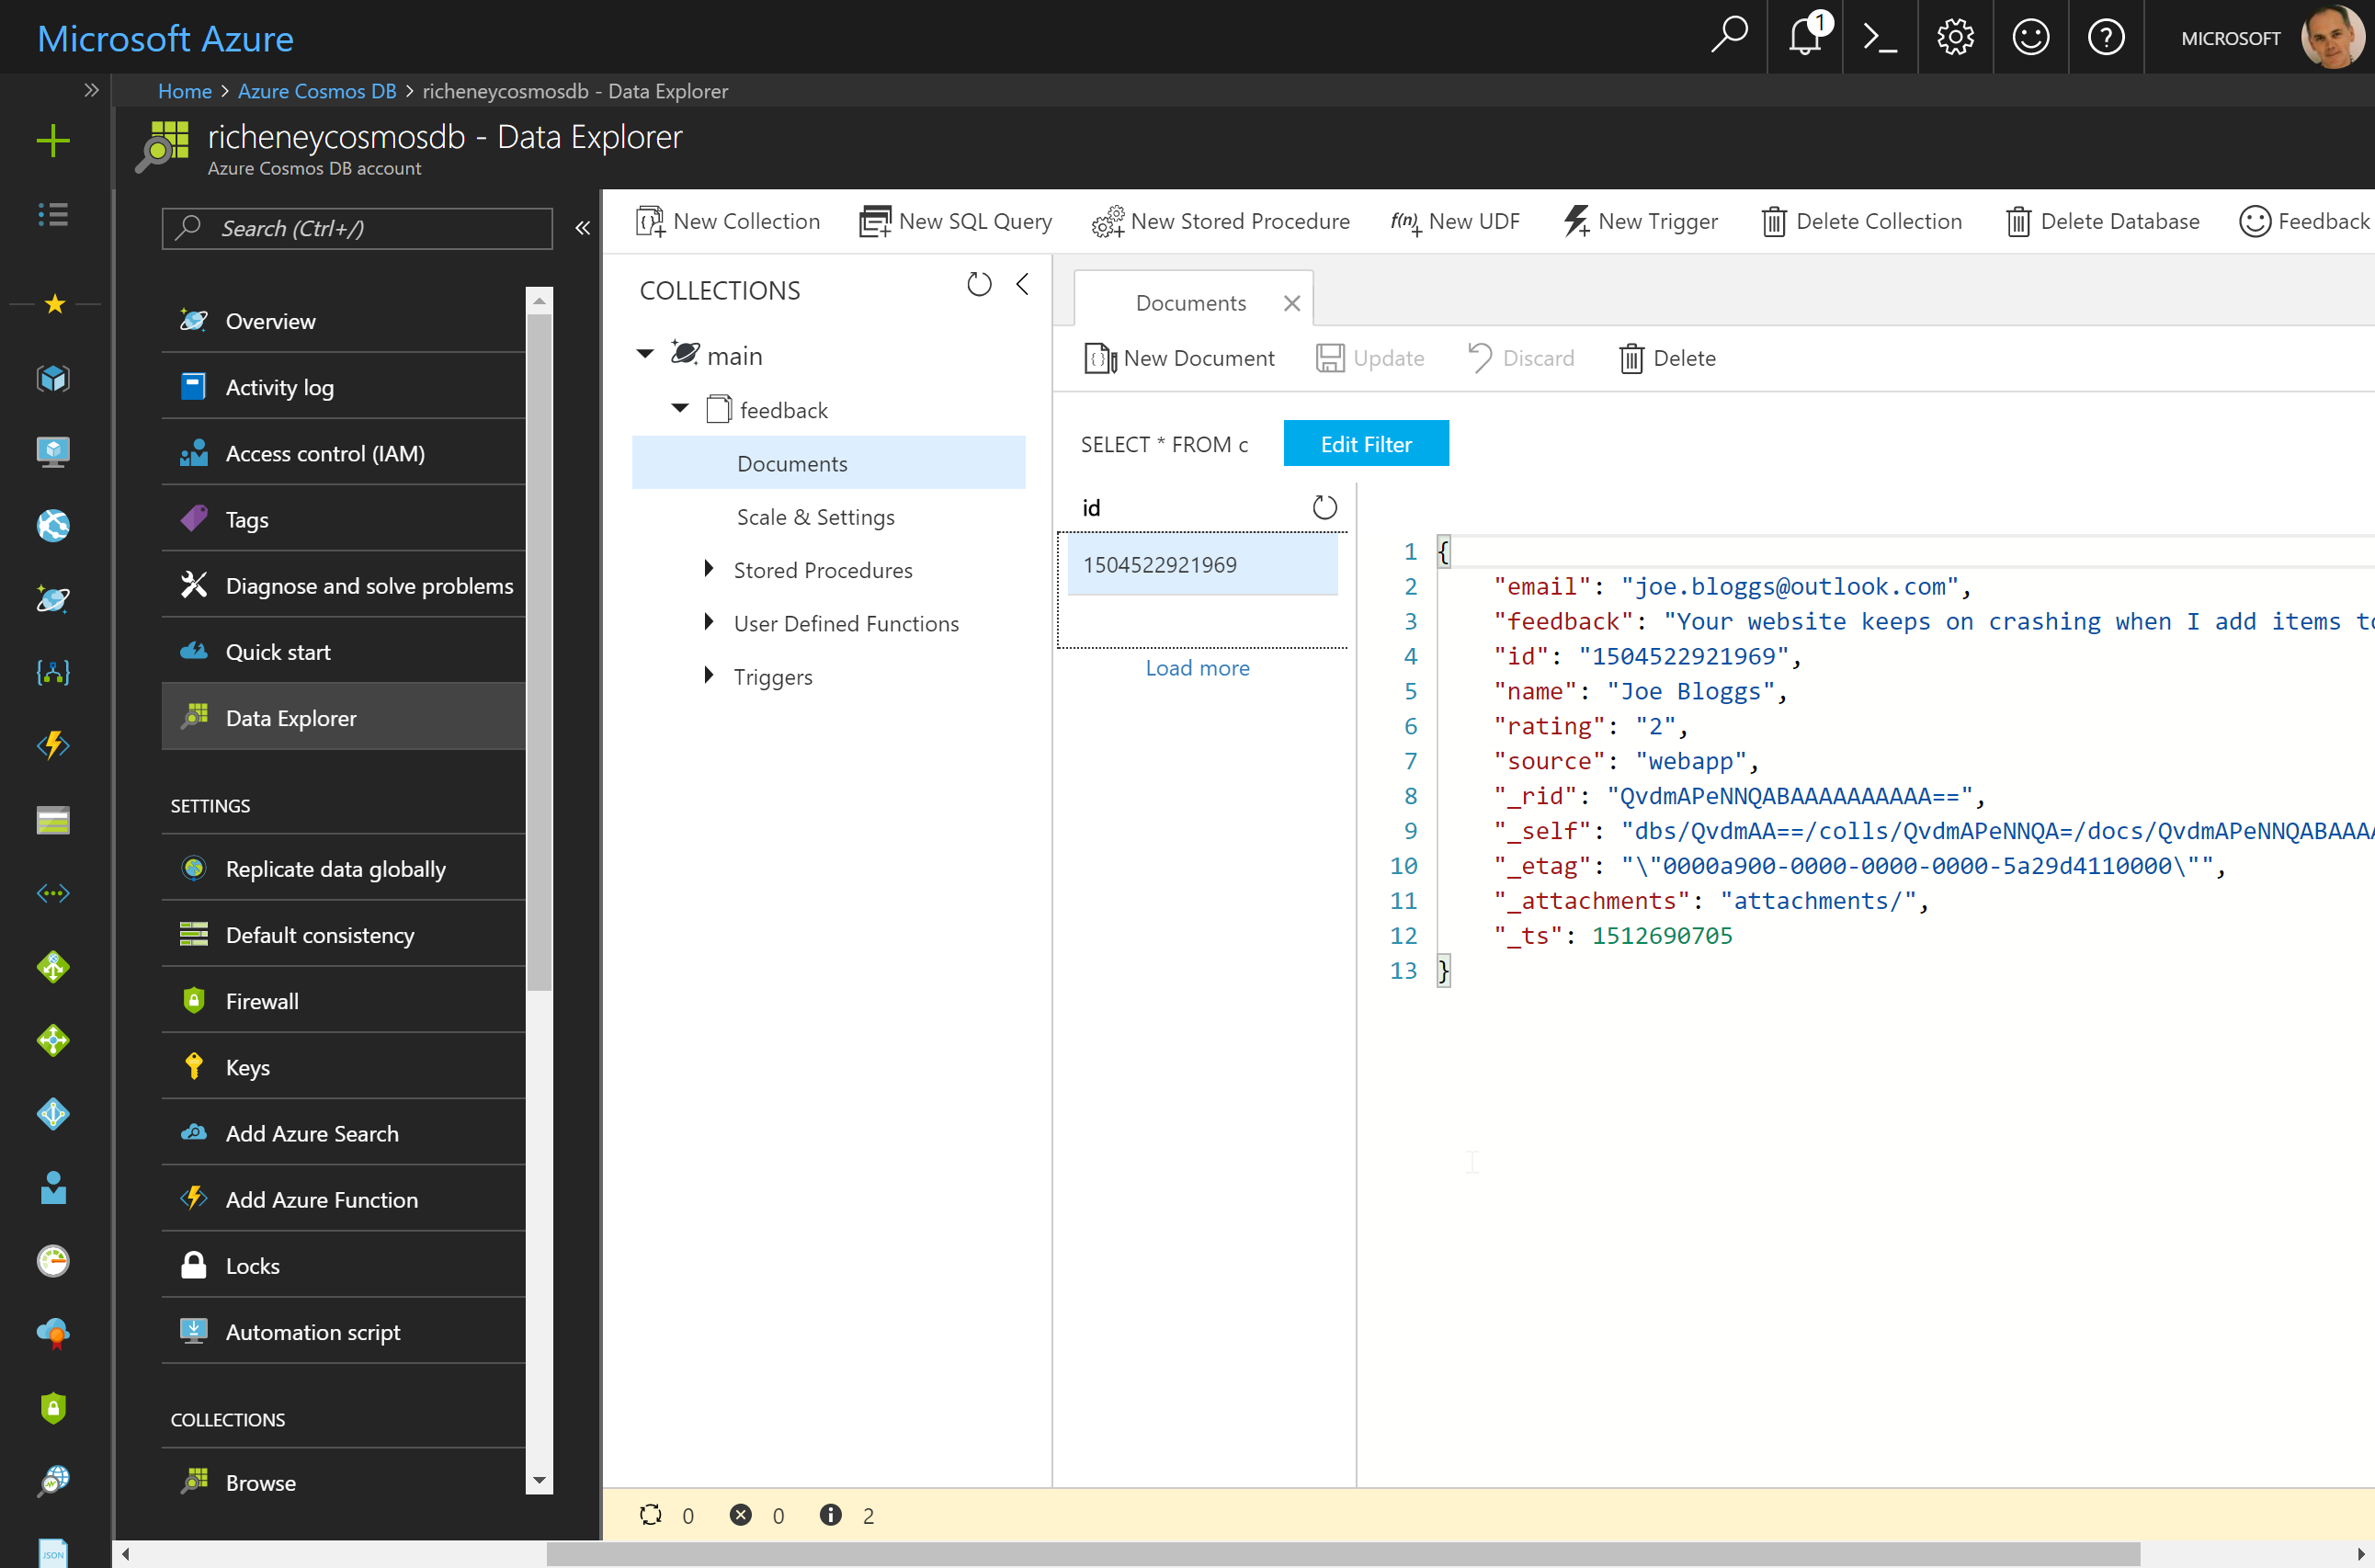
- Go into Cosmos DB and use the Data Explorer to verify that the feedback is beeing collected successfully
Final notes
- Note that the logic app also allows drag and drop reordering of steps
- Prove this by moving the Cosmos DB document step above the HTTP Response
- It is also possible to cosmetically rename the steps
- If you have time then explore the other inbuilt connectors offered by Logic Apps
- Note that Functions can also be integrated into Logic Apps for full flexibility
Leave a comment