
Introduction
The Web App lab is split into two options - the first option is for students who are familiar with Git and uses this method to push files to the Web App, while the second option is aimed at students who are less familiar with Git tools and therefore uses the portal to pull files into the Web App.
Option 1: Using Git to push files to Web App
The diagram below gives an overview of what we are doing with a set of html files hosted on GitHub and pushing those into a Web App in Azure using Git.
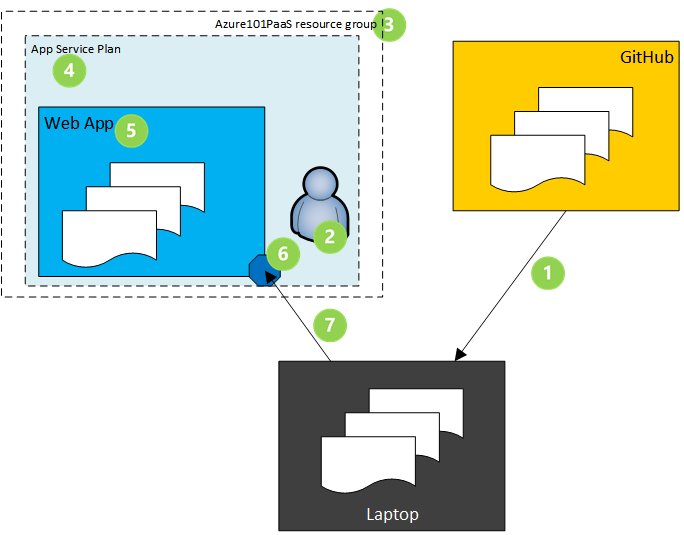
- Use git clone to download the sample static HTML site from GitHub to your laptop
- Login to Azure and create a deployment user
- Create the Azure101PaaS resource group
- Create the free tier app service plan
- Create a web app within the app service plan
- Configure a Git access point for the web app
- Define the access point as an upstream git repo called “azure”, and use git push to add the html files
Select your console
The instructions are from the point of the Cloud Shell (>_) shown at the top of the Azure Portal. This will create some local storage the first time you use it. There is no need to login to Azure as it is done automatically for you. (Note that we will not be using the permanent storage folder clouddrive as it does not support the file permissions required by git commands, so the clone of the Github repo will be transient.) This is the default console for this lab.
For those of you who have completed the Bash and CLI 2.0 prereqs, you will have installed the Linux subsystem, and then installed both CLI 2.0 and Git into that subsystem. If that is so then open a Command Prompt and then type bash. Type in az login and follow the instructions. You can then use this as your console.
Instructions
1. Clone the HTML files from Github
We will use some bash variables to make this section work well. First of all we’ll create a couple of variables for your first and last name. For example:
first=Richard
last=Cheney
Set the first and last variables to match your given name and family name rather than mine.
Setting these will help to ensure that the variables set in the following section are likely to be unique, notably the app name (which has to be globally unique) and the username (that has to be unique within the subscription).
Type (or copy and paste) the following commands into the console:
git clone https://github.com/richeney/azure101-webapp-html
cd azure101-webapp-html
git init
ls -Al
pwd

git config --global user.email "$first.$last@microsoft.com"
git config --global user.name "$first $last"
git config --global credential.helper cache

rg=Azure101PaaS
user=${first}${last}Deploy
pwd=azure101p455w0rd
appName=azure101${first}${last}
- The first section
- clones the HTML files in the GitHub repo locally
- changes the working directory to the new clone of the repo and then initialises it for Git
- lists the files and then finally the pwd command prints the working directory so that you know where they are locally
- The second section
- configures git with user information
- sets up to cache our credentials after the first successful connection to a remote repository
- The third section then defines some variables (for the resource group, deployment user credentials and the web app name) that we’ll use later in the lab
If you have installed full bash on Windows 10 then you may double click the index.html file in File Explorer to view the website locally. You should see a couple of pieces of static images and text on the left, and a Twitter timeline on the right.
If you are in the Cloud Shell then cat index.html will display the raw html.
2. Create the deployment user
Run the following command to create the deployment user:
az webapp deployment user set --user-name $user --password $pwd
- If you have changed the password from the example above, and is too simple or common then you may see a basic 400 decline HTTP error
- If that happens then you can change the password to something more complex and obscure and retry
- The deployment user is the equivalent of a service account so that Git can authenticate to Azure and deploy to it
3. Create the resource group
Create the resource group:
az group create --name $rg --location westeurope
4. Create the App Service plan
The App Service plans provide the underlying resources for your apps, and multiple apps can use them. The plans define the region, available instance sizes, scale count and SKU level, i.e. free, shared, basic, standard, premium.
Create an App Service plan called quickStartPlan on the Free SKU
az appservice plan create --name quickStartPlan --resource-group $rg --sku FREE
- You should see output JSON when the above command succeeds
5. Create the Web App
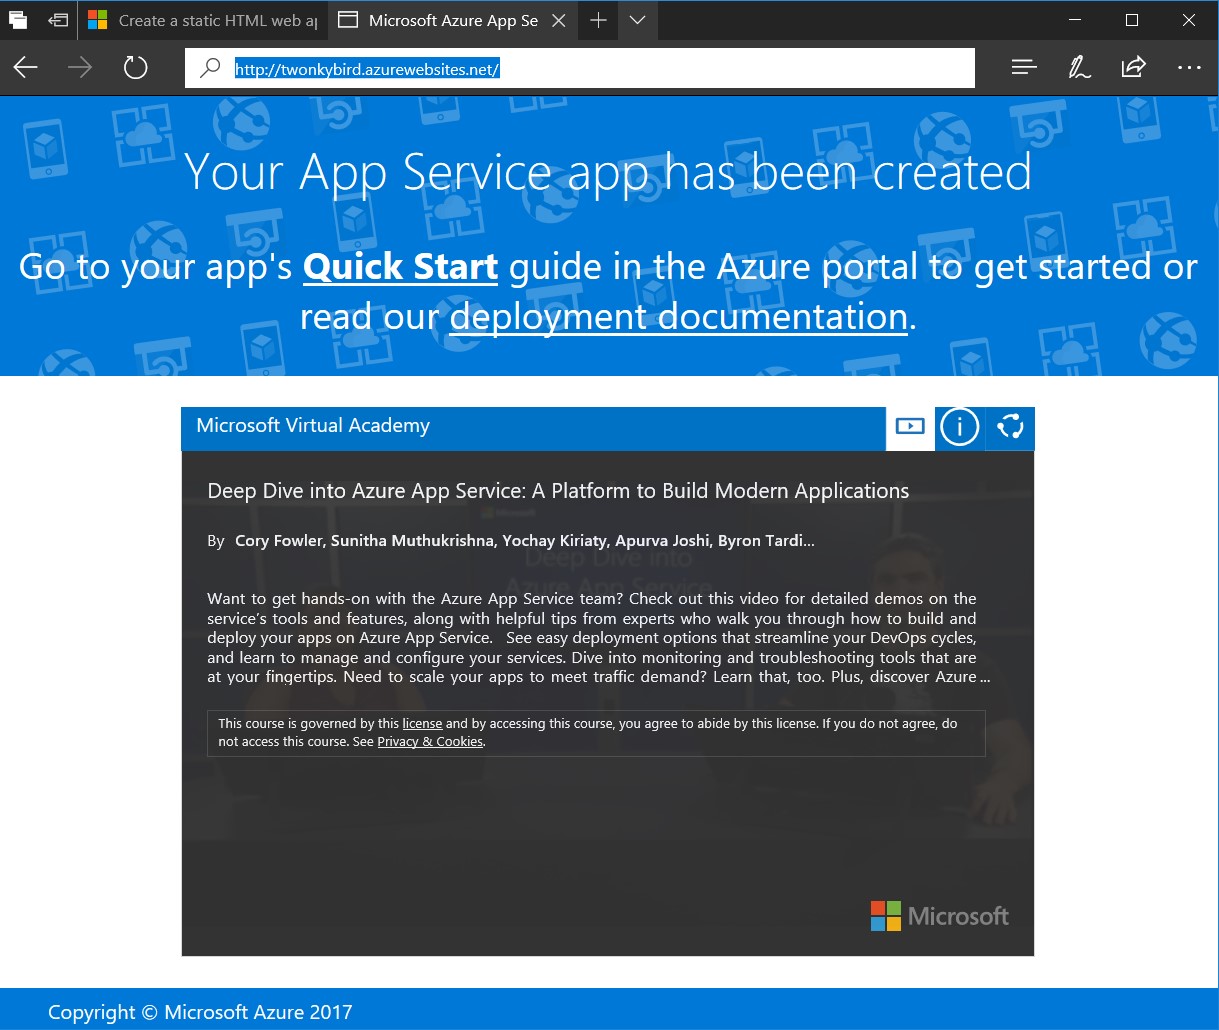
Create the Web App. The name for the Web App must be globally unique as it forms part of the FQDN. You will be prompted to change it if it already exists.
az webapp create --name $appName --resource-group $rg --plan quickStartPlan
- Again, there will be output JSON when the command succeeds
- Open your web browser and navigate to
http://<unique_app_name>.azurewebsites.net. (You will also find the link in the new web app in the Azure portal.) - You should see a ‘placeholder’ web page – this indicates that the web app is running and ready to be configured.
6. Create the Git deployment access point
Create the http endpoint for the deployment:
deployuri=$(az webapp deployment source config-local-git --name $appName --resource-group $rg --query url --output tsv)

echo $deployuri
-
The first command create an https endpoint similar to below, and then saves that value into the $deployuri variable. The second prints the variable to screen, e.g.
https://<username>@<appname>.scm.azurewebsites.net/<appname>.git -
Note the scm section of the URL - this is the Kudu address. We’ll come back to that later
7. Add a Git remote called Azure and then push to the Web App
Create the Git remote, calling it azure:
git remote add azure $deployuri

git remote -v
Push the master branch of the local html repo up to the azure remote:
echo $pwd

git push azure master
Refresh the web page and confirm that it has changed.
8. Change the HTML and push again to the Web App
Edit the index.html to change the Twitter account to your own. You can use nano index.html, or vi index.html for those familiar with using terminal editors. Or you may go into the web app in the portal and use the App Service Editor in the blade and edit the index.html directly in the browser.
Commit the change, and then push it up to the azure remote:
git commit -a -m "Description of the change"

git push azure master
Refresh the web page and confirm that it has been changed as expected.
If you have time:
There is a rich ecosystem built around the PaaS applications. If you have time then explore the ecosystem for Web Apps
- Browse the blade in the portal, checking out deployment slots, scale up and out, App Service Editor and Application Insights
- Click on your website link. Access Kudu by inserting scm before azurewebsites.net, i.e.
https://<website>.scm.azurewebsites.net.
Option 2: Use the portal and pull the content in
Azure offers many ways of achieving something, with a view that users should use the tools with which they are most comfortable. This alternative version of the lab is not recommended for larger scale web farms, but does given an insight into the power of PaaS level Web Apps.
- Open the portal
- Click on + New, search for “Web App” and click on Create
- Set the App name to something globally unique, such as azure101<yourname>, as it will form part of the FQDN
- Create a new resource group, and call it Azure101PaaS
- There is a choice of WIndows or Linux based web apps. Retain the WIndows default.
- Click on the app service plan/location so that we can define our own
- create a new App Service Plan called freeTier
- use the same region as the Resource Group
- specify the F1 free tier
- click on OK
- Click on Create
Once the web app has deployed successfully:
- open the App Service blade
- click on the URL in the Overview section
The placeholder web page will be opened in a new tab:
- Scroll down the App Service blade and find App Service Editor in the Development Tools section
- Click on the Go-> link in the main pane. This will open up a new tab containing the App Service Editor environment.
-
Select the Git button on the left

- Set the Repository URL to
https://github.com/richeney/azure101-webapp-html - Click on the Clone from a git URL
- Type
exitonce the clone is complete - Return to your browser tab containing the webpage, and refresh. It should now show an updated page containing some static web page content plus a Twitter feed
- Click on the files icon on the left and then select the index.html
- Edit the index.html file, changing the Twitter account on the twitter-timeline class to your own
- Return the the tab containing the webpage, and refresh. It should now show your Twitter feed instead
If you have time:
- Browse the blade in the portal, checking out deployment options, deployment slots, scale up and out, and Application Insights
- Click on your website link. Access Kudu by inserting scm before azurewebsites.net, i.e.
https://<website>.scm.azurewebsites.net
Leave a comment