
Introduction
These labs have been updated soon for 0.12 compliant HCL. If you were working through the original set of labs then go to Terraform on Azure - Pre 0.12.
In this lab we will build out a core environment, with some of the core networking services you would expect to see in a hub and spoke topology. We will start using multiple .tf files, and we’ll make use of GitHub as our repository so that you get the benefits of version control.
This environment will be the basis of the remaining labs in the workshop, so no need to blow it away at the end of the lab!
Creating a GitHub repository
Git is the dominant source code management (SCM) platform in use today. (Git was created by Linus Torvalds as he found the existing SCM systems to have missing functionality.) Many organisations host their own private Git repositories, including Microsoft. (Microsoft contributed to the Git source code to extend the underlying filesystem in order to host the Windows source code.)
You will create a free public terraform-labs repository on GitHub. GitHub is the largest host of open source code in the world. (This documentation is also hosted on a GitHub repository.)
For this lab you will need to have:
- Git installed locally
- Ensure the git executable is in the operating system path
- For Windows
- Visual Studio Code will not find
- Type
where gitin Command Prompt - Note that git must be found in one of the system path directories
- For Linux and MacOS
- Type
gitin the terminal for Linux or MacOS
- Type
- Check Visual Studio Code (vscode)
- Support for Git is integrated and in-the-box
- Click on the Source Control icon on the left (
CTRL+SHIFT+G) - The top of the main pane should display “SOURCE CONTROL: GIT”
- A GitHub account
OK, let’s create our repository.
- Log into GitHub
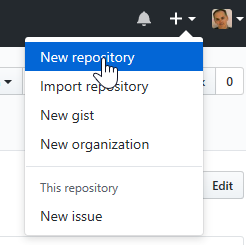
- Click on the
+at the top right and ‘New repository’- Name: terraform-labs
- Description: leave blank
- Public (default)
- Tick the Initialize this repository with a README check box
- Create repository
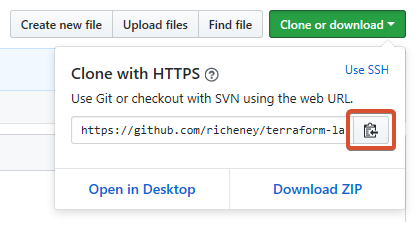
- Click on the green Clone or download button
- Copy the repository URL, which should be similar to
https://github.com/<githubUsername>/terraform-labs.git
Clone the empty terraform-labs repository into vscode:
- Open vscode
- Type CTRL-SHIFT-P to open the Command Palette
- Type
cloneand select Git: Clone - Paste the repository URL and hit enter
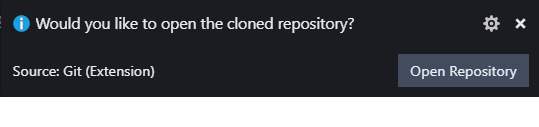
- Select the repository location for the clone
- Once cloned you should see a toast notification
- Click Open Repository
Now that you have cloned the repository locally, your local repository will have an ‘origin’ upstream configured, which is a link back to the original GitHub repository. As you make changes you can commit those to your local repository and then push them upstream to GitHub.
Let’s check that process by modifying the README.md, committing the change and then pushing it upstream:
- Edit the README.md file in vscode
- Add in the following text:
Lab files for https://aka.ms/citadel/terraform workshop. - Save the change
- Click on the Git icon to bring up the SCM area
- Hover over the README.md filename and click on the
+to stage - Type in a commit message, e.g. Updated description
- Click on the
✓to commit - Push up to the ‘origin’ GitHub by either
- clicking on the arrows in the status bar to refresh (both push and pull), or
- clicking on the ellipsis (
...) in the SCM area andPushfrom the context menu
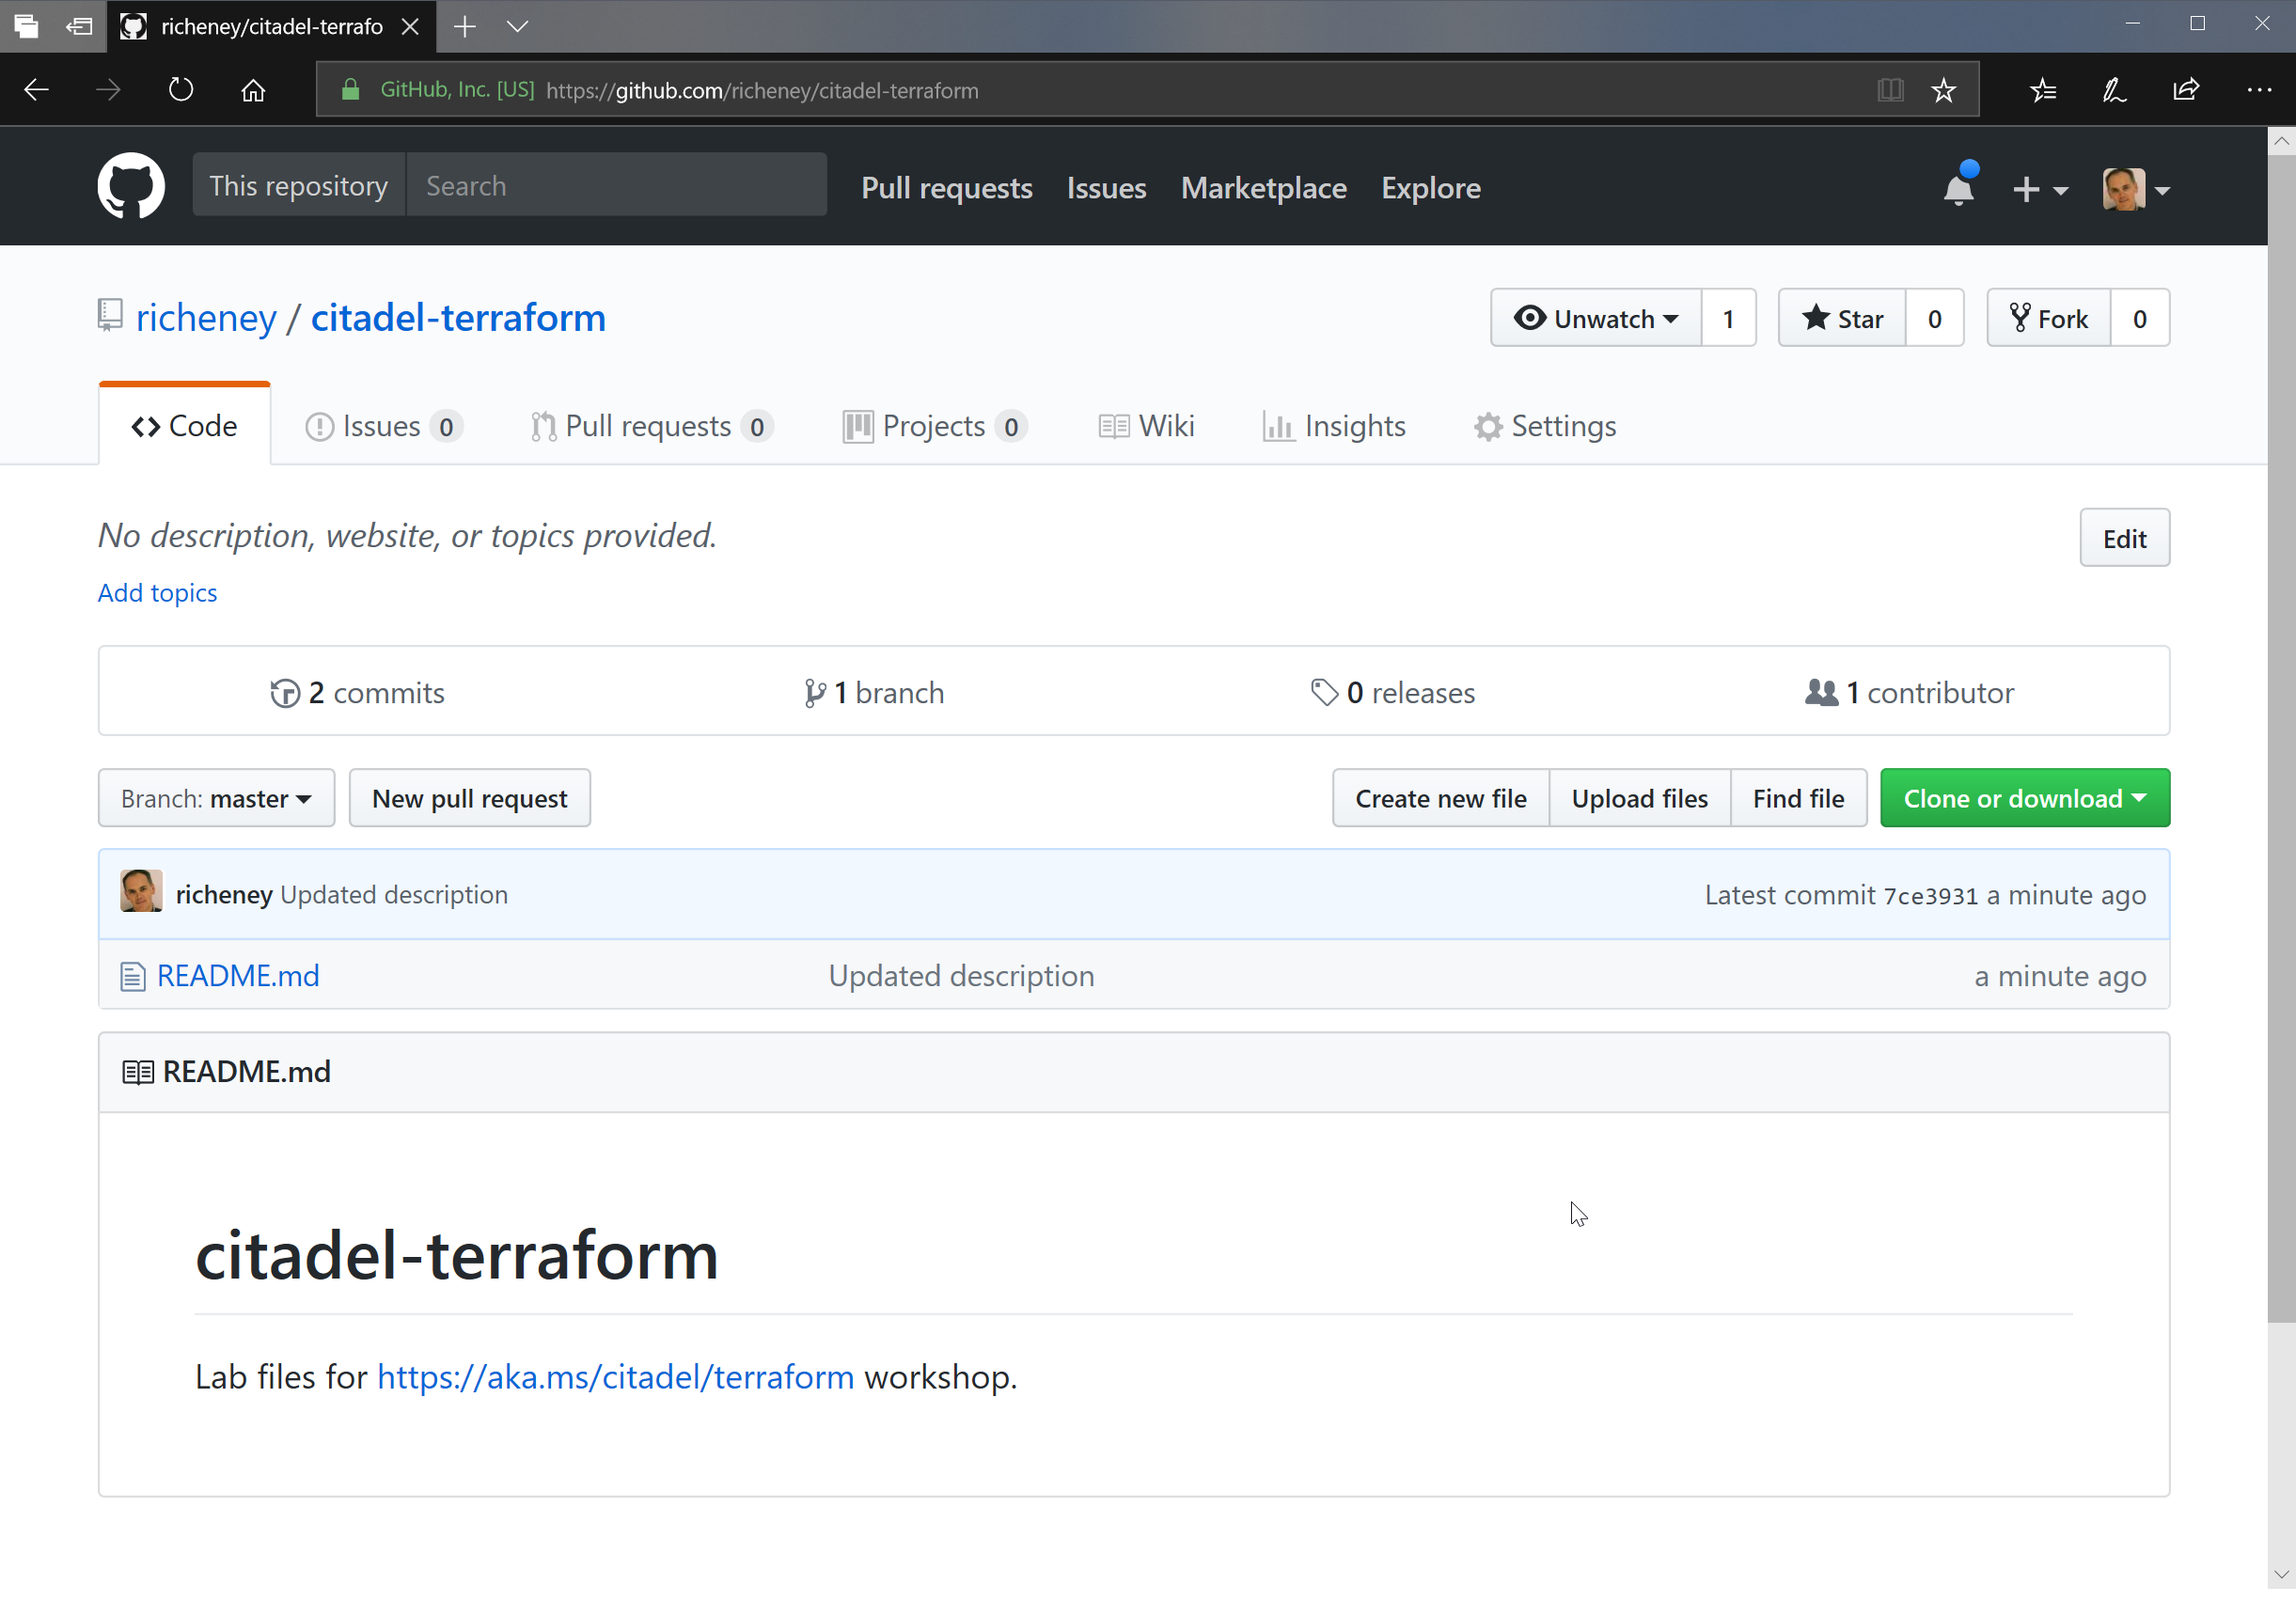
- Once the push has completed then go back into GitHub (
https://github.com/\<githubUsername>/terraform-labs) and refresh - Confirm the README file now shows your committed change
OK, so we can save the files and run terraform commands locally as move through the lab. Don’t forget to periodically commit your changes locally and push them up into your GitHub repository.
Visual Studio Code has a nice smart commit feature. If you have a number of changed files that you want to stage and commit locally in one go, then you can add in the message at the top of the SCM sidebar and do CTRL-ENTER then it will prompt you to enable Smart Commit. You then only need to sync in the status bar to push the files up to GitHub. You are still able to chunk your changed files into separate commits. Just stage your selected files and the Smart Commit will only commit those.
The vscode setting (
CTRL-.) for that is"git.enableSmartCommit": true.
AzureRM Provider documentation
The main documentation area for the Terraform azurerm provider is on the Terraform site itself. Use this short URL to access it quickly:
In this lab we will be creating the following as part of our core environment:
- Virtual Network with three subnets
- VPN Gateway in the GatewaySubnet
- Network Security Groups
Browse the documentation pages for the various provider types. Note that the index on the left lists out the Provider and the Data Sources first. The various Resources are then listed underneath.
For the sake of time we will actually comment out the VPN Gateway in these labs before applying our configuration as it takes a little while to build and it is one of the pricier resources that we will be using.
Organising your .tf files
As we found in the last lab, Terraform will merge together all of the *.tf files in the current working directory, ignoring any files which have a different file extension. By design, Terraform does not recursively walk the directory structure, so any *.tf files in sub-directories will not be considered.
This provides an opportunity to think about how you would organise your files to suit your purposes.
Some admins prefer to have all of the Terraform stanzas in a single and often very large .tf file, often called main.tf.
Some prefer to split out certain top level keywords, e.g.:
$ ls
main.tf
outputs.tf
variables.tf
Others prefer to break out by service or groups of service, e.g.:
$ ls
instances.tf
load-balancers.tf
shared.tf
You may decide how you want to structure your files. This lab will assume that the variables are in their own variables.tf file, and then we’ll essentially have a file per resource group:
$ ls
core.tf
keyvaults.tf
nsgs.tf
variables.tf
The Core resource group will contain our core networking, i.e. the virtual network, three subnets (training, dev and GatewaySubnet) and a VPN gateway.
The NSGs resource group will contain a some simple predefined NSGs. The first is intended for the resource group level and includes a selection of allowed ingress ports.
| NSG Name | Protocol | Port |
| AllowSSH | TCP | 22 |
| AllowHTTP | TCP | 80 |
| AllowHTTPS | TCP | 443 |
| AllowSQLServer | TCP | 1443 |
| AllowRDP | TCP | 3389 |
And then we will a couple of NIC level NSGs for attaching to Windows and Ubuntu servers, allowing RDP and SSH respectively.
Initial variables.tf
- Create a variables.tf file
- Go back into vscode’s explorer view (
CTRL+SHIFT+E) - Hover over the Explorer bar and click on the new file icon
- Name it variables.tf
- Go back into vscode’s explorer view (
- Add in the following variables
variable "loc" {
    description = "Default Azure region"
    default     =   "West Europe"
}

variable "tags" {
    default     = {
        source  = "citadel"
        env     = "training"
    }
}
- Save the file (
CTRL+S) - Close the file (
CTRL+W)
We’ll add to that file as we move through the lab.
Tip: Give your filenames a .tf extension and save them before adding any HCL. The .tf extension will activate the Terraform extension within vscode, along with the intellisense and syntax highlighting.
NSGs
OK, let’s start with the NSGs. We will hardcode these from the name of the resource group to the names of the NSGs and the security rules within them. The initial file includes the NSG intended fo use at the resource group level, and the Ubuntu NSG intended for use at the VM’s NIC. You’ll then add on RFP to the resource_group_default NSG and create a new NSG for Windows.
- Create an nsgs.tf
- Add in the following text
*/resource "azurerm_resource_group" "nsgs" {
   name         = "NSGs"
   location     = "${var.loc}"
   tags         = "${var.tags}"
}

resource "azurerm_network_security_group" "resource_group_default" {
   name = "ResourceGroupDefault"
   resource_group_name  = "${azurerm_resource_group.nsgs.name}"
   location             = "${azurerm_resource_group.nsgs.location}"
   tags                 = "${azurerm_resource_group.nsgs.tags}"
}

resource "azurerm_network_security_rule" "AllowSSH" {
    name = "AllowSSH"
    resource_group_name         = "${azurerm_resource_group.nsgs.name}"
    network_security_group_name = "${azurerm_network_security_group.resource_group_default.name}"

    priority                    = 1010
    access                      = "Allow"
    direction                   = "Inbound"
    protocol                    = "Tcp"
    destination_port_range      = 22
    destination_address_prefix  = "*"
    source_port_range           = "*"
    source_address_prefix       = "*"
}

resource "azurerm_network_security_rule" "AllowHTTP" {
    name = "AllowHTTP"
    resource_group_name         = "${azurerm_resource_group.nsgs.name}"
    network_security_group_name = "${azurerm_network_security_group.resource_group_default.name}"

    priority                    = 1020
    access                      = "Allow"
    direction                   = "Inbound"
    protocol                    = "Tcp"
    destination_port_range      = 80
    destination_address_prefix  = "*"
    source_port_range           = "*"
    source_address_prefix       = "*"
}


resource "azurerm_network_security_rule" "AllowHTTPS" {
    name = "AllowHTTPS"
    resource_group_name         = "${azurerm_resource_group.nsgs.name}"
    network_security_group_name = "${azurerm_network_security_group.resource_group_default.name}"

    priority                    = 1021
    access                      = "Allow"
    direction                   = "Inbound"
    protocol                    = "Tcp"
    destination_port_range      = 443
    destination_address_prefix  = "*"
    source_port_range           = "*"
    source_address_prefix       = "*"
}

resource "azurerm_network_security_rule" "AllowSQLServer" {
    name = "AllowSQLServer"
    resource_group_name         = "${azurerm_resource_group.nsgs.name}"
    network_security_group_name = "${azurerm_network_security_group.resource_group_default.name}"

    priority                    = 1030
    access                      = "Allow"
    direction                   = "Inbound"
    protocol                    = "Tcp"
    destination_port_range      = 1443
    destination_address_prefix  = "*"
    source_port_range           = "*"
    source_address_prefix       = "*"
}

resource "azurerm_network_security_group" "nic_ubuntu" {
   name = "NIC_Ubuntu"
   resource_group_name  = "${azurerm_resource_group.nsgs.name}"
   location             = "${azurerm_resource_group.nsgs.location}"
   tags                 = "${azurerm_resource_group.nsgs.tags}"

    security_rule {
        name                       = "SSH"
        priority                   = 100
        direction                  = "Inbound"
        access                     = "Allow"
        protocol                   = "Tcp"
        source_port_range          = "*"
        destination_port_range     = 22
        source_address_prefix      = "*"
        destination_address_prefix = "*"
  }
}
The resource blocks show the two different ways that you can define NSGs. The resource_group_default has separate resource stanzas for the NSG rules, which are then attached to the empty NSG resource. The Ubuntu NSG resource includes a security_rule block within it.
Steps:
- Save the file
- Open a terminal
- Either open a separate terminal or just use the integrated terminal in vscode (
CTRL+') - If in a separate terminal then change to your local repository directory
- Run
ls -lto check that the nsgs.tf and variables.tf are there
- Either open a separate terminal or just use the integrated terminal in vscode (
- Log in to Azure (
az login)- Check your context (
az account show)
- Check your context (
Terraform has a few ways of authenticating the azurerm provider. In the first couple of labs we used the Cloud Shell, and the context included
"cloudShellID": true. Cloud Shell uses a variant of Managed Service Identity (MSI) which is also used by the Terraform marketplace offering.In this lab you will be using the Azure CLI authentication, which is good for local development work. In later labs we will make use of Service Principals, which is my preferred mechanism for multi-admin and/or multi-tenanted environments.
- Run through the init -> plan -> apply workflow
-
Check your new NSGs resource group in the portal
- Add in a new NSG for Windows servers called nic_windows to nsgs.tf
- Include an embedded security_rule to allow RDP traffic (port 3389)
- Add a new NSG rule called AllowRDP and link it to the existing resource_group_default NSG
- Rerun the plan -> apply workflow
Note the additions and changes highlighted in the plan.
Core networking
OK, time for you to get a little self sufficient and create a coreNetwork.tf file for our core networking.
This lab is designed to get you to start working with the https://aka.ms/terraform documentation area. Note that you’ll have to scroll past the data sources on the left to get to the resource types. (The data sources are used to get information about existing Azure resources.)
You may also make use of the snippets that came with one of the modules. Type CTRL-SPACE and then type tf-azurerm_resource_group to get an example snippet copied into your file. The snippets do not cover all resource types - for instance the azurerm_virtual_network_gateway is not currently in the set - but can be useful in quickly creating .tf files.
Note that we will create a stanza for the VPN Gateway. but for the sake of time we will default to commenting it out as it takes around 45 minutes to run.
- Create a coreNetwork.tf file containing:
- Resource Group
- Name: core
- Location: use the loc variable
- Tags: use the tags variable
- Match the Terraform id to the ARM resource name unless specified otherwise
- Ensure all following resources are in this resource group and inherit the tags and location
- Public IP
- Name: vpnGatewayPublicIp
- Dynamically allocated
- Virtual Network
- Name: core
- Address space: 10.0.0.0/16
- DNS servers: 1.1.1.1 & 1.0.0.1 (the Cloudflare public DNS servers)
- Subnets
- GatewaySubnet: 10.0.0.0/24
- training: 10.0.1.0/24
- dev: 10.0.2.0/24
- VPN Gateway
- Name: vpnGateway
- Route based VPN on the basic SKU
- BGP should be enabled
- IP Configuration:
- Name: vpnGwConfig1
- Use the Public IP
- Use a dynamically allocated private IP
- Use the GatewaySubnet
- Resource Group
If you get stuck then the bottom of this lab has a link to a set of files that you can reference. Visual Studio Code also has a very good compare tool.
- Run through the terraform init and plan to confirm that everything will run through ok
Note that we will comment out the VPN Gateway stanza to save time and money Don’t run
terraform applytoo quickly!
- Use the multiline comment format to comment out the VPN Gateway stanza
There are a couple of ways of commenting in HCL:
 # This is a single line comment

 /* And this is a multi line
 comment */
- Rerun the plan and confirm that the gateway now won’t be created
- Apply the configuration
Commit your changes
If you look at the Source Control view in vscode then you should see a number of pending changes in there. Really we only want to commit the files we have been creating rather than the ones that have been generated by the terraform commands, and we can control that through the use of a .gitignore file.
- Create a file called .gitignore
- Add in the following text
.terraform/*
terraform.tfstate
terraform.tfstate.backup
- Save and close the file
The .gitignore exclusions should grey out the Terraform system files in the vscode Explorer, and in Source Control the pending changes should now be restricted to your *.tf files and the new .gitignore.
- Stage and commit using “End of lab 3” as the message
- Push the changes into your terraform-labs GitHub repo
End of Lab 3
We have reached the end of the lab. You have started to use GitHub and work with multiple resource groups, resources and .tf files. We also deployed a very simple set of core resources that we can leverage in the following labs.
The .tf files in tour repository should look somewhat similar to those in https://github.com/richeney/terraform-pre-012-lab3, although you may have spread your Terraform stanzas across your .tf files differently dependent on how you have it organised.
In the next lab we will look at some of the meta parameters that you can use in Terraform to gain richer functionality.
Leave a comment