
Introduction
You can go a long way with Terraform making use of hard coded stanzas or defaulted variables. If you have a simpler configuration or don’t mind manually editing the files to configure the variables then this is a simple way to manage your Terraform files. However we are looking to build up reusable IP that will work in a multi-tenanted environment, and will prove to be more robust over time as we update those building blocks.
In this lab we will leverage some of the functions and meta parameters that you can use within HCL. Some of the richer configuration examples that you see will make extensive use of these meta parameters so you will need to have an idea of what they do if you want to leverage the work of others.
We’ll also look at the various ways that we can define variables.
Reference documentation
There are a few key pages on the Terraform site that you will come back to often:
| Interpolation Syntax | Variables, conditionals, functions, count, mathematical operations |
| Variables | Strings, lists, maps, booleans, environment variables and variable files |
| Locals | Local values and how to use them |
| Data Sources | Using data sources |
| Outputs | Defining outputs |
Interpolation
You have already been using interpolation. Terraform has interpreted everything wrapped in "${ ... }". So far this has been limited to referencing variables (e.g. "${var.loc}") or the exported attributes of various resource types (e.g. "${azurerm_resource_group.nsgs.location}").
Terraform has a rich syntax covered on the interpolation syntax page.
- Scroll through the interpolation page to familiarise yourself with the breadth of capability
Question:
What is the self variable and what does it do? How would the interpolation expression look for finding out the location of the current resource?
Answer:
The special self variable is a shorthand to refer to the current resource stanza. You can use "${self.location}" to reference the location of the current resource. It only works within provisioners, which are covered in a later lab.
Question:
If you had a boolean variable called createResource then you could make use of count with in if-then-else expression to control whether a resource is created or not. How does that work?
Answer:
count = "${var.createResource ? 1 : 0}"
Question:
Syntactically, what is the difference between "${var.index-count - 1}" and "${var.index-count-1}"
Answer:
"${var.index-count - 1}" subtracts 1 from a variable called index-count. "${var.index-count-1}" returns the value of a variable called index-count-1.
Initial webapp.tf file
Count is a useful meta parameter, and allows for multiple resources to be configured. Let’s work through an example to get some familiarity with it. We’ll use the web app PaaS service, and deploy them to multiple locations
- Change the existing loc variable from “West Europe” to the shortname “westeurope”
- The azurerm provider is intelligent enough to know that this is not a change
- Create a new webapplocs list variable
- Set the default to contain the shortnames of a few regions from
az account list-locations --output table - E.g.
[ "eastus2", "uksouth", "centralindia" ]
- Set the default to contain the shortnames of a few regions from
- Create a new webapps.tf file
- Define a new resource group called webapps
- Use the loc and tags variables as per normal
- Note that the resource group location only determines the region for the resource group’s metadata
- Add in the following code block which deploys a free tier plan and a linux web app to a single region
- Define a new resource group called webapps
resource "random_string" "webapprnd" {
  length  = 8
  lower   = true
  number  = true
  upper   = false
  special = false
}

resource "azurerm_app_service_plan" "free" {
    name                = "plan-free-${var.loc}"
    location            = "${var.loc}"
    resource_group_name = "${azurerm_resource_group.webapps.name}"
    tags                = "${azurerm_resource_group.webapps.tags}"

    kind                = "Linux"
    reserved            = true
    sku {
        tier = "Free"
        size = "F1"
    }
}

resource "azurerm_app_service" "citadel" {
    name                = "webapp-${random_string.webapprnd.result}-${var.loc}"
    location            = "${var.loc}"
    resource_group_name = "${azurerm_resource_group.webapps.name}"
    tags                = "${azurerm_resource_group.webapps.tags}"

    app_service_plan_id = "${azurerm_app_service_plan.free.id}"
}
- Save your files
- Run through the Terraform init, plan and apply workflow to test the deployment
- Show the id for the plan:
echo azurerm_app_service_plan.free.id | terraform console - Show the web address:
echo azurerm_app_service.citadel.default_site_hostname | terraform console - Commit and push
Using count
OK, we’ll now modify the app service plan and app service stanzas to make them multi-region. This is done by using the count meta parameter.
Note that the example still uses the Linux free tier. In some subscription offers this will be limited to one per subscription. If so then either switch to Windows, or change the sku and tier tro Standard and S1 respectively.
Here is a dummy example:
resource "azurerm_provider_type" "terraformid" {
    count               = 3
    name                = "cosmeticname-count.index"
    location            = "${var.webapplocs[count.index]}"
    resource_group_name = "${azurerm_resource_group.webapps.name}"
    tags                = "${azurerm_resource_group.webapps.tags}"

    kind                = "Linux"
    sku {
        tier = "Free"
        size = "F1"
    }
}
, which may be as set to something simple such as count = 2 or a numeric variable, such as count = "${var.nlocs}". However we’ll set this to the number of locations we have in the webapplocs list variable.
We can then reference ${count.index} in the stanzas. Remember that we can slice out a single list element. For instance you can select the first element of a variable called myList using ${var.myList[0]}.
- Change the azurerm_app_service_plan.free and azurerm_app_service.citadel stanzas
- Add a new count argument based on the length of the webapplocs list variable
- Change location to the correct webapplocs element using
${count.index} - Change the resource name to use the same region shortname as a suffix, replacing
${var.loc}
- Save the webapps.tf file
Again, if at any point you find yourself struggling then you can always take a look at the lab files in the link at the bottom of the page.
If you run the terraform plan at this point then it should error, saying that it can no longer find azurerm_app_service_plan.free.id.
The azurerm_app_service_plan.free.id is the Azure Resource Manager ID for the app service plan, and is used as the value of the app_service_plan_id argument in the app service stanza.
We now have multiple app service plans spread around the globe, and so Terraform automatically generates am array rather than a single string, and introduces a special syntax form called the splat syntax. So rather then the single azurerm_app_service_plan.free.id, we now use azurerm_app_service_plan.free.*.id to access the list of Azure resource IDs generated by introducing count. And you can pull out a single element from that list using the element() function.
- Change the app_service_plan_id attribute value to
"${element(azurerm_app_service_plan.free.*.id, count.index)}" - Run the terraform plan and apply steps
- List out the app service plan ids and web app hostnames using the splat syntax:
echo "azurerm_app_service_plan.free.*.id" | terraform consoleecho "azurerm_app_service.citadel.*.default_site_hostname" | terraform console
Multiple web apps per location
One really nice feature of the element() function is that it automatically wraps, acting like a mod operator. So if you wanted to have a number of web apps at each location you could create a new variable, multiply up the count and use the element function rather than a straight list index.
Here is an example of the two stanzas plus a local variable. Note that you do not need to make these changes to your webapps.tf file. We’ll also cover locals a little later in this lab.
locals {
    webappsperloc   = 3
}

resource "azurerm_app_service_plan" "free" {
    count               = "${length(var.webapplocs)}"
    name                = "plan-free-${var.webapplocs[count.index]}"
    location            = "${var.webapplocs[count.index]}"
    resource_group_name = "${azurerm_resource_group.webapps.name}"
    tags                = "${azurerm_resource_group.webapps.tags}"

    kind                = "Linux"
    reserved            = true
    sku {
        tier = "Free"
        size = "F1"
    }
}

resource "azurerm_app_service" "citadel" {
    count               = "${ length(var.webapplocs) * local.webappsperloc }"
    name                = "${format("webapp-%s-%02d-%s", random_string.webapprnd.result, count.index + 1, element(var.webapplocs, count.index))}"
    location            = "${element(var.webapplocs, count.index)}"
    resource_group_name = "${azurerm_resource_group.webapps.name}"
    tags                = "${azurerm_resource_group.webapps.tags}"

    app_service_plan_id = "${element(azurerm_app_service_plan.free.*.id, count.index)}"
}
The stanza for the app service plans is unchanged. The count for the app service plans is still based on the number of regions.
The app_service stanza is very different. For starters, the count for the web apps is now the number of regions multiplied by the webappsperloc local:
"${ length(var.webapplocs) * local.webappsperloc }"
The location makes use of element to loop round the locations. So if there are five locations (0-4), then location 0 would be used when count.index is 0, 5 and 10.
"${element(var.webapplocs, count.index)}"
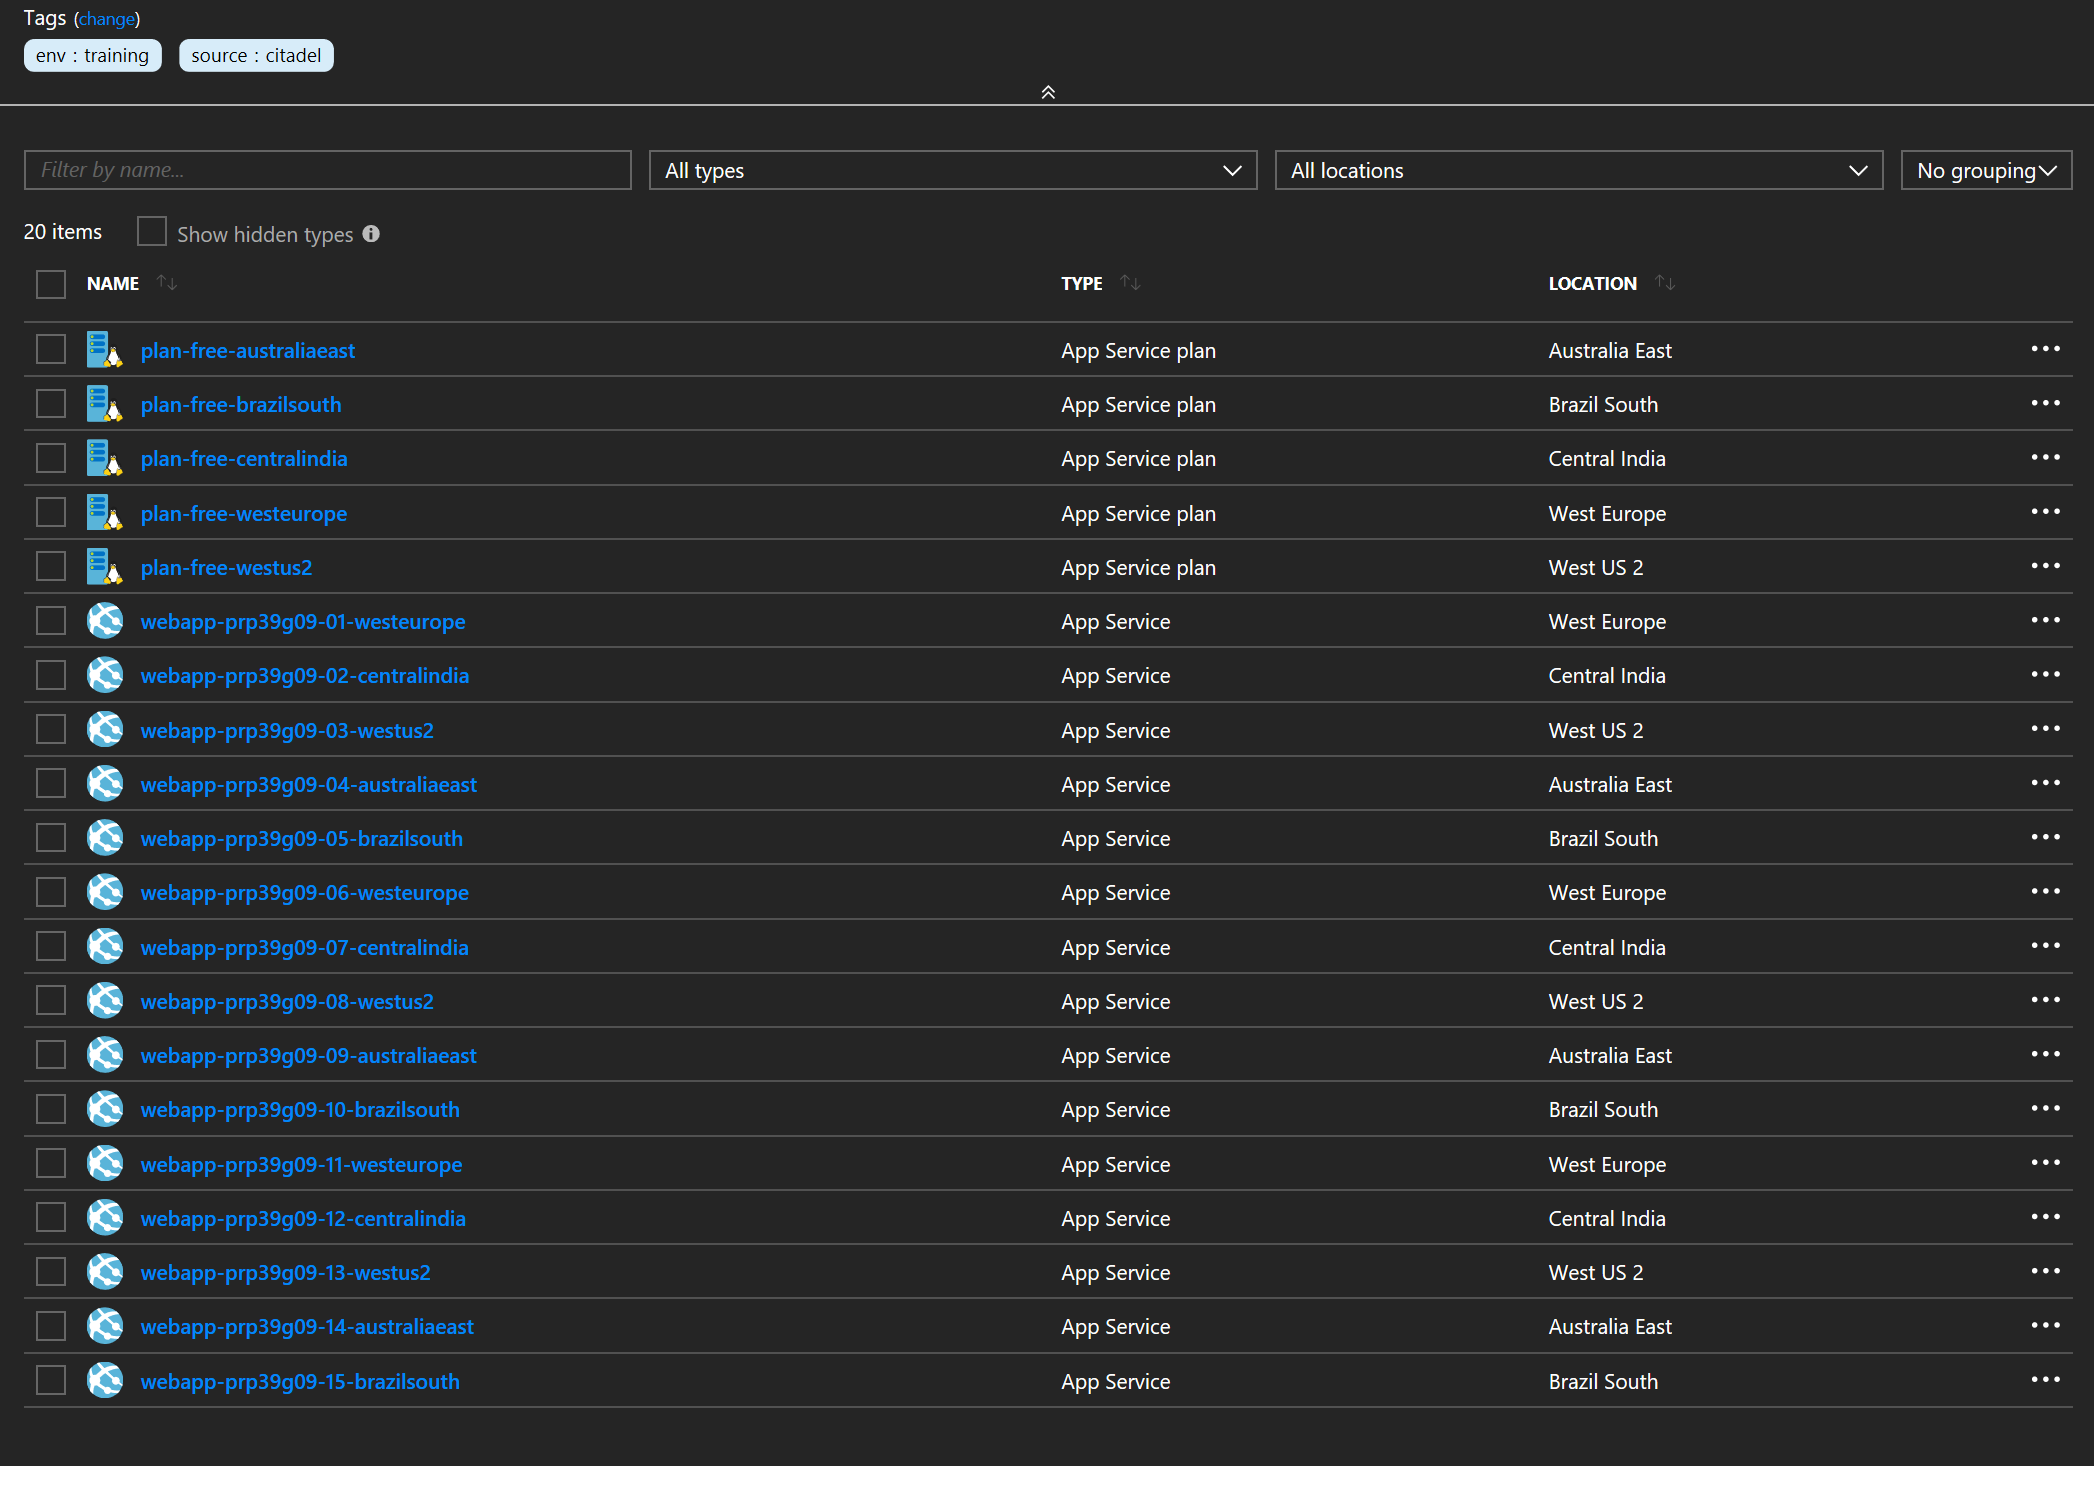
And the naming has been formatted better, to include the count index which has been incremented by one (to be more natural for us humans) and zero filled. Again we are now using element for the region shortname suffix.
"${format("webapp-%s-%02d-%s", random_string.webapprnd.result, count.index + 1, element(var.webapplocs, count.index))}"
And here is the end result after running through the workflow:
OK, so that is the basics for using copy. For those who are familiar with copy in ARM templates then it is roughly comparable with some important differences:
- ARM supports copy at both the resource and sub-resource level (for those array defined sub-resources such as subnets, data disks, NICs etc.)
- Terraform supports count at the resource stanza level only
- Not all Terraform resource types support the use of the count meta parameter
- Whilst ARM supports count for sub-resources with a list type (such as NICs, data disks and subnets), these are commonly managed in Terraform as separate resource stanzas with their own provider type
- The generated splat lists are then referenced by other provider types
- Terraform supports a count of zero whereas ARM template currently do not
- Therefore count is also used to control whether a resource is deployed at all, covering the ARM template condition functionality
Variables
The variable page is your one stop reference for how to feed in variables. So far we have used the variable keyword to declare our variables and we have used default values.
Let’s take the example of our loc variable and see a few different ways of overriding the default and setting it to UK South.
Environment variables
You may use environment variables for your terraform commands. All environment variable names must be prefixed with TF_VAR_, so if your variable name is loc then the environment variable setting would look like this:
export TF_VAR_loc=uksouth
terraform apply
Or you may set it only for the duration of that single command line, e.g. TF_VAR_loc=uksouth terraform apply.
Inline variables
You can also set the parameters inline, e.g. terraform apply -var 'loc=uksouth'. You may use -var multiple times.
Using .tfvars files
If you have a lot of variables to set then you can place them in a file. By convention these are suffixed with .tfvars.
Think of the variables.tf as your variable declarations, where you define which variables are required and configure default values where sensible. The variables.tfvars file can then be used to set the values. If you specify a value for a variable in variables.tfvars then it will override the default in variables.tf.
This is analogous to declaring your ARM template parameters in the parameter section of the main azuredeploy.json template, and then setting the values in a azuredeploy.parameters.json file.
Each line should be of the straighforward loc=uksouth format. You can then use -var-file varfilename as a switch. However if your variable file is called terraform.tfvars or .auto.tfvars then it will be loaded automatically.
Combinations of the above
You can use multiple of these. One approach is to use environment variables for sensitive connectivity information (such as the service principal information we’ll see in a later lab), to have standard customer variables in a terraform.tfvars file and then use -var switches as overrides.
You will be prompted to interactively enter any variable values if they are have not been defined using any of these mechanisms.
Create a terraform.tfvars file
Let’s create a tfvars file and add our variable values in there rather than relying on the defaults. We will use the same values so that we don’t make a real change to our environment. We’ll also remove the default for the webapplocs in variables.tf.
- Create a terraform.tfvars file
- Add in the following block to set the loc and tags:
loc     = "westeurope"
tags    = {
    source  = "citadel"
    env     = "training"
}
- Add in your webapplocs value
- Set the default webapplocs to an empty list
- Run
terraform planto confirm that there are no planned changes
Using terraform plan to confim that there are no changes is good practice when you are reorganising your files, as it is a sense check that no unintentional changes have been introduced.
You can check that files linked to at the bottom of the lab if you get stuck.
Locals
Taking the ‘infrastructure as code’ analogy a little further, you can think of normal variables as being the equivalent of global variables, and locals as being the local variables in a sub-routine or similar.
Locals are variables that are scoped to the .tf that they are stated in. The formatting is essentially a map of name value pairs for each local variable. Here is an example setting and usage, using the web app example stanza:
locals {
    app_regions     = [ "eastus2", "uksouth", "centralindia" ]
    default_prefix  = "webapp-${var.tags["env"]}"
    app_prefix      = "${var.app_prefix != "" ? var.app_prefix : local.default_prefix}"
}

resource resource "azurerm_app_service" "citadel" {
    count               = "${length(local.app_regions)}"
    name                = "${format("%s-%s-%s", local.app_prefix, random_string.webapprnd.result, local.app_regions[count.index])}"
    location            = "${local.app_regions[count.index]}"
    resource_group_name = "${azurerm_resource_group.webapps.name}"
    tags                = "${azurerm_resource_group.webapps.tags}"

    app_service_plan_id = "${element(azurerm_app_service_plan.free.id, count.index)}"
}
They are very useful for localised hard coding, and also for locally defaulting values as shown in the local.app_prefix logic.
Outputs
You can define attributes to be exported as outputs. One of the benefits of using outputs is that the outputs are listed at the end of the terraform apply output.
Outputs are defined as standalone stanzas and can be placed in any of your .tf files. Here is an example:
output "network_interface_ids" {
  description = "ids of the vm nics provisoned."
  value       = "${azurerm_network_interface.vm.*.id}"
}
Add an output to webapps.tf
- Add a webapp_ids output to your webapps.tf file, to list out the ids for all of your webapps
- Run the terraform plan and apply workflow
You should see output similar to the following:
:

Apply complete! Resources: 0 added, 0 changed, 0 destroyed.

Outputs:

webapp_ids = [
    /subscriptions/2d31be49-d959-4415-bb65-8aec2c90ba62/resourceGroups/webapps/providers/Microsoft.Web/sites/webapp-rtplste0-westeurope,
    /subscriptions/2d31be49-d959-4415-bb65-8aec2c90ba62/resourceGroups/webapps/providers/Microsoft.Web/sites/webapp-rtplste0-eastasia,
    /subscriptions/2d31be49-d959-4415-bb65-8aec2c90ba62/resourceGroups/webapps/providers/Microsoft.Web/sites/webapp-rtplste0-brazilsouth,
    /subscriptions/2d31be49-d959-4415-bb65-8aec2c90ba62/resourceGroups/webapps/providers/Microsoft.Web/sites/webapp-rtplste0-eastus2
]
You can also show the outputs in the current state file using the terraform output command. You can also output in JSON format if reading into languages such as Python or using with linux commands such as the jq filter:
terraform-labs$ terraform output
webapp_ids = [
    /subscriptions/2d31be49-d959-4415-bb65-8aec2c90ba62/resourceGroups/webapps/providers/Microsoft.Web/sites/webapp-rtplste0-westeurope,
    /subscriptions/2d31be49-d959-4415-bb65-8aec2c90ba62/resourceGroups/webapps/providers/Microsoft.Web/sites/webapp-rtplste0-eastasia,
    /subscriptions/2d31be49-d959-4415-bb65-8aec2c90ba62/resourceGroups/webapps/providers/Microsoft.Web/sites/webapp-rtplste0-brazilsouth,
    /subscriptions/2d31be49-d959-4415-bb65-8aec2c90ba62/resourceGroups/webapps/providers/Microsoft.Web/sites/webapp-rtplste0-eastus2
]

terraform-labs$ terraform output -json
{
    "webapp_ids": {
        "sensitive": false,
        "type": "list",
        "value": [
            "/subscriptions/2d31be49-d959-4415-bb65-8aec2c90ba62/resourceGroups/webapps/providers/Microsoft.Web/sites/webapp-rtplste0-westeurope",
            "/subscriptions/2d31be49-d959-4415-bb65-8aec2c90ba62/resourceGroups/webapps/providers/Microsoft.Web/sites/webapp-rtplste0-eastasia",
            "/subscriptions/2d31be49-d959-4415-bb65-8aec2c90ba62/resourceGroups/webapps/providers/Microsoft.Web/sites/webapp-rtplste0-brazilsouth",
            "/subscriptions/2d31be49-d959-4415-bb65-8aec2c90ba62/resourceGroups/webapps/providers/Microsoft.Web/sites/webapp-rtplste0-eastus2"
        ]
    }
}

terraform-labs$ terraform output -json | jq -r '.webapp_ids.value[] | select(endswith("brazilsouth"))'
/subscriptions/2d31be49-d959-4415-bb65-8aec2c90ba62/resourceGroups/webapps/providers/Microsoft.Web/sites/webapp-rtplste0-brazilsouth
End of Lab 4
We have reached the end of the lab. You have made use of count and count.index and also been introduced to a few other areas such as ways of setting variables, using locals and defining outputs.
Your .tf files should look similar to those in https://github.com/richeney/terraform-pre012-lab4.
With everything we have looked at so far you can develop some pretty complex configurations. In the next lab we will move away from the Coud Shell or Azure CLI authentication we have used to date, and start using Service Principals.
Leave a comment