
Introduction
In this lab we will look at other providers that can help with our Azure deployments. One of the reasons for choosing Terraform is the extensible support for multiple providers so that the same workflow and logic can be applied to various public and private cloud platforms.
The same provider extensibility also applies to supporting services and data plane configuration. In this lab we will look at examples from Cloudflare and Datadog, and then we’ll deploy an Azure Kubernetes Service (AKS) Kubernetes cluster using a combination of the AzureRM provider for the control plane and the Kubernetes provider for the data plane.
We will also:
- Evolve our use of modules with a nested module
- Look at locals, keepers and the lifecycle meta-parameter
- Use a more natural workflow to create and test a new module locally
- Create a upstream GitHub repository and push our code to it
Let’s start by exploring alternative providers.
Example Providers
Take a look at the range of Terraform Providers available. It is a wide and expanding list, covering a multitude of private and public cloud platforms, various applications, supporting technologies and cloud services such as public DNS.
All of the Providers follow the same documentation standard as the AzureRM Provider.
Datadog
Datadog is used by 1000’s of customers as their platform for modern monitoring and analytics, and it has over 200 integrations with various cloud services, including a number of Azure services.
The Datadog Provider is relatively simple, with a couple of key variables for the API to authenticate with, and four possible resource types:
- datadog_downtime
- datadog_monitor
- datadog_timeboard
- datadog_user
This allows the monitoring to be configured automatically as one facet of the wider Terraform configuration.
Cloudflare
Cloudflare offer a number of services including fast authoritative public DNS servers on 1.1.1.1 and 1.0.0.1. They are very fast in terms of DNS lookup latency and speed of DNS record propagation.
These are widely used as an alterative to other well known public DNS servers such as Google’s 8.8.8.8 and 8.8.4.4, and have a free tier for personal use.
The Cloudflare Provider is authenticated using an email address for the Cloudflare account plus an API token. There are a few more resource types available:
- cloudflare_load_balancer
- cloudflare_load_balancer_pool
- cloudflare_page_rule
- cloudflare_rate_limit
- cloudflare_record
- cloudflare_load_balancer_monitor
- cloudflare_zone_settings_override
Again, the options here extend what is possible in a Terraform configuration.
Kubernetes
There are a number of different container orchestration technologies, but Kubernetes has essentially won that war and is now the de facto orchestrator technology for hyperscale cloud platforms. If you are unfamiliar with Kubernetes, then spend a few minutes to read the Kubernetes core concepts.
The Terraform Kubernetes Provider has a couple of authentication options, and includes a wide array of resource types and also a couple of data types. It can take a base Kubernetes cluster and its running components, and then schedule the Kubernetes resources, like pods, replication controllers, services, etc.
But it does need a base Kubernetes cluster first…
Azure Kubernetes Service (AKS)
In this lab we will create an Azure Kubernetes Service (AKS) cluster using the azurerm_kubernetes_cluster resource type. We will then use the Kubernetes provider to do additional configuration on top of the AKS deployment. This lab will demonstrate how you can use multiple Providers to achieve the end goal, and how to link them by using the exported attributes of one Provider type as arguments to another Provider type.
If you are not familiar with AKS, it is a Kubernetes cluster where you only have to pay for the compute nodes. If you want to see how it is created manually via the CLI then use this tutorial. A few key AKS features include:
- The Kubernetes management plane is provided as a free Platform-as-a-Service (PaaS) service!
- The Open Service Broker for Azure (OSBA) simplifies integration with other Azure PaaS services
- The Virtual Kubelet Provider for Azure Container Instances (ACI) enables limitless bursting (experimental open source project)
Note that we will only be using the core AKS functionality in this lab, with a simple demo container image.
Create the AKS module
We’ll take this lab in stages.
- Initialise the module area
- Add API permissions to Azure Active Directory to your Terraform service principal
- Define the terraform-module-aks module and the service_principal sub-module
- Create an SSH key pair
- Test locally with a customised providers.tf file
- Commit locally
- Add GitHub as a remote repository and push to it
- Test our code as a module
- Add the additional Kubernetes configuration
- Re-test
The Terraform configuration in this section is loosely based on Nic Jackson’s blog post, updated with some of Lawrence Gripper’s excellent AKS repo.
Initialise the module area
Create a local module area called terraform-aks-module by following the lab steps below. It is assumed that you are starting in the terraform-labs directory.
- Run the following commands to initialise the module area and open it in a new VSCode window
mkdir -m 750 ../terraform-module-aks
cd ../terraform-module-aks
git init
touch variables.tf main.tf outputs.tf manifest.json
mkdir service_principal
touch service_principal/variables.tf service_principal/main.tf service_principal/outputs.tf
code .
Insufficient directory permissions?
One feature of this lab is that it shows how to configure the Terraform service principal with sufficient API permissions to use the azurerm_service_principal resource type in order to create the AKS service principal on the fly. There isn’t a great deal of information available on the internet on how to have one service principal create another, so this lab helps to fill that gap.
However, you may be working in a subscription where you have insufficient directory authority to create users and groups and therefore you cannot successfully assign and use the additional API permissions (For instance this will be true for Microsoft employees using subscriptions associated with the microsoft.com directory.)
You can still complete the lab, but you’ll have to skip the service_principal sub-module and associated API permissions for the Terraform service principal and tweak the main.tf accordingly. Instead we’ll hardcode the AKS service principal ID and secret values to those of your existing Terraform service principal.
There will be two sets of example files at the end of the lab to match whichever path you have taken.
If you cannot create users and groups in your subscriptions directory then look out for sentences in the lab that mention insufficient directory permissions, or instructions blocks wrapped with HTML style <insufficient directory permissions> <list of commands> </insufficient directory permissions> tags.
If you have insufficient directory permissions then skip to the main AKS module.
Add the additional API permissions to your Terraform service principal
The advanced configuration section of Lab 5 explains both custom RBAC roles in ARM, and adding additional API permissions to the service principal’s app registration.
This section adds the required API permissions for the legacy Azure Active Directory API (as per the note at the top of the azurerm_service_principal page).
- Add the following JSON into your manifest.json file:
[
    {
        "resourceAppId": "00000002-0000-0000-c000-000000000000",
        "resourceAccess": [
            {
                "id": "311a71cc-e848-46a1-bdf8-97ff7156d8e6",
                "type": "Scope"
            },
            {
                "id": "1cda74f2-2616-4834-b122-5cb1b07f8a59",
                "type": "Role"
            }
        ]
    }
]
- Update the API permissions for your Terraform service principal’s registered application:
subId=$(az account show --query id --output tsv)
appId=$(az ad sp show --id "http://terraform-${subId}-sp" --query appId --output tsv)
az ad app update --id $appId --required-resource-accesses @manifest.json
az ad app show --id $appId --query requiredResourceAccess
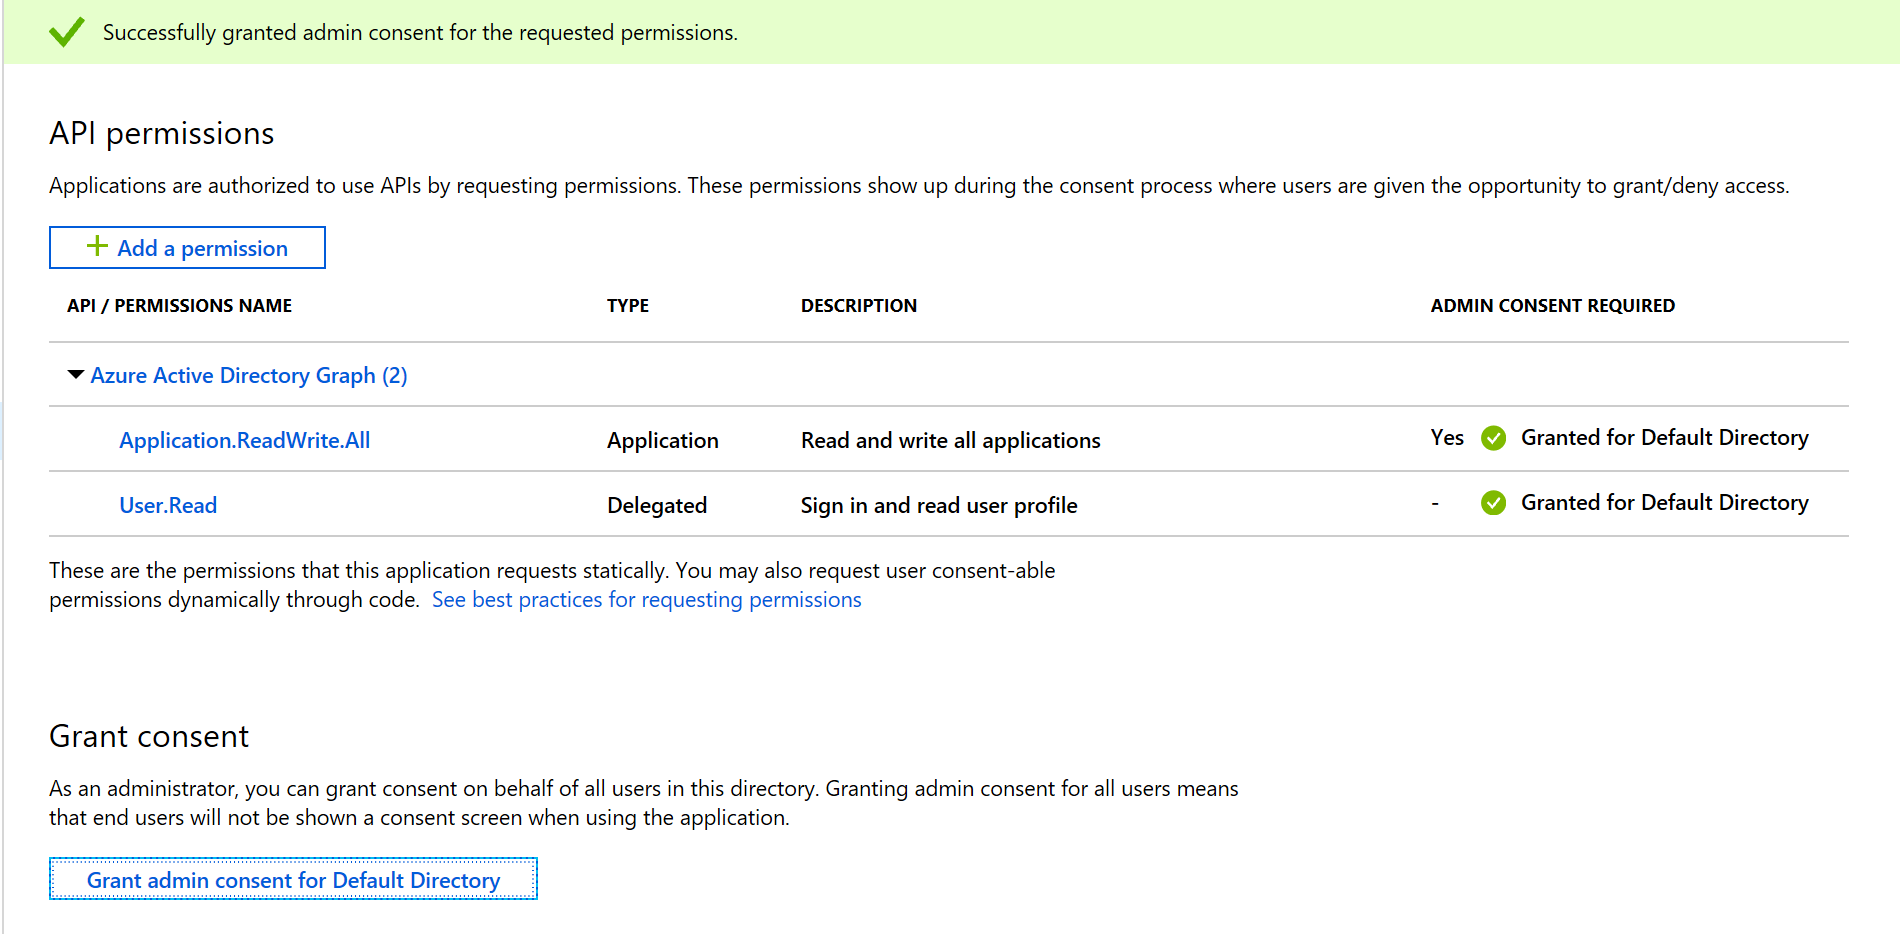
- Grant admin consent for the Default Directory via the portal:
- Navigate to Azure Active Directory (AAD)
- Under the Manage list, select App registrations (Preview)
- Ensure the All Applications tab is selected
- Search for, and select the Terraform Service Principal application that we created previously (i.e. terraform-
-sp) - Select API Permissions
- Click the ‘Grant admin consent for Default Directory’ button
- Click Yes on the confirmation prompt
Create the service_principal sub-module
The AKS service requires a service principal itself. The service principal that is created will automatically be assigned the Contributor role on the new resource groups that the AKS provider deploys. Terraform has the ability to create service principals so we will make use of that. We’ll keep it tidy by hiding those resource types in a sub-module.
- Open the service_principal sub-folder in the VSCode explorer
- Copy the following code block into the service_principal module’s main.tf
resource "azurerm_azuread_application" "aks_app" {
    name = "${var.sp_name}"
}

resource "azurerm_azuread_service_principal" "aks_sp" {
    application_id = "${azurerm_azuread_application.aks_app.application_id}"
}

resource "random_string" "aks_sp_password" {
    length  = 16
    special = true
    keepers = {
        service_principal = "${azurerm_azuread_service_principal.aks_sp.id}"
    }
}

resource "azurerm_azuread_service_principal_password" "aks_sp_password" {
    service_principal_id = "${azurerm_azuread_service_principal.aks_sp.id}"
    value                = "${random_string.aks_sp_password.result}"
    end_date             = "${timeadd(timestamp(), "8760h")}"

    lifecycle {
        ignore_changes = ["end_date"]
    }

    provisioner "local-exec" {
        command = "sleep 30"
    }
}
Note that the password block includes a provisioner to locally sleep for 30 seconds, to give the app and service principal sufficient time to become available. This is to overcome a current known bug. More on provisioners in the next lab.
Question:
What impact does the keeper value have on the service principal password?
Answer:
It ensures that the password is not changed unless the Service Principal ID is changed (i.e. it has been recreated).
Question:
How long will the password be valid for?
Answer:
8760 hours = 1 year.
Question:
What does the lifecycle meta-parameter do for the password?
Answer:
It manages the lifecycle of the resource, and ensures that the password is not changed if and when the end date is updated. You would have to use the Terraform [taint command](https://www.terraform.io/docs/commands/taint.html) to force a password to be recreated.
- Copy the following code block into the service_principal module’s outputs.tf
output "sp_id" {
  value = "${azurerm_azuread_service_principal.aks_sp.id}"
}

output "client_id" {
  value = "${azurerm_azuread_service_principal.aks_sp.application_id}"
}

output "client_secret" {
  sensitive = true
  value     = "${random_string.aks_sp_password.result}"
}
The client ID and secret will be used by the azurerm_kubernetes_cluster resource in the parent.
- Copy the following code block into the service_principal module’s variables.tf
variable "sp_name" {
    description = "Service Principal name"
    type        = "string"
}
The only argument required by the service_principal is the name, which simplifies the main.tf that we’ll be creating in the parent directory. This is a good practice to adopt as it helps to make your modules readable and supportable.
OK, that is the sub-module finished. Let’s move up a level and do the main AKS module.
Main AKS module
- Close any open editing windows in VSCode (using
CTRL+W) - Close the service_principal folder in the VSCode explorer
- If you have insufficient directory permissions then you may delete the service_principal folder
- Add the following to the variables.tf (Note: This is the variables.tf file in the root of our Terraform-Module-AKS directory, NOT the variables.tf file in the service_principal directory)
variable "resource_group_name" {
   default =   "aks"
}

variable "location" {
   default =   "westeurope"
}

variable "ssh_public_key" {
   type         = "string"
   default      = ""
   description  = "Public key for aksadmin's SSH access."
}

variable "agent_count" {
   default =   2
}

variable "vm_size" {
   default =   "Standard_DS2_v2"
}

variable "tags" {
    default     = {
        source  = "citadel"
        env     = "testing"
    }
}
Every argument for this module has a default value, which will make testing easier. Note that the default for the SSH public key is an empty string. More on that in a moment.
- Add the following into the main.tf (Again, this is the main.tf file in the root of our Terraform-Module-AKS directory, NOT the main.tf file in the service_principal directory)
locals {
    cluster_name            = "aks-${random_string.aks.result}"
    default_ssh_public_key  = "${file("~/.ssh/id_rsa.pub")}"
    ssh_public_key          = "${var.ssh_public_key != "" ? var.ssh_public_key : local.default_ssh_public_key }"
}

module "service_principal" {
    source    = "service_principal"
    sp_name   = "${local.cluster_name}"
}

resource "azurerm_resource_group" "aks" {
    name     = "${var.resource_group_name}"
    location = "${var.location}"
}

resource "random_string" "aks" {
  length  = 8
  lower   = true
  number  = true
  upper   = true
  special = false
}

resource "azurerm_kubernetes_cluster" "aks" {
  name                = "${local.cluster_name}"
  location            = "${azurerm_resource_group.aks.location}"
  resource_group_name = "${azurerm_resource_group.aks.name}"
  dns_prefix          = "${local.cluster_name}"
  depends_on          = [
      "module.service_principal"
  ]

  linux_profile {
    admin_username  = "aksadmin"

    ssh_key {
      key_data = "${local.ssh_public_key}"
    }
  }

  agent_pool_profile {
    name            = "default"
    count           = "${var.agent_count}"
    vm_size         = "${var.vm_size}"
    os_type         = "Linux"
    os_disk_size_gb = 30
  }

  service_principal {
    client_id       = "${module.service_principal.client_id}"
    client_secret   = "${module.service_principal.client_secret}"
  }

  tags              = "${var.tags}"
}
<insufficient directory permissions> If you encountered the ‘insufficient directory permissions’ you need to follow these steps, else you can skip them
- Modify the
resource "azurerm_kubernetes_cluster" "aks"block- Remove the
depends_on = ["module.service_principal"] - Hardcode the service_principal stanza’s values for client_id and client_secret to use the values in your provider.tf
- Remove the
- Remove the
module "service_principal" {}block
</insufficient directory permissions>
OK, this is the first time that we have actively used Locals. Locals are useful for generating values that will only be used within this individual .tf file. (Locals are roughly similar to the Variables section of an ARM template).
The cluster name is a good example of a local variable, as it uses a random string appended to the aks- prefix, and is then referenced a few times throughout the main.tf.
The SSH key is another good example of a local variable, as it allows us to overcome a limitation in Terraform. You cannot use an interpolation within a variable definition’s default value. If you remember, we defaulted the variable to an empty string. The Locals section defines a default value (based on the contents of the default name for an SSH public key), and then the local.ssh_public_key will default to that if the user has not passed in an SSH public key argument value.
- Add the following into the outputs.tf:
output "kube_config" {
  value = "${azurerm_kubernetes_cluster.aks.kube_config_raw}"
}

output "host" {
  value = "${azurerm_kubernetes_cluster.aks.kube_config.0.host}"
}
SSH Public Key
OK, so we’ll need an SSH key pair for this to work. If you have one already then skip this section.
If not then create one using the command below in your home directory:
ssh-keygen -t rsa -b 2048 -C "richard.cheney@microsoft.com"
Use your own email address for the comment field!
The ~/.ssh/id_rsa.pub public SSH key will be used in the locals default. It will be used as the authentication for the aksadmin user.
Note: You will need to press Enter in the command-line when prompted as follows:
Enter file in which to save the key (/home/username/.ssh/id_rsa):Enter passphrase (empty for no passphrase):Enter same passphrase again:
You should receive an output similar to the following:
Your identification has been saved in /home/username/.ssh/id_rsa.
Your public key has been saved in /home/username/.ssh/id_rsa.pub.
The key fingerprint is:
SHA256:Ocwl7ZCZbtvnRLg9w8It7zFVS8SdxRoEHJXqpivh73Y richard.cheney@microsoft.com
Specifying minimum provider versions
We will need the Terraform service principal credentials for full testing:
- Copy in provider.tf file from the terraform-labs repository into the terraform-module-aks directory
We will need a minimum version of the AzureRM provider for the AKS module to work. Exploring this introduces a key tenet for Terraform regarding versioning.
As you already know, when you run terraform init, the required providers are copied locally. It is important to understand that those providers will not be upgraded unless you force that to happen.
Terraform has a philosophy around version management that enables you to collectively control the version of everything from top to bottom (i.e. the Terraform executable, the individual Terraform providers and the Terraform files themselves). Therefore, you have full control on when any of those components are upgraded, so that you know that nothing will become unexpectedly broken.
Take a look at the AzureRM changelog. This lists the new features, bug fixes and improvements that are rolled into each release. If you require functionality of a newer release then you have a couple of options:
- Specify a provider version constraint in the provider block and run
terraform init - Run
terraform init -upgrade=trueto upgrade to the latest version allowed within configured constraints
Specify a minimum version of 1.17 for the AzureRM Provider:
- Add a constraint to the AzureRM provider block for a minimum version of 1.17 (or later)
Version 1.17 is current at the time of writing; feel free to specify a more recent version if the changelog entry mentions new or updated azurerm_kubernetes_* provider types
- Run
terraform init
Note that the output recommends that a minimum version should be specified for the random provider:
The following providers do not have any version constraints in configuration,
so the latest version was installed.

To prevent automatic upgrades to new major versions that may contain breaking
changes, it is recommended to add version = "..." constraints to the
corresponding provider blocks in configuration, with the constraint strings
suggested below.

* provider.random: version = "~> 2.0"
- Update the provider.tf and specify the recommended minimum version
- Show the required providers and any associated version constraints, using
terraform providers
Example output:
.
├── provider.azurerm ~> 1.17.0
├── provider.random ~> 2.0
└── module.service_principal
    ├── provider.azurerm (inherited)
    └── provider.random (inherited)
Locally test the core AKS module
- Run
terraform init - Run
terraform plan - Run
terraform apply -auto-approve
The cluster should take around 15 minutes to deploy, so it’s a good time for a coffee break. Once it has completed then check that the cluster is operating as expected.
- Create the Kubernetes config file using the AKS module’s kube_config output:
umask 022
mkdir ~/.kube
echo "$(terraform output kube_config)" > ~/.kube/config
- Install kubectl using
sudo az aks install-cli - Check the cluster health using
kubectl get nodes
NAME                     STATUS   ROLES   AGE   VERSION
aks-default-38841400-0   Ready    agent   29m   v1.9.11
aks-default-38841400-1   Ready    agent   29m   v1.9.11
- Run the dashboard proxy using the kubectl proxy command
- Use
kubectl proxy &to run in the background- Run
jobsto view running background jobs - Use
kill %1to kill off background job 1
- Run
- Use
- Open the dashboard
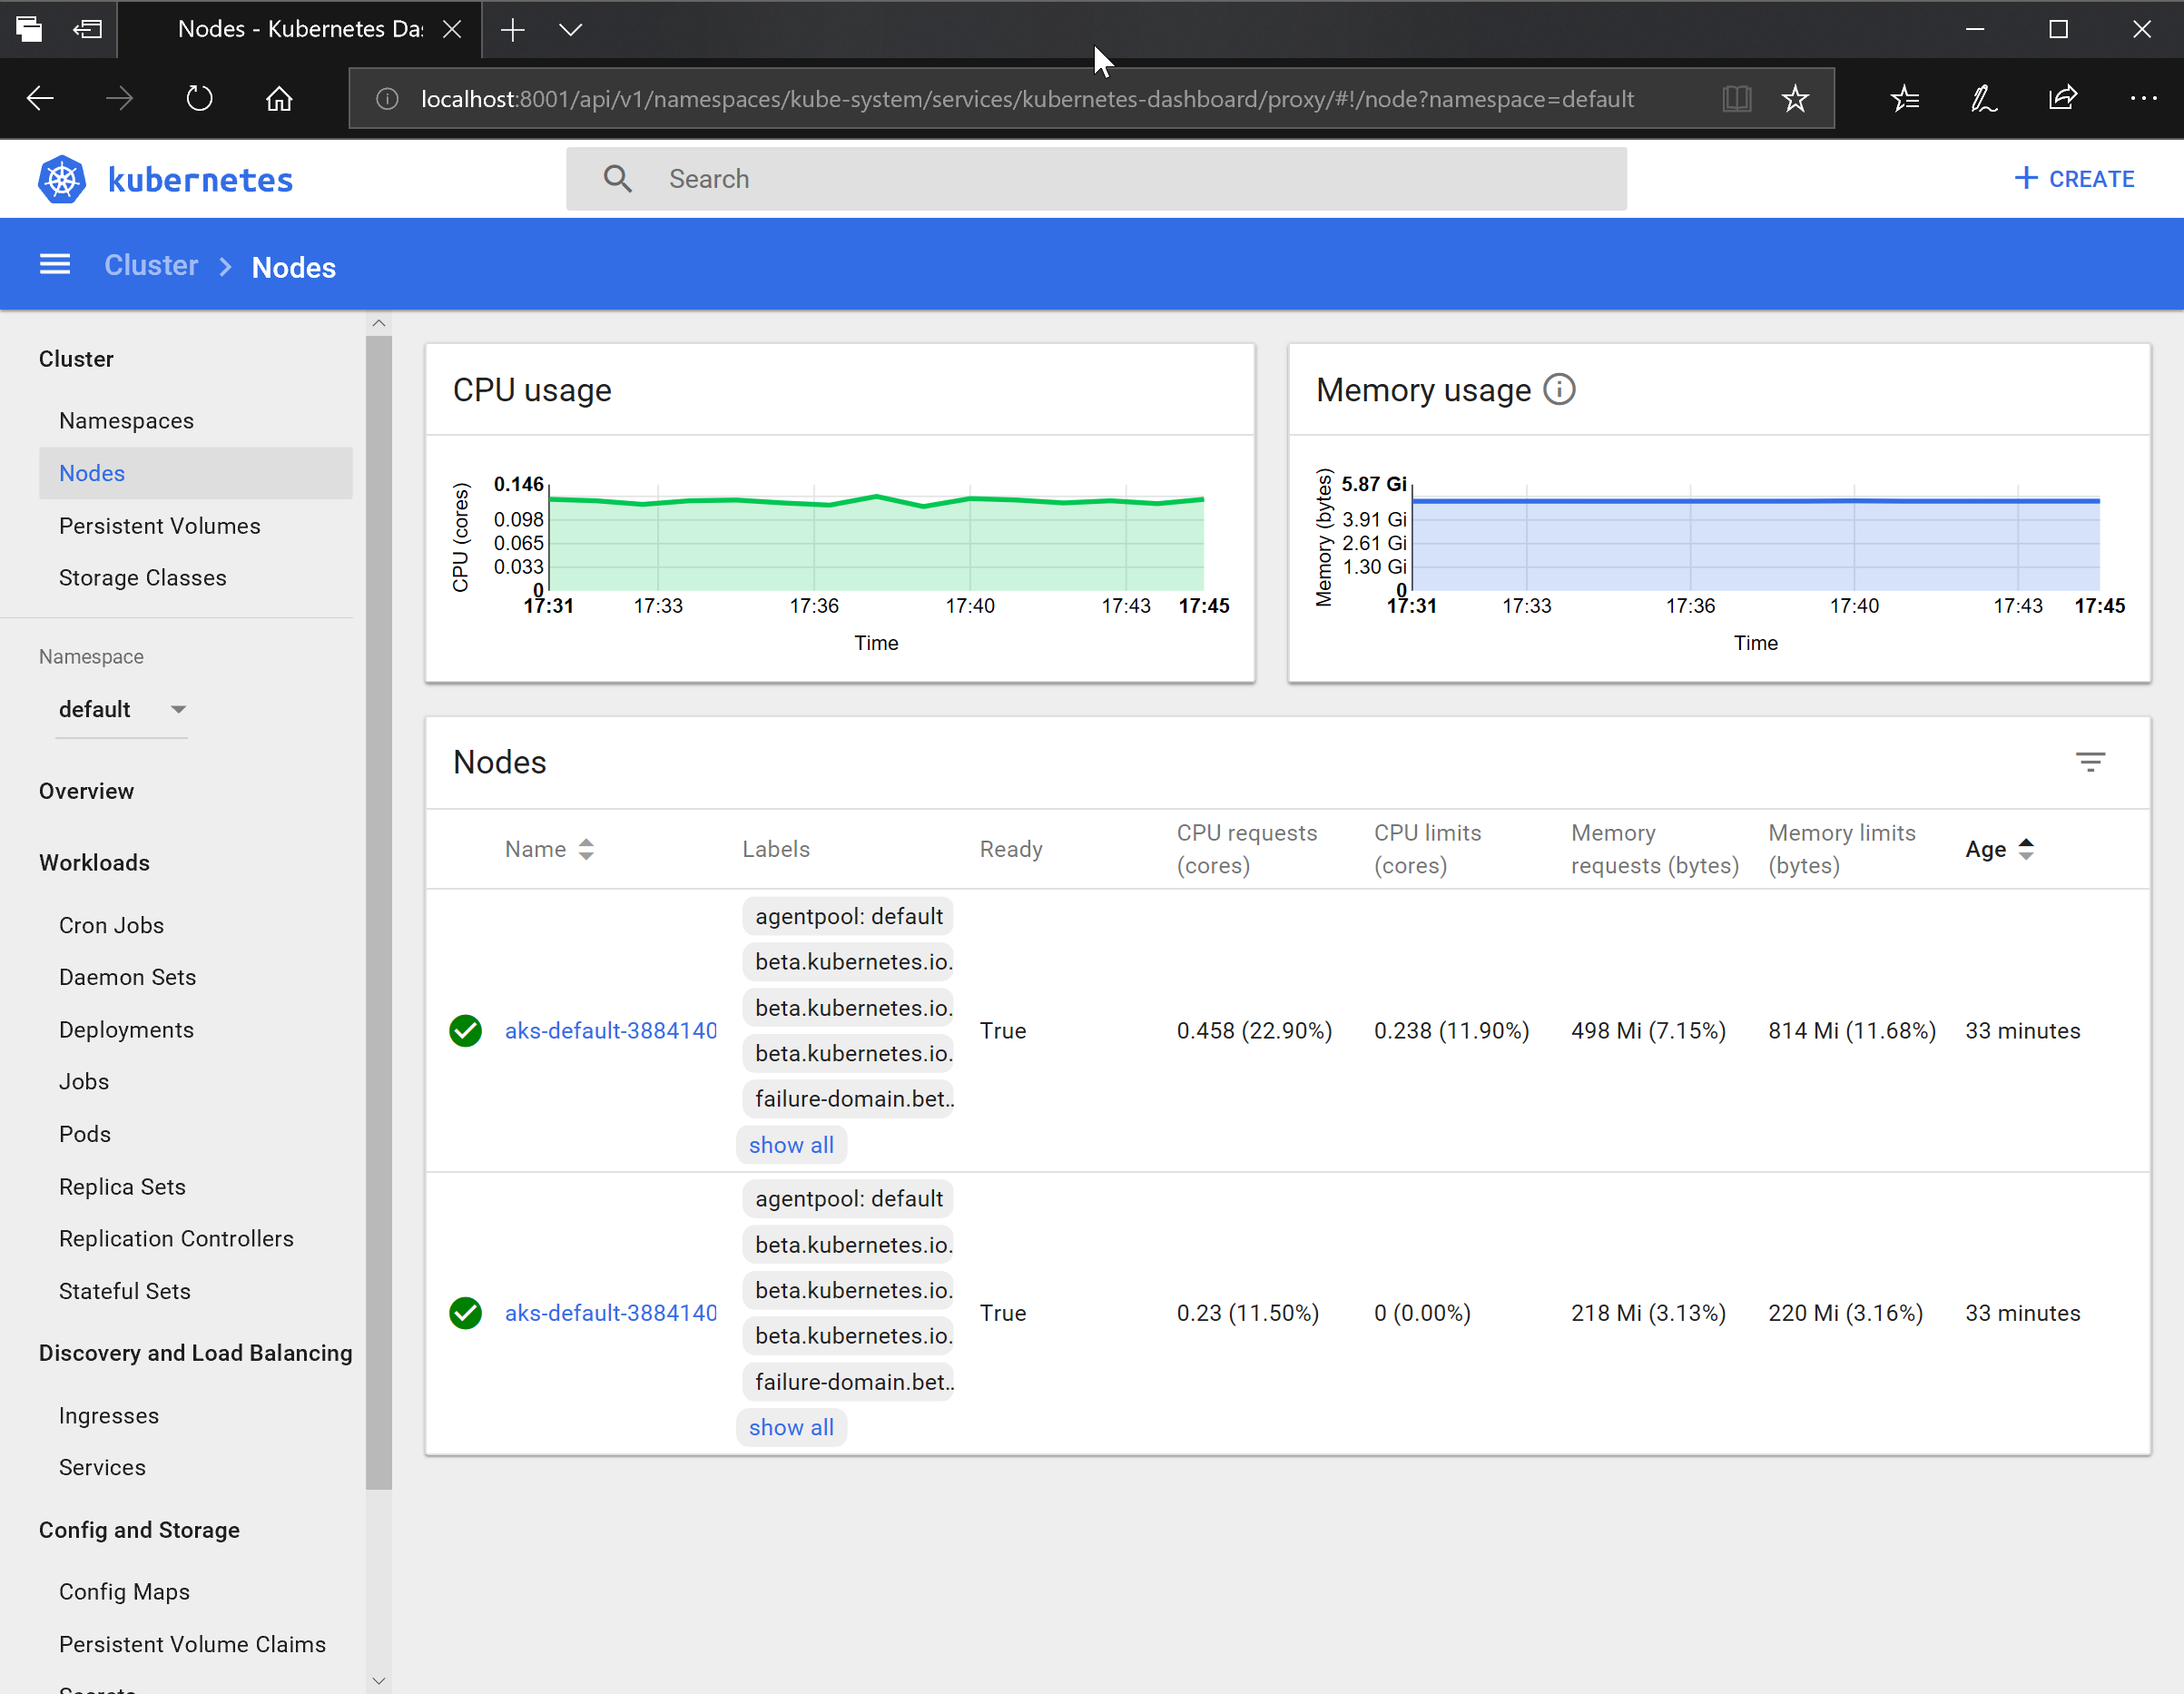
If your browser screen is similar to the image above then all is good.
Add the Kubernetes configuration
Now it is time to introduce the Kubernetes provider. We can use this to extend the configuration to not only create the AKS cluster, but to provision the pods and services on top.
- Append the following into your provider.tf file:
provider "kubernetes" {
    version                 = "~> 1.3"
    host                    = "${azurerm_kubernetes_cluster.aks.kube_config.0.host}"
    client_certificate      = "${base64decode(azurerm_kubernetes_cluster.aks.kube_config.0.client_certificate)}"
    client_key              = "${base64decode(azurerm_kubernetes_cluster.aks.kube_config.0.client_key)}"
    cluster_ca_certificate  = "${base64decode(azurerm_kubernetes_cluster.aks.kube_config.0.cluster_ca_certificate)}"
}
Note that the exported attributes of the azurerm_kubernetes_cluster are now being used by the Kubernetes provider, which also introduces an implicit dependency.
- Append the main.tf with the following resource type block:
resource "kubernetes_pod" "test" {
  metadata {
    name = "terraform-example"
  }

  spec {
    container {
      image = "nginx:1.7.9"
      name  = "example"
    }
  }
}
We are now making use of a different provider by using the kubernetes_pod resource type.
- Run through the
terraform init,terraform planandterraform applyworkflow - Run
kubectl get nodes - Run
kubectl get pods - Re-run the
kubectl proxyand check the dashboard
If you can access the dashboard and see the two nodes and the single test pod then the module is successfully tested.
- Remove the cluster by running
terraform destroy
The destruction will take several minutes. While that is running you can move to the next section and push the module up to GitHub.
If you have insufficient directory permissions then your module will have hardcoded the Terraform service principal ID and secret values. You can turn those into variables and continue, or skip to the extending Terraform into ARM section.
Push to GitHub
You should already have a GitHub account from the earlier labs.
- Remove the Terraform Service Principal values from your provider.tf so that only the version argument remains
- Commit the files into your local repo
- Add the files to the index
git add --all - Commit the files
git commit -a -m "Initial commit"
- Add the files to the index
- Log onto GitHub
- Create a new repository called terraform-module-aks
- Do not check the Initialize this repository with a README box
- Copy the two commands for pushing an existing repository from the command line
Example commands:
git remote add origin https://github.com/richeney/terraform-module-aks.git
git push -u origin master
- Run the two commands in your local repository
Example output:
/git/terraform-module-aks (master) $ git push -u origin master
Username for 'https://github.com': richeney
Password for 'https://richeney@github.com':
Counting objects: 13, done.
Delta compression using up to 4 threads.
Compressing objects: 100% (13/13), done.
Writing objects: 100% (13/13), 2.86 KiB | 154.00 KiB/s, done.
Total 13 (delta 0), reused 0 (delta 0)
remote:
remote: Create a pull request for 'master' on GitHub by visiting:
remote:      https://github.com/richeney/terraform-module-aks/pull/new/master
remote:
To https://github.com/richeney/terraform-module-aks.git
 * [new branch]      master -> master
Branch 'master' set up to track remote branch 'master' from 'origin'.
The full module should now be uploaded to GitHub.
Test the module hosted in GitHub
If you wish you can test the whole module.
We’ll do this within your Cloud Shell’s home directory.
- Create a new lab8 folder in your home directory (
mkdir lab8) - Change to this directory (
cd lab8) - Create an empty aks.tf file (
touch aks.tf) - Edit the file in the Monaco editor (
code .) - Add the following HCL into the aks.tf file:
provider "azurerm" {
    tenant_id       = "00000000-0000-0000-0000-000000000000"
    subscription_id = "00000000-0000-0000-0000-000000000000"
}

module "aks" {
  source = "github.com/username/terraform-module-aks"
  agent_count = 4
}

output "cluster" {
  value = "${module.aks.cluster}"
}
- Change the tenant and subscription IDs to match those in
az account show --output json - Change the username
- Save and quit (
CTRL+S,CTRL+Q) - Export ARM_CLIENT_ID and ARM_CLIENT_SECRET environment variables
- Set the environment variables to the Terraform service principal’s app ID and password (the values may be found in the terraform-labs/provider.tf)
- Example: `export ARM_CLIENT_ID=”00000000-0000-0000-0000-000000000000”
- Optionally, you may add the export commands to your ~/.bashrc
- Run through the Terraform workflow
terraform getterraform initterraform planterraform apply
Once complete, you can use the following command to get the credentials for the ~/.kube/config file:
az aks get-credentials --name $(terraform output cluster) --resource-group aks
The command creates your ~/.kube/config file. It is an alternative to the command you ran earlier that redirected the terraform kube_config output.
The kubectl binary is already included as part of the Cloud Shell container image, so you can use that straight away without having to install it:
kubectl get pods
For more commands check the Kubernetes cheatsheet.
You can even open the dashboard directly from the Cloud Shell using this command:
az aks browse --enable-cloud-console-aks-browse --name $(terraform output cluster) --resource-group aks
Use CTRL+C to close the tunnel. You can then run terraform destroy to remove the cluster.
OK, that is the lab element completed. Well done!
While your cluster is being removed you can read through the next two sections to discuss some additional options:
- Terraform driving native ARM template deployments
- ARM templates leveraging certain Terraform providers
Extending Terraform into ARM
One AzureRM resource type that we have not discussed so far is azurerm_template_deployment.
There has been a huge investment into the AzureRM Terraform provider (from both Microsoft and HashiCorp in collaboration) and it has excellent coverage of the most commonly used Azure services. However, there are some limitations:
- coverage - there are certain cases where Azure services are available as an ARM resource type, but are not yet available as a Terraform resource type
- lag - inevitably there will be a period of lag when new Azure services are released, although prominent services such as AKS and Cosmos DB has been released close to the General Availability (GA) date
Terraform can initiate the deployment of an ARM template and have knowledge of the deployment. Destroying the resource in Terraform (via terraform destroy) will only destroy Terraform’s knowledge of the deployment. For this reason it is recommended to create a separate resource group for the templated deployment so that removing both the resource group and the ARM deployment will remove the resources as well.
If an AzureRM resource type then becomes available, then a resource stanza can be created and the existing resource(s) can be imported. It will need careful configuration until a terraform plan doesn’t show any creates, destroys or changes. It would not be safe to configure new additions, deletions or changes until that steady state has been achieved.
Extending ARM into Terraform
For your information, ARM templates can now also drive certain Terraform Providers as per the Azure Resource Provider for Terraform blog page.
While it is in Public Preview, the following 3 Terraform providers will be supported (Cloudflare, Datadog and Kubernetes) with other providers being added in the future.
Azure Resource Manager (ARM) will never drive other cloud providers, but it does allow ARM configurations to take advantage of the Terraform framework and extend the configuration beyond the functionality at the control plane level.
End of Lab 8
We have reached the end of the lab. You have provisioned and configured a Kubernetes cluster on the AKS service, and looked at some of the other providers and provider types. We have also leveraged additional API permissions to create the AKS service principal on the fly. We have worked through a sensible workflow to create and test a new module before publishing it, and re-testing as needed.
Your AKS module should look similar to that in https://github.com/richeney/terraform-module-aks.
In the next lab we will also look at provisioners and how they can help to go beyond vanilla image deployments for your virtual machines.
Leave a comment