
Introduction
These labs have been updated soon for 0.12 compliant HCL. If you were working through the original set of labs then go to Terraform on Azure - Pre 0.12.
So far we have been authenticating using either Cloud Shell (labs 1 and 2) or Azure CLI (labs 3 and 4), which both work really well for one person when doing demos and a little development work. If you see your current context (as shown by az account show) then that will show the authentication type (if not explicitly) and also shows the tenancy and subscription you will be deploying into.
However it is not a workable approach when you have multiple admins working on an environment and it is not suitable if you are dealing with multiple tenants.
In this lab we will look at how we could make our Terraform platform work effectively in a multi-tenanted environment by using Service Principals. The approach here applies to any more complex environment where there are multiple subscriptions in play, as well as those supporting multiple tenancies or directories. Service Principals are also the recommended route if you are integrating the Terraform Provider into automation or within a DevOps CI/CD pipeline.
Pre-requisites
You will have already been using the az and terraform executables locally. As Terraform is from the OSS world then these labs are unapologetically written from a linux and CLI 2.0 perspective. Linux and MacOS users are well catered for as vscode is cross-platform and the standard packages (az, terraform) are easily installed.
For Windows 10 then the minimum is to use both terraform and az at the Windows OS level so that you can use them within a Command Prompt or PowerShell session.
However the remaining labs really are based on Windows 10 users having enabled the Windows Subsystem for Linux (WSL) and do make use of Bash scripting at points. If you have Windows 10 and can enable WSL then it is very much recommended. Don’t forget to follow the guide to also install az, jq, git and terraform at that level.
An alternative is to make use of the Terraform VM discussed towards the bottom of the lab. This has az, jq and terraform pre-installed and defaults to using MSI so the whole VM is authenticated to a subscription. You can ssh on to the VM and work straight away. And you are still free to use service principals in preference to MSI. This is an option, especially if your vi, nano or emacs skills are good.
Service Principals
Service Principals are security identities within an Azure AD tenancy that may be used by apps, services and automation tools.
When you create a Service Principal then from an RBAC perspective it will, by default, have the Contributor role assigned at the subscription scope level. For most applications you would remove that and then assign a more limited RBAC role and scope assignment, but this default level is ideal for Terraform provisioning.
We will create a Service Principal and then create a provider.tf file in our containing the fields required. Make sure that you are in the right Azure context first (i.e. which tenancy and subscription).
- check your current context by using
az account show - list out your subscriptions using
az account list --output table - change subscription by using
az account set --subscription <subscriptionId>
Service principals work really well in a multi-tenanted environment as the service principal authentication details can sit directly in the relevant terraform directory so that it is easy to define the target subscription and tenancy and tightly connect it with the other infrastructure definitions.
For a standard multi-tenancy environment then you would create a service principal per subscription and then create a provider block for each terraform folder. (The provider stanza can be in any of the .tf files, but provider.tf is common.)
Having a separate terraform folder per customer or environment with its own provider.tf files is very flexible. It also mitigates common admin errors such as terraform commands being run whilst in the wrong context.
Steps
This is an overview of the steps if you want to do this manually:
- Create the service principal
- Capture the appId, password and tenant
- Login as the service principal to test (optional)
- Either
- Create a azurerm provider block populated with the service principal values
- Export environment variables, with an empty azurerm provider block
- Modify the service principal’s role and scope (optional)
- Add application API permissions if required (optional)
Here is an example provider.tf file containing a populated azurerm provider block:
provider "azurerm" {
  subscription_id = "2d31be49-d959-4415-bb65-8aec2c90ba62"
  client_id       = "b8928160-69bf-4483-a2cc-b726e1e65d87"
  client_secret   = "93b1423d-26a9-4ee7-a4f6-29e32d4c05e8"
  tenant_id       = "72f988bf-86f1-41af-91ab-2d7cd012db47"
}
Recommendations:
- Set restrictive file permissions.
In a production environment you would need to ensure that this file has appropriate permissions so that the client_id and client_secret does not leak and create a security risk.
- Add provider.tf into your .gitignore file
Don’t push up sensitive values up into a public GitHub repository!
The alternative is to use environment variables. For example, by adding the following lines to a .bashrc file:
export ARM_SUBSCRIPTION_ID="2d31be49-d959-4415-bb65-8aec2c90ba62"
export ARM_CLIENT_ID="b8928160-69bf-4483-a2cc-b726e1e65d87"
export ARM_CLIENT_SECRET="93b1423d-26a9-4ee7-a4f6-29e32d4c05e8"
export ARM_TENANT_ID="72f988bf-86f1-41af-91ab-2d7cd012db47"
If you are using environment variables then the provider block should be empty:
provider "azurerm" {}
Note that this approach is not as effective if you are moving between terraform directories for different customer tenancies and subscriptions, as you need to export the correct variables for the required context, but it does have the benefit of not having the credentials visible in one of the *.tf files.
You can also mix and match, with the tenant and subscription IDs in the provider, and then environment variables for ARM_CLIENT_ID and ARM_CLIENT_SECRET. This is a good combination as it ensures that you do not accidentally deploy resources into the wrong subscription, whilst removing the service principal’s app ID and password from the Terraform files.
Challenge
Rather than a straight lab, we’ll make this one more of a challenge. The challenge will get you in the habit of searching for documentation available from both Hashicorp and Microsoft. In this challenge you will create a service principal called terraform-labs-<subscriptionId>-sp.
Run through the following:
- Find your subscription ID and copy the GUID to the clipboard
- Search for the documentation to create an Azure service principal for use with Terraform
- Follow the guide and create a populated provider.tf file
- Add provider.tf to your .gitignore file
- Log on to azure as the service principal using the CLI
- Log back in with your normal Azure ID and show the context
- Search for the Azure Docs for changing the role (and scope) for the service principal
- There is no need to change the role or scope at this point - this is purely for info
- Run
terraform initandterraform plan - Log into the Azure portal and search on App Registrations
- The service will list out apps registered for the service principals
If you get stuck then there are answers at the bottom of the lab.
Automated scripts
If you want to automate the process then feel free to make use of this createTerraformServicePrincipal.sh script to create a service principal and provider.tf: https://github.com/azurecitadel/azurecitadel.github.io/blob/master/automation/terraform/createTerraformServicePrincipal.sh
The script will interactively
- create the service principal (or resets the credentials if it already exists)
- prompts to choose either a populated or empty provider.tf azurerm provider block
- exports the environment variables if you selected an empty block (and display the commands)
- display the az login command to log in as the service principal
The following commands will download it and run it:
uri=https://raw.githubusercontent.com/azurecitadel/azurecitadel.github.io/master/automation/terraform/createTerraformServicePrincipal.sh
curl -sL $uri > createTerraformServicePrincipal.sh && chmod 750 createTerraformServicePrincipal.sh
./createTerraformServicePrincipal.sh
You can also download a short splogin.sh script that logs in as the service principal if you have a populated provider.tf file:
uri=https://raw.githubusercontent.com/azurecitadel/azurecitadel.github.io/master/automation/terraform/splogin.sh
curl -sL $uri > splogin.sh && chmod 750 splogin.sh
Resetting service principal credentials
Note that if you have lost the password values at any point then you can always use the following command to generate a new password:
az ad sp credential reset --name "http://terraform-<subscriptionId>"
Note the full name for a Service Principal is the display name we specified in the initial creation, prefixed with http:// You will need to have the correct level of role based access to display or reset credentials.
Aliases
There is another less frequently used argument that you can specify in the provider block called alias.
Using aliases can be of use in a customer environment where they want to configure a deployment across multiple subscriptions or clouds. Let’s take the example of customer with one subscription for the core services and another for the devops team. If you do not have an alias specified in a provider block then that is your default provider, so adding aliases creates additional providers. You can then specify that provider alias in your resource stanzas. For example:
provider "azurerm" {
  subscription_id = "2d31be49-d999-4415-bb65-8aec2c90ba62"
  client_id       = "cf34389a-839e-42a9-8201-9a5bed151767"
  client_secret   = "923ea4d9-829a-4477-9650-7a11c4a680f3"
  tenant_id       = "72f988bf-8691-41af-91ab-2d7cd011db47"
}

provider "azurerm" {
  alias           = "azurerm.devops"
  subscription_id = "1234be49-d999-4415-bb65-8aec2c90ba62"
  client_id       = "1234389a-839e-42a9-8201-9a5bed151767"
  client_secret   = "1234a4d9-829a-4477-9650-7a11c4a680f3"
  tenant_id       = "72f988bf-8691-41af-91ab-2d7cd011db47"
}

resource "azurerm_resource_group" "devopsrg" {
  provider = "azurerm.devops"

  # ...
}
And don’t forget that different service principals can have different scopes and roles within a subscription so that may also come in useful depending on the requirement.
Using service principals is an easy and powerful way of managing multi-tenanted environments when the admins are working in a centralised Terraform environment.
Advanced service principal configuration
If you are creating resource groups (and standard resources within them) then a Terraform service principal with the standard Contributor role assigned at the subscription level is the most common configuration you will see. Consider this the default.
You will often see examples of Terraform resource types where the service principal is created manually. The serviceA principal’s client id and password are then passed in as variables. This does not need special permissions but is less automated.
This section deals with the additional configuration required to enhance your Terraform service principal’s abilities and widen the provider types it can apply and destroy.
You will need to be at the Owner or equivalent level to complete this section.
If you have no need of advanced service principal configuration then you may skip ahead to the challenge answers.
Creating a custom Terraform role
If you are doing any of the following then your service principal will require a custom RBAC role and assignment:
- Creating RBAC roles and assigning against scopes
- azurerm_role_assignment
- azurerm_role_definition
- azurerm_user_assigned_identity
- Creating and assigning policy definitions and initiatives
- azurerm_policy_assignment
- azurerm_policy_definition
The definition of the in-built Contributor role has a number of NotActions, such as Microsoft.Authorization/*/Write.
See the role definition by running az role definition list --name Contributor.
Output:
[
  {
    "assignableScopes": [
      "/"
    ],
    "description": "Lets you manage everything except access to resources.",
    "id": "/subscriptions/2bf55508-ddee-49d0-b4ac-c6a7461ef999/providers/Microsoft.Authorization/roleDefinitions/b24988ac-6180-42a0-ab98-20f7382dd24c",
    "name": "b24988ac-6180-42a0-ab98-20f7382dd24c",
    "permissions": [
      {
        "actions": [
          "*"
        ],
        "dataActions": [],
        "notActions": [
          "Microsoft.Authorization/*/Delete",
          "Microsoft.Authorization/*/Write",
          "Microsoft.Authorization/elevateAccess/Action",
          "Microsoft.Blueprint/blueprintAssignments/write",
          "Microsoft.Blueprint/blueprintAssignments/delete"
        ],
        "notDataActions": []
      }
    ],
    "roleName": "Contributor",
    "roleType": "BuiltInRole",
    "type": "Microsoft.Authorization/roleDefinitions"
  }
]
We want to allow some of those Microsoft.Authorization actions. You can list those out using the following command:
az provider operation show --namespace Microsoft.Authorization --query resourceTypes[].operations[].name[] --output tsv | sort | grep -v read
Output:
Microsoft.Authorization/classicAdministrators/delete
Microsoft.Authorization/classicAdministrators/write
Microsoft.Authorization/denyAssignments/delete
Microsoft.Authorization/denyAssignments/write
Microsoft.Authorization/locks/delete
Microsoft.Authorization/locks/write
Microsoft.Authorization/policyAssignments/delete
Microsoft.Authorization/policyAssignments/write
Microsoft.Authorization/policyDefinitions/delete
Microsoft.Authorization/policyDefinitions/write
Microsoft.Authorization/policySetDefinitions/delete
Microsoft.Authorization/policySetDefinitions/write
Microsoft.Authorization/roleAssignments/delete
Microsoft.Authorization/roleAssignments/write
Microsoft.Authorization/roleDefinitions/delete
Microsoft.Authorization/roleDefinitions/write
For the moment we only want the roleAssignments and roleDefinitions actions and therefore the rest should remain as specified NotActions.
In the following commands, substitute 00000000-0000-0000-0000-000000000000 with your subscription GUID
- Create a file called terraform.customrole.json, containing the following:
{
    "Name":  "Terraform",
    "IsCustom":  true,
    "Description":  "Contributor, with exploded Microsoft.Authorization actions and no Blueprint actions.",
    "Actions":  [
        "*"
        ],
    "NotActions":  [
        "Microsoft.Authorization/classicAdministrators/write",
        "Microsoft.Authorization/classicAdministrators/delete",
        "Microsoft.Authorization/denyAssignments/write",
        "Microsoft.Authorization/denyAssignments/delete",
        "Microsoft.Authorization/locks/write",
        "Microsoft.Authorization/locks/delete",
        "Microsoft.Authorization/policyAssignments/write",
        "Microsoft.Authorization/policyAssignments/delete",
        "Microsoft.Authorization/policyDefinitions/write",
        "Microsoft.Authorization/policyDefinitions/delete",
        "Microsoft.Authorization/policySetDefinitions/write",
        "Microsoft.Authorization/policySetDefinitions/delete",
        "Microsoft.Authorization/roleAssignments/delete",
        "Microsoft.Authorization/roleAssignments/write",
        "Microsoft.Authorization/roleDefinitions/delete",
        "Microsoft.Authorization/roleDefinitions/write",
        "Microsoft.Authorization/elevateAccess/Action",
        "Microsoft.Blueprint/*/write",
        "Microsoft.Blueprint/*/delete"
        ],
    "DataActions": [],
    "NotDataActions": [],
    "AssignableScopes":  [
        "/subscriptions/00000000-0000-0000-0000-000000000000"
        ]
}
The custom policy above is essentially the same as contributor, but with the exploded Microsoft.Authorization actions you can selectively delete the NotActions to permit your Terraform service principal to do more. Blueprint write and delete actions are prohibited.
- Customise the AssignableScopes. Any of the following are valid:
- Change to “/” to allow the role to be assigned to all subscriptions (and child scopes)
- Provide a list of subscription (or resource group) resource IDs as scopes
- Customise the NotActions:
- For example, if you need your Terraform service principal to assign inbuilt roles to scopes, then delete the two lines for Microsoft.Authorization/roleAssignments
- There is a corresponding read action for those lines that is implicitly allowed
- Permitting write actions enables
terraform applyfor those provider types, but you’ll also need the delete action forterraform destroy
- Create the custom role:
az role definition create --role-definition terraform.customrole.json
- List the roles assigned at the subscription level:
az role assignment list --output table
- Remove the Contributor role:
az role assignment delete --role Contributor --assignee http://terraform-00000000-0000-0000-0000-000000000000-sp
- Add the custom role:
az role assignment create --role Terraform --assignee http://terraform-00000000-0000-0000-0000-000000000000-sp
- List the roles again
- Display the new role definitions using
az role definition list --name Terraform
Adding API Permissions to Azure Active Directory
For Azure Active Directory resources you will need additional API permissions:
- Creating service principals and applications
- azurerm_azuread_application
- azurerm_azuread_service_principal
- azurerm_azuread_service_principal_password
This area actually falls outside of ARM. When you created the Terraform service principal, you also created an App Registration. You can give this registered app additional permissions for various APIs.
As per the note at the top of the azurerm_azuread_service_principal documentation, the service principal will need Read & Write All Applications and Sign In & Read User Profile in the AAD API. This is the legacy API rather than the newer Microsoft Graph.
There are two types of permissions.
1. Delegated.  The app is permitted to drive the API but within the scope of the "parent" ID.  Therefore if the admin running `terraform apply` does not have access to create objects within AAD then the delegated permission will also not have access.  This is relatively safe.
1. Application. The permission is absolute and therefore inherently less secure.  Give thought before adding Role permissions and be selective on who then has access to the service principal credentials.
Portal
As you can tell from the labs, I like to automate wherever possible. As a one off task this is quicker via the portal, especially as the final step does not appear to have a matching CLI command yet.
- Navigate to the API Permissions
- Search for “App Registrations” in All Services
- Select Preview experience
- All Applications
- Select the terraform-
-sp application - API Permissions
- Add a Permission
- Select the Azure Active Directory Graph in the Supported legacy APIs section
- Select Application Permissions
- Check Application.ReadWrite.All
- Select Delegated Permissions
- Check User.Read
- Select Application Permissions
- Click on Add Permissions
- Select the Azure Active Directory Graph in the Supported legacy APIs section
- View the additional permissions in code form
- Click on the Manifest in the blade
- Scroll down to the requiredResourceAccess section
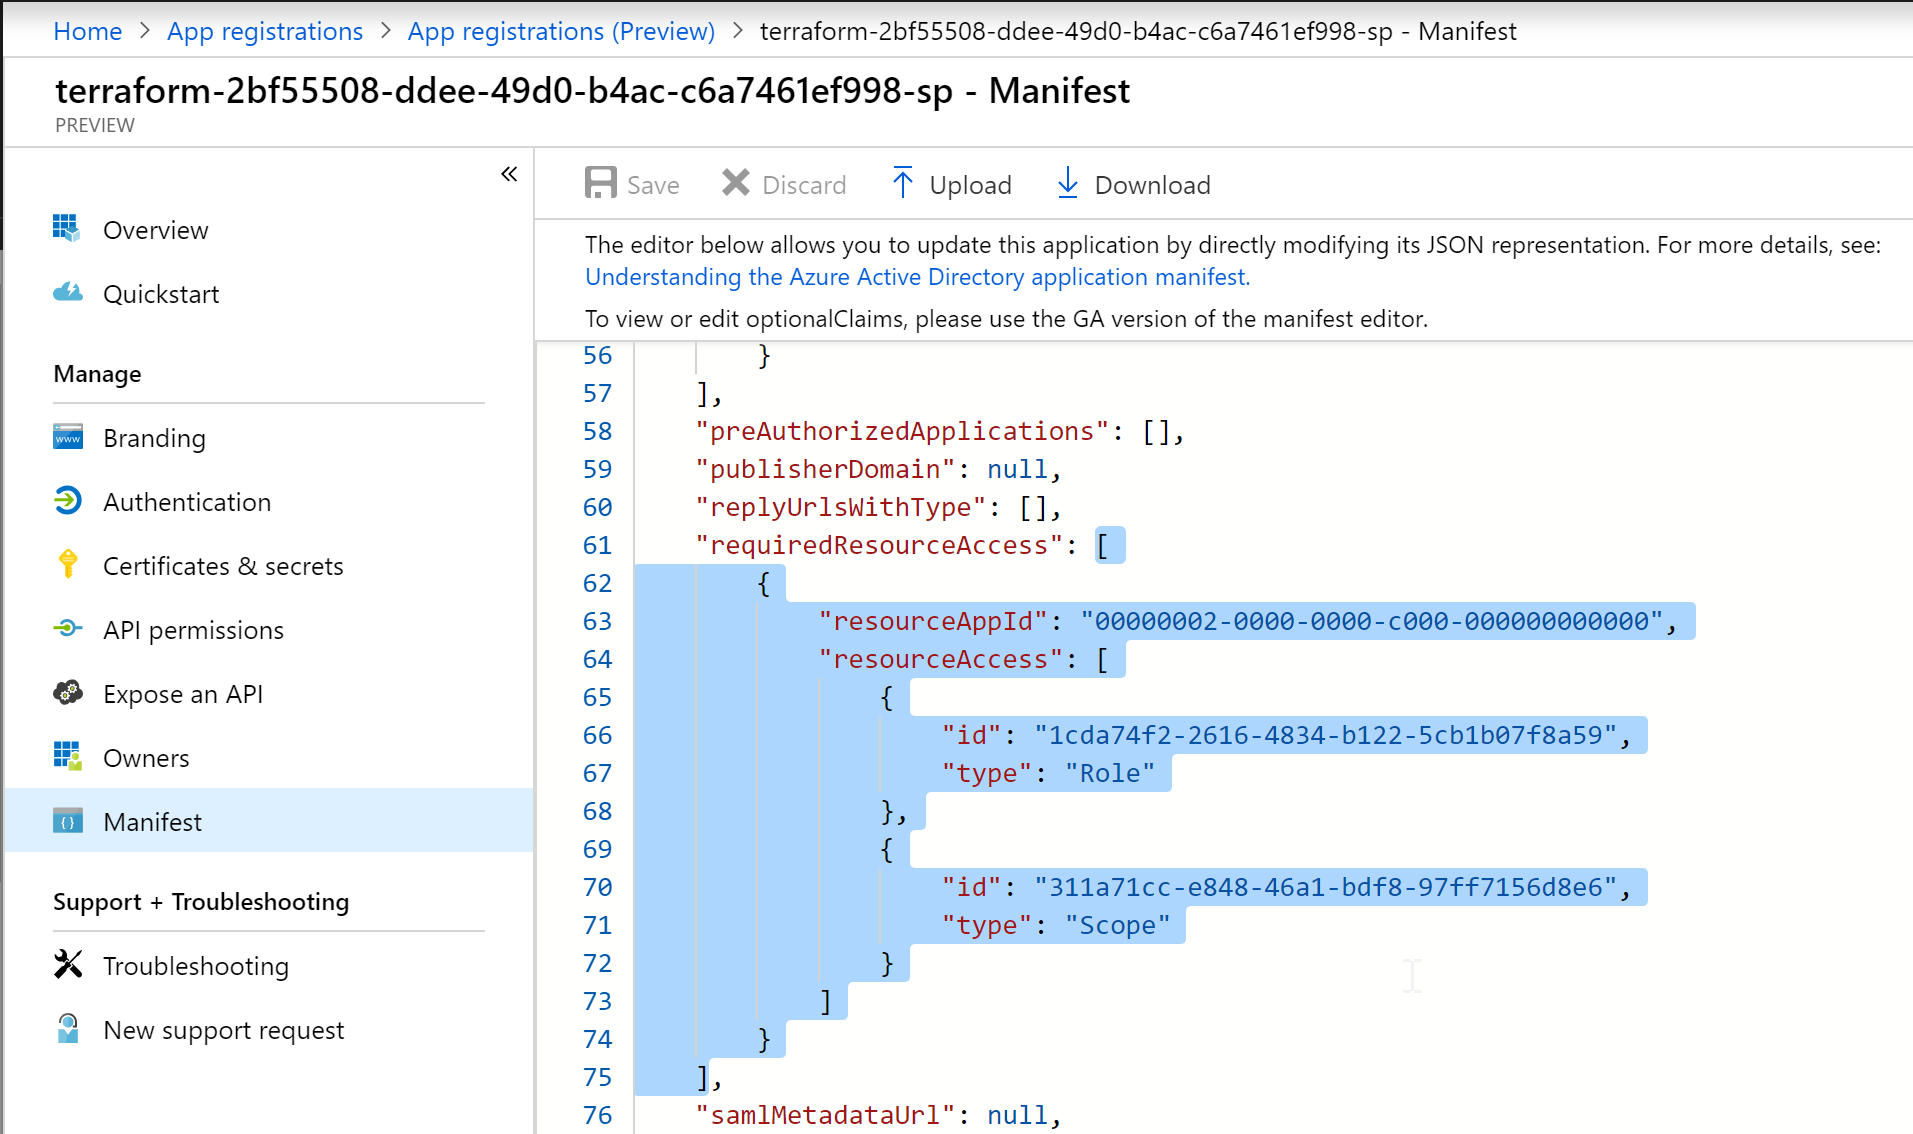
The Resource App ID for the AAD API is 00000002-0000-0000-c000-000000000000, and the permissions GUIDs are listed in this GUID Table
- Click again on the API Permissions
Note the warning showing that admin consent is required.
- Grant admin consent for Default Directory
- Click Yes when prompted
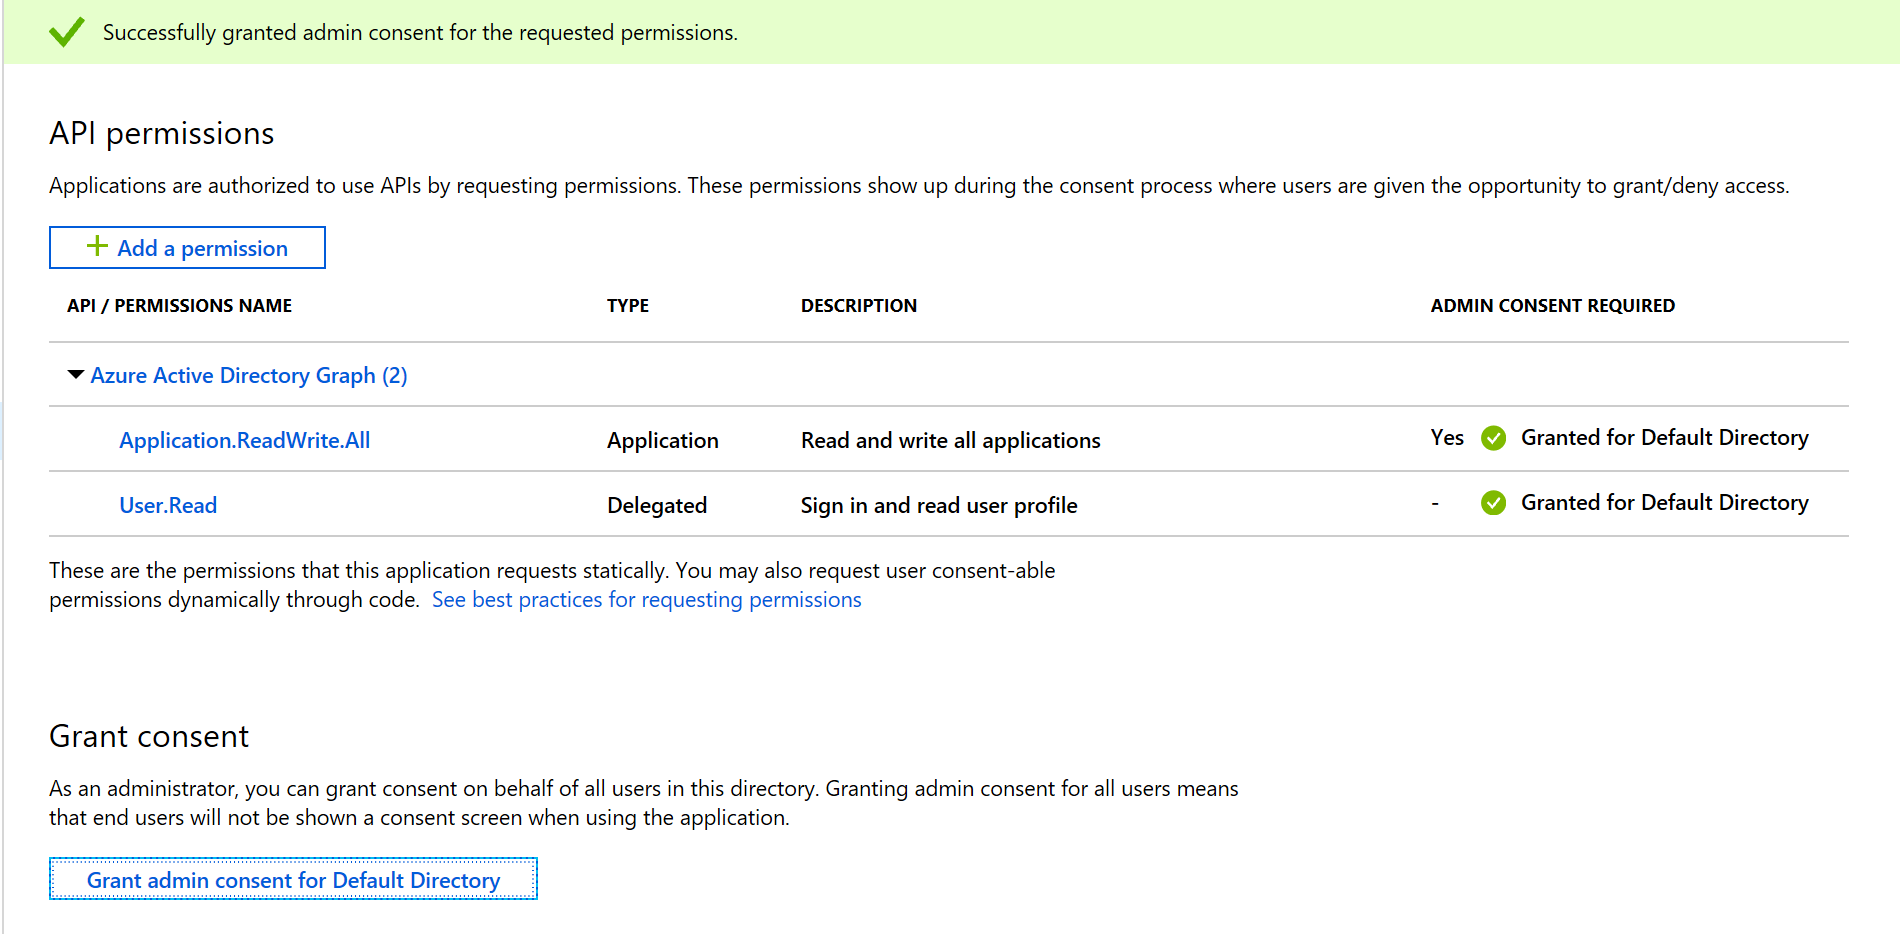
The Terraform service principal will now be able to use the azurerm_service_principal provider type.
CLI
The CLI commands are listed below for completeness. Note that there does not appear to be a CLI command to grant admin consent for the Default Directory.
- Create a file called manifest.json, containing the following JSON:
[
    {
        "resourceAppId": "00000002-0000-0000-c000-000000000000",
        "resourceAccess": [
            {
                "id": "311a71cc-e848-46a1-bdf8-97ff7156d8e6",
                "type": "Scope"
            },
            {
                "id": "1cda74f2-2616-4834-b122-5cb1b07f8a59",
                "type": "Role"
            }
        ]
    }
]
- Get the ID for the service principal’s application:
subId=$(az account show --query id --output tsv)
appId=$(az ad sp show --id "http://terraform-${subId}-sp" --query appId --output tsv)
- Show the API Permissions in the application’s manifest:
az ad app show --id $appId --query requiredResourceAccess
This should be an empty array ([]) at this point.
- Update the API Permissions with the manifest
az ad app update --id $appId --required-resource-accesses @manifest.json
- Rerun the command to show the API permissions
Note that there is no CLI command to grant consent to the default directory. Granting consent requires a few REST API calls. Follow the portal steps to navigate to the API Permissions dialog and then click on the button to grant consent
Challenge Answers
Here are the answers to the challenge part of the lab.
- Find your subscription ID and copy the GUID to the clipboard
There are many ways of finding the subscription GUID. Here are a few:
- You can search on subscriptions at the top of the portal, or look at the properties in the portal blade of any resource group or resource.
- From the az CLI you can run `az account show --output json`.
- In scripting you could set a variable using `subId=$(az account show --output tsv --query id)`.
- Search for the documentation to create an Azure service principal for use with Terraform
Searching on "terraform azure service principal" takes you to https://www.terraform.io/docs/providers/azurerm/authenticating_via_service_principal.html.
- Log back in with your normal Azure ID and show the context
az logout
az login
az account show
- Search for the Azure Docs for changing the role (and scope) for the service principal
Searching on "azure cli service principal" takes you to https://docs.microsoft.com/en-us/cli/azure/create-an-azure-service-principal-azure-cli.
This includes sections on deleting and creating role assigments. You should always remove the Contributor role when adding a different inbuilt or custom role to a service principal.
The page itself does not mention scope, but clicking on the az role assignment create link takes you through to the https://docs.microsoft.com/en-us/cli/azure/role/assignment#az-role-assignment-create reference page. The command has a --scope switch that defaults to the subscription but can be set to another scope point such as a resource group or an individual resource.
End of Lab 5
We have reached the end of the lab. We’re now using Service Principals for authentication.
Your .tf files should look similar to those in https://github.com/richeney/terraform-pre-012-lab5.
If you want to explore other options in a multi-tenanted environment then take a look at the following:
In the next lab we will look at the terraform.tfstate file.
Leave a comment