
Overview
In this lab we will be creating a simple template using Visual Studio Code. We will then be deploying it into a resource group using Azure CLI 2.0. The lab will make use of the storage account resources, which is one of the simpler ones available on the Azure platform.
We’ll go through a few iterations of the template as we move through the lab:
- Simple and hardcoded template
- Add in parameters for storageAccount and accountType and specify inline
- Make use of variables and functions to make the accountName unique
- Configure outputs to add the generated accountName
- Create a parameters file to finish off
The lab does take a little while to run through, but will give you a good grounding in the various sections of the ARM templates, refactoring elements between them and using the CLIs to deploy.
Pre-reqs
Before we start, let’s check your configuration.
First of all you will need a working Azure subscription.
For this lab we will be using Visual Studio Code, and it is assumed that you have configured it as per the VS Code prereqs page:
- Visual Studio Code
- Git installed into the operating system
- CLI 2.0 (az) installed into your operating system
- If you are using PowerShell on Windows, then ensure you have the AzureRM module installed and imported
- For Windows 10 users the the following is recommended
- Bash on Ubuntu (Windows Subsystem for Linux) installed
- Install both git and az into the linux subsytem
- VS Code extensions installed
- ARM snippets configured
- Integrated Console chosen
Finally you have forked the https://github.com/azurecitadel/arm-workshop area into your GitHub account and then synced it locally.
Create the azuredeploy.json template
Let’s create an empty ARM JSON file in Visual Studio Code using the snippets.
Figure 1: Creating the azuredeploy.json template
- Hover over the arm-workshop bar and click on new file
- Create a file called lab1/azuredeploy.json
- The lab1 folder will be autocreated
- In the body of the file, type
arm!and hit enter - CTRL-S to save
Note that if you have any syntax errors then you will see some red highlighting in the scrollbar area.
Visual Studio Code denotes unsaved files with a round dot in the tab at the top. Once you have saved the file then this will disappear. Individual file windows can be closed with CRTL-W.
Typing
arm!brings in one of the JSON snippets you should have installed as part of the prereqs. You can find the JSON snippets used in ARM templates in File | Preferences | User Snippets or via the settings cog at the bottom left.
You should now have the empty JSON file:
{
    "$schema": "https://schema.management.azure.com/schemas/2015-01-01/deploymentTemplate.json#",
    "contentVersion": "1.0.0.0",
    "parameters": {},
    "variables": {},
    "resources": [],
    "outputs": {}
}
The theory section on ARM templates explains the various sections. Remember that in JSON the curly brackets ({}) are objects, containing name:value pairs, whilst the square brackets ([]) are unkeyed lists.
Add a storage account resource
Let’s add a simple storage account resource into the empty list:
Figure 2: Adding the storage account resource
- Hit enter within the resource list
- Type
arm-stgto add in the storage account snippet - Change the value used for the storage account name (as it needs to be globally unique) and the display text
- CRTL-S to save
The snippet is setup to automatically select both instances of StorageAccount1 using the Select All Occurrences mode (CTRL-F2) is automatically switched on. This accelerates the refactoring. Pressing ESC untoggles the Select All Occurrences mode. Feel free to search the json.json user snippet file and find the ${StorageAccount1} strings.
Your ARM template should now look something like this, but with a different (and hopefully unique) storage account name.
Your snippet may use a newer apiVersion with a slightly different format than displayed in these labs. ARM snippets are updated regularly to take advantage of newer features and functionality within Azure, and this is reflected in the apiVersion of the resource. See https://aka.ms/armref for resource format corresponding to the apiVersion.
{
    "$schema": "https://schema.management.azure.com/schemas/2015-01-01/deploymentTemplate.json#",
    "contentVersion": "1.0.0.0",
    "parameters": {},
    "variables": {},
    "resources": [
        {
            "type": "Microsoft.Storage/storageAccounts",
            "name": "richeneysa",
            "apiVersion": "2015-06-15",
            "location": "[resourceGroup().location]",
            "tags": {
                "displayName": "richeneysa"
            },
            "properties": {
                "accountType": "Standard_LRS"
            }
        }
    ],
    "outputs": {}
}
Note that we will come back to ensuring the uniqueness of certain values, such as storage account names.
Once you have saved the file, you should get into the habit of committing changes to your local arm-workshop repo, and pushing those commits up into GitHub:
Figure 3: Using Git integration to commit your file
- Click on the Git source control symbol
- Click on
+to stage - Enter a commit message and then
CTRL+ENTER - Click on the sync symbol in the status bar
Please remember to commit and push periodically!
Open up the Integrated Console and login to Azure
Let’s move on and deploy the template. We’ll run this in the Integrated Console for now. You can use the CLI commands in either bash or PowerShell consoles, or the PowerShell cmdlets from the AzureRM module. Your choice.
- Open up the Integrated Console using CRTL-‘ (or View | Integrated Console)
Logging in using CLI
Figure 4: Logging in to Azure using CLI 2.0
- Type
az loginand follow the instructions
It has been assumed that you have only one subscription. If not then use
az account set --subscription <yourSubscriptionName>.
Logging in using PowerShell
- Type
Login-AzAccountto launch the dialog window - Switch to it using ALT-TAB and authenticate
It has been assumed that you have only one subscription. If not then use
Select-AzSubscription -SubscriptionName <yourSubscriptionName>.
Once authenticated then you will not need to reauthenticate for a period of time.
Create the resource group and deploy the template
In the Integrated Console, move into your lab1 folder, create a new resource group called ‘lab1’ and then deploy the azuredeploy.json template into it.
Bash
Figure 5: Creating the resource group and deploying the template
cd lab1
az group create --name lab1 --location "West Europe"
az group deployment create --name job1 --resource-group lab1 --template-file azuredeploy.json
PowerShell
cd lab1
New-AzResourceGroup -Name lab1 -Location "West Europe"
New-AzResourceGroupDeployment -Name job1 -ResourceGroupName lab1 -TemplateFile azuredeploy.json
Validating a deployment
Figure 6: Viewing deployment history via the Azure portal
- Select the ‘lab1’ resource group in the portal.
- Validate the storage account exists with your unique name
- Click on Deployments in the Settings section of the resource group blade
- Click on the Events link in the Related section
- Select one or two of the events to show the Detail blade
Browse the deployment operations documentation for more detail, and information on how to access the same information programmatically through PowerShell, Azure CLI and the REST API.
Declaring user parameters
Figure 7: Adding user parameters
storageAccount
It will be more useful if we can specify that storage account name as a user parameter. Let’s move it up into the parameters section.
- Add the
arm-parametersnippet into the parameters object- Use CTRL-SPACE to bring up the snippets
- Change the name to ‘storageAccount’
- Select the unique storage account resource name
- Press CTRL-F2 to select both occurrences (as per the status bar)
- Replace them with
[parameters('storageAccount')] - Save the template
After the editing your template should look similar to this:
{
    "$schema": "https://schema.management.azure.com/schemas/2015-01-01/deploymentTemplate.json#",
    "contentVersion": "1.0.0.0",
    "parameters": {
        "storageAccount": {
           "type": "string",
           "metadata": {
                "description": ""
            }
        }
    },
    "variables": {},
    "resources": [
        {
            "type": "Microsoft.Storage/storageAccounts",
            "name": "[parameters('storageAccount')]",
            "apiVersion": "2015-06-15",
            "location": "[resourceGroup().location]",
            "tags": {
                "displayName": "[parameters('storageAccount')]"
            },
            "properties": {
                "accountType": "Standard_LRS"
            }
        }
    ],
    "outputs": {}
}
Note the syntax of the parameters function. Functions are within square brackets as all expressions within square brackets are evaluated prior to deployment. The function’s arguments are listed in round brackets, e.g. [functioname(arg1, arg2, arg3)]. In this instance we are passing in the name of the parameter as a string, hence the single quotes.
accountType
Let’s also do the same with the accountType, and introduce a couple more parameter controls at the same time. You should now be getting used to VS Code, so I’ll be less explicit. The Azure Docs area is an excellent resource and that especially so for the ARM templates. If you search on “azure docs ARM template parameters” then the top hit will take you to the authoring templates page. Use this as a reference as you define the parameter section.
- Add the accountType to the parameters section, and use the parameter value in the resource section.
- Set the allowed values to be Standard_LRS, Premium_LRS, or Standard_RAGRS
- Set the default value to be Standard_LRS
accountType has moved to “sku” object in apiVersions newer than 2016-01-01. If your deployment fails, check the apiVersion and format at https://aka.ms/armref.
Note that the parameter type is from a fixed list:
- string
- secureString
- int
- boolean
- object
- secureObject
- array
Strings, integers and booleans (true|false) are self-explanatory.
The arrays and objects are the standard JSON constructs, and allow for more complex nested parameters to be defined.
The secureString and secureObject allow for sensitive data such as passwords, keys and other secrets to be specified, whilst ensuring that those parameters cannot be read following resource deployment. More on those later.
Once you have updated the template then it should look similar to this:
{
    "$schema": "https://schema.management.azure.com/schemas/2015-01-01/deploymentTemplate.json#",
    "contentVersion": "1.0.0.0",
    "parameters": {
        "storageAccount": {
            "type": "string",
            "metadata": {
                "description": "Storage Account Name - must be unique"
            }
        },
        "accountType": {
            "type": "string",
            "defaultValue": "Standard_LRS",
            "allowedValues": [
                "Standard_LRS",
                "Premium_LRS",
                "Standard_RAGRS"
            ],
            "metadata": {
                "description": "SKU Type"
            }
        }
    },
    "variables": {},
    "resources": [
        {
            "type": "Microsoft.Storage/storageAccounts",
            "name": "[parameters('storageAccount')]",
            "apiVersion": "2015-06-15",
            "location": "[resourceGroup().location]",
            "tags": {
                "displayName": "[parameters('storageAccount')]"
            },
            "properties": {
                "accountType": "[parameters('accountType')]"
            }
        }
    ],
    "outputs": {}
}
I have also updated the cosmetic descriptions for the two parameters.
As you start adding to your ARM templates you will find that VS Code has a couple of useful features as shown in the screenshot below.
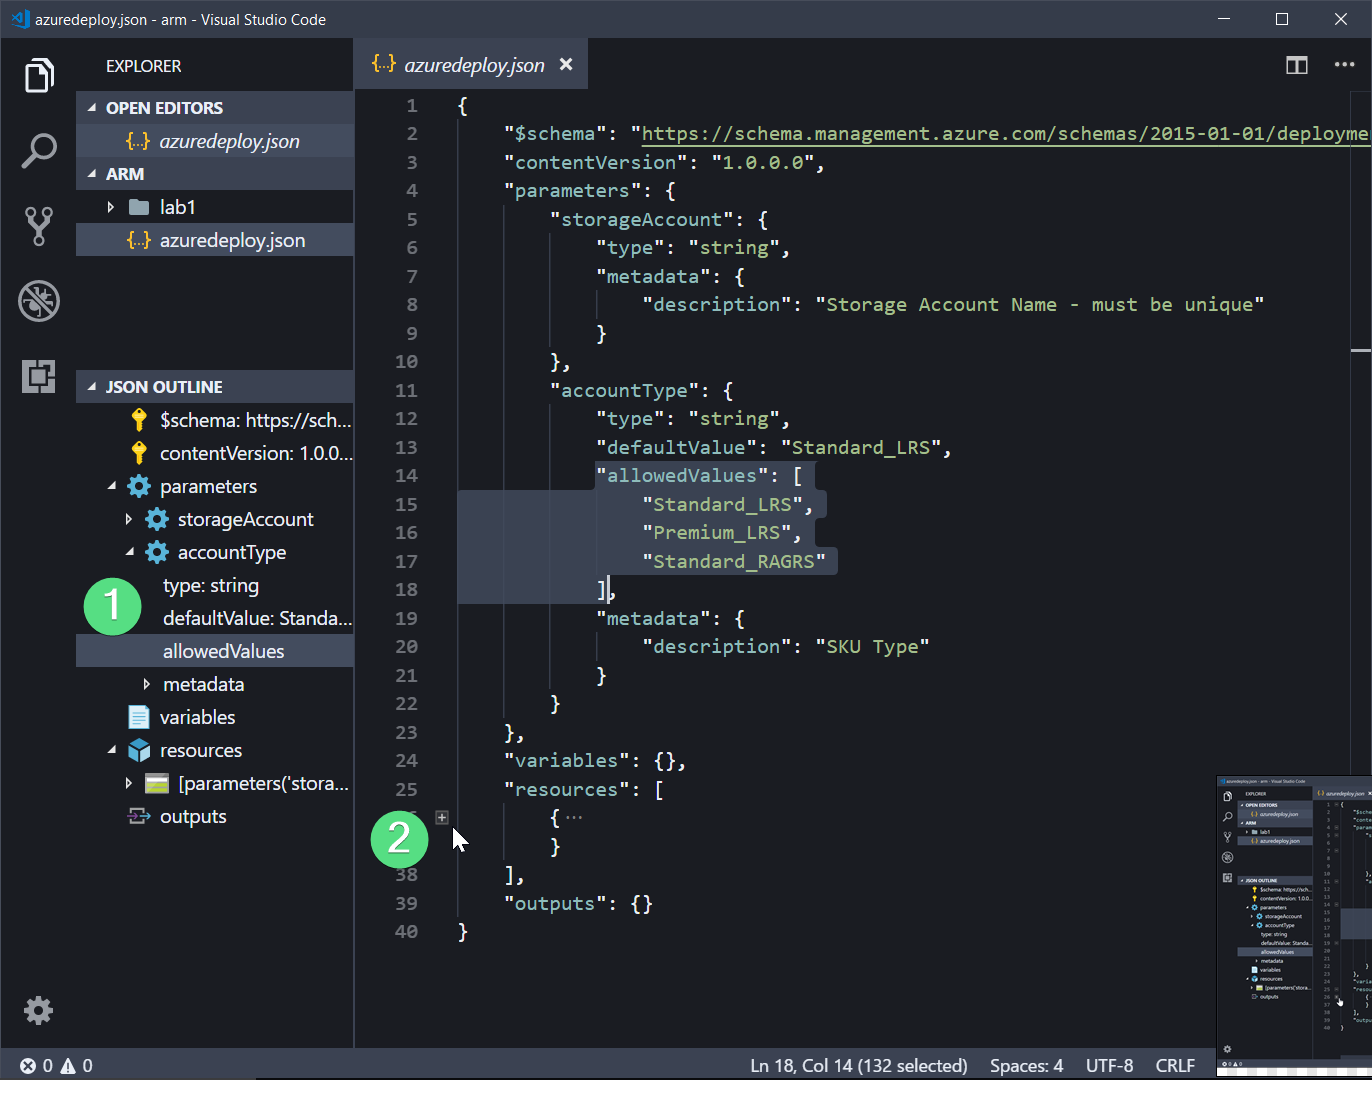 Figure 8: JSON outline and +/-
- In the Explorer (CTRL+SHIFT+E) on the left, you should see a JSON Outline, which is useful for navigating your template, highlighting a section of it and confirming that syntactically it is looking healthy. If it does not look right in the JSON Outline then that would suggest that you have some braces in the wrong place.
- If you hover the cursor between the line numbers and the file contents then you’ll see small
+and-icons appear that you can use to shrink down the file. This is useful for closing down sections of the templates that you know are healthy so that you can concentrate on new sections that may be causing you problems. And again, if the lines that are opened and closed are not right then you need to check your braces. I often close up existing parameters and resources when adding new ones to make sure that they are going in at the right point.
Finally, the JSON Tools extension gives you a couple of new keyboard shortcuts. ALT+M will minify your JSON so that it takes up the minimum amount of space, and this may be useful later. But for the moment the more useful is the CTRL+ALT+M shortcut which pretty prints the JSON, cleaning up your indentation to make the template a little easier to read.
Get used to using these as you move through the labs as it will save you some pain!
Submitting with parameter specified inline
OK, so we now have a couple of parameters in our template. We’ll use the default value for the accountType. If we were to use the previous submission commands then we would be prompted interactively for the parameter value.
However we can specify the storage account name inline as we deploy, as per the commands below. We’ll also start using some variables to make the commands a little shorter and reusable.
Bash
rg=lab1
template=/mnt/c/myTemplates/lab1/azuredeploy.json
job=job2
parms="storageAccount=richeneysa2"
az group deployment create --name $job --parameters "$parms" --template-file $template --resource-group $rg
Note that the inline parameters may be either space delimited name-value pairs, or a JSON string. Both of the following would therefore be valid as an argument for the –parameters switch:
parms="storageAccount=richeneysa3 accountType=Premium_LRS"
parms='{"storageAccount":{"value":"richeneysa4"},"accountType":{"value":"Standard_RAGRS"}}'
The JSON format is more commonly created by code via languages such as Python or tools such as jq. We’ll use the more human readable name-value pairs form.
PowerShell
$rg="lab1"
$template="C:\myTemplates\lab1\azuredeploy.json"
$job="job2"
$storageAccount="richeneysa2"
New-AzResourceGroupDeployment -Name $job -storageAccount $storageAccount -TemplateFile $template -ResourceGroupName $rg
The inline parameters for PowerShell deployments are very slick, and effectively create additional switches for the deployment cmdlet on the fly based on the parameter names specified in the template. See the -storageAccount switch in the example above; this only works as we have storageAccount as a parameter value in our template.
ARM Functions
But before we start looking at variables, let’s take a deeper look at the wealth of functions that are available to the ARM templates. We’ll start to see more of them as we work through the various sections of the labs so it is worth spending some time to understand that range of capability.
The documentation for the ARM template functions is one of those areas that you will visit often, and so we come to one of our three important short URLs:
We’ll now step through some of the functions available to ARM templates, and how they can be used. This will not cover all of them, as the documentation for the templates is pretty good, so if you need to understand something trivial like how to trim a string with whitespace then dive in to that area and dig out the information.
The functions are split into seven groups:
| Function Group | Use Case |
| Array and Object | used to manipulate or test JSON arrays and objects |
| Comparison | which are a group of test operators used by the condition function |
| Deployment | which covers those related to the deployment job, e.g. the parameters and variables functions |
| Logical | which are a group used in logical expressions, such as if, and and or, or converting strings to booleans |
| Numerical | the group providing integer and floating point arithmetic operators |
| Resource | a very useful set for working with Azure Resource Manager constructs, such as info and IDs for the subscription, resource group, resources and providers, plus keys of resources, and references to a resources current state |
| Strings | and the final set provides a large set of functions to manipulate and test strings |
Another way of thinking about functions is to split them into those used to:
- get or generate information
- manipulate data
- test
You will see many of these functions used by some of the more complex templates that we will come across as we continue to work through the labs.
Using variables
OK, so our template is now looking pretty good. The major issue with it is that it does not ensure that the storageAccount will be unique and therefore the success of the deployment cannot be assured. Let’s fix that by using a variable and some of the functions that are available.
A quick search on “azure storage account naming conventions” takes us to the naming conventions page in the best practices area. The storage account name has to be lower case alphanumerics with 3-24 characters, and it recommends using a standard prefix.
Run through the following to modify your template:
- Change the name of the storageAccount user parameter to storageAccountPrefix
- Add in a default for the new parameter
- Create a storageAccount variable to concatenate the storageAccountPrefix with a generated string to make it unique
- Make use of your internet searching skills
- You will need to use a few new functions to do this:
- concat: will concatenate two or more strings
- uniqueString: will perform a hash function based on the provided string(s) and return 13 characters
- We’ll provide uniqueString with the id property of the resourceGroup() object as the seed
- For bonus points you can ensure the new variable will be in lower case
- toLower: will lower case a string
- If we are going to concatenate the uniqueString with the prefix then we need to make sure we do not exceed 24 chars for the storageAccount, so we’ll also put a maxLength restriction on the prefix parameter.
- Finally we will reference the variable in the resources section.
Take your time and work slowly through the steps one by one. This is the toughest part of this first lab, and intentionally so! Please avoid skipping ahead to check on the template at the end of this lab page.
Hints:
- Most of the functions above are string functions
- The resourceGroup function is in resource functions
- Use your internet search skills - others will have used uniqueString for the same purpose
- If you get absolutely stuck then check the video below or the variables section in the final azuredeploy.json at the bottom of this lab
If you finish earlier than others then explore the functions further.
Figure 9: Using variables and nesting functions
Testing template file validity
As you get into more complex JSON templates, you will start to appreciate the IntelliSense that is built into VS Code and the Azure Resource Manager Tools extension.
Errors will be shown as wavy red underlines, and warnings will have yellow. Hover over one of these and the tooltip will give good information on what needs to be addressed.
The scrollbar on the right hand side will also show where there are issues to be resolved so that you can scroll quickly from one to the other.
You should not consider a template file ready to use until all errors and warnings have been removed.
You can also use the az group deployment validate subcommand to syntactically validate a template file. The rest of the command switches are the same as az group deployment create, making it easy to include that in a workflow.
PowerShell can do exactly the same, replacing New-AzResourceGroupDeployment with Test-AzResourceGroupDeployment.
These will all flush out fundamental issues with the format of the template. However, the only true test is to deploy the template.
Once you have completed updating your template then deploy it to the lab1 resource group to confirm that it works as expected. You shouldn’t need to specify any parameters, but you can do so if you wish. If you have issues with your template then compare it against the one at the bottom of the lab to see how it differs.
You can use the az storage account list --resource-group lab1 --output table or (Get-AzStorageAccount -ResourceGroupName lab1).StorageAccountName commands to show the results of the concatenated unique name.
Using the outputs section
The last section is probably the most optional out of all of the ARM template sections, but you will start to make more and more use of it if you start to nest templates, or wrap them up in other scripting.
If you have been deploying the templates using the bash CLI with the standard JSON output, then you will see that you have some standard JSON information outputted by each deployment. You can customise that output using the output section. We are going to use it to output the unique storage account name that has been generated.
Configuring the outputs section in the template
In the video below we’ll configure the output section in our azuredeploy.json file:
Figure 10: Adding outputs
The outputs section in our template now looks like this:
    "outputs": {
        "storageAccount": {
            "type": "string",
            "value": "[variables('storageAccount')]"
        }
    }
The JSON from the deployment upon completion will now be customised. Below is an example of that output. Check out the outputs section:
{
  "id": "/subscriptions/2ca40be1-7680-4f2b-92f7-06b2123a68cc/resourceGroups/lab1/providers/Microsoft.Resources/deployments/job.20171209.1344",
  "name": "job.20171209.1344",
  "properties": {
    "correlationId": "4b9b4fab-6277-49ae-9d5b-3228290e74a7",
    "debugSetting": null,
    "dependencies": [],
    "mode": "Incremental",
    "outputs": {
      "storageAccount": {
        "type": "String",
        "value": "richeneysa4wqyiyovsesrs"
      }
    },
    "parameters": {
      "accountType": {
        "type": "String",
        "value": "Standard_LRS"
      },
      "storageAccountPrefix": {
        "type": "String",
        "value": "richeneysa"
      }
    },
    "parametersLink": null,
    "providers": [
      {
        "id": null,
        "namespace": "Microsoft.Storage",
        "registrationState": null,
        "resourceTypes": [
          {
            "aliases": null,
            "apiVersions": null,
            "locations": [
              "westeurope"
            ],
            "properties": null,
            "resourceType": "storageAccounts"
          }
        ]
      }
    ],
    "provisioningState": "Succeeded",
    "template": null,
    "templateLink": null,
    "timestamp": "2017-12-09T13:47:06.021708+00:00"
  },
  "resourceGroup": "lab1"
}
Look at where the name of the storage account is nested within the JSON object. If we remove all of the other data, it would look like this::
{
  "properties" : {
    "outputs" : {
      "storageAccount" {
        "type": "String",
        "value": "richeneysa4wqyiyovsesrs"
      }
    }
  }
}
Using the outputs section with Bash and PowerShell
And we can now harvest that output in order to set a variable. Let’s see how you can do that for a single value in both Bash and PowerShell:
Bash
rg=lab1
job=job.$(date --utc +"%Y%m%d.%H%M")
template=/mnt/c/myTemplates/lab1/azuredeploy.json
query='properties.outputs.storageAccount.value'
storageAccount=$(az group deployment create --query "$query" --template-file $template --output tsv --name $job --resource-group $rg)
echo $storageAccount
richeneysa4wqyiyovsesrs
Let’s focus on what is new.
The query='properties.outputs.storageAccount.value' line is setting a new $query variable to match the nesting you saw in the JSON above. And we have introduced the --query switch to the deployment, which allows us to use these JMESPATH queries to customise which values are output.
We have also used the --output switch to output in tab separated value format which is far simpler when settings bash variables. Run az account show --output json to see what that the default output looks like and then compare with the other possible output types, jsonc, table and tsv. Try a few simple queries such as --query user and --query user.name to see how it affects the result.
The JMESPATH queries are hugely flexible and powerful, but here we are simply selecting one of the outputs. There is a separate Bash and CLI guide if you want to go deeper in this area.
PowerShell
$rg="lab1"
$job = 'job.' + ((Get-Date).ToUniversalTime()).tostring("MMddyy.HHmm")
$template="C:\myTemplates\lab1\azuredeploy.json"
$storageAccountPrefix = "richeneysa"
$storageAccount = (New-AzResourceGroupDeployment -Name $job -storageAccountPrefix $storageAccountPrefix -TemplateFile $template -ResourceGroupName $rg).Outputs.storageAccount.Value
echo $storageAccount
And here we are using exactly the same logic in PowerShell. Note how the command is wrapped in parentheses and then we are pulling out the sub-value.
More on outputs
There are a more sections in these labs that go into a little more detail on outputs.
First is the outputs section for the Azure Quickstart Template in lab2. This deals with multiple values in the output sections and how you can install and use ‘jq’ in bash, or use the more flexible objects within PowerShell.
Final azuredeploy.json template
Okay, so we have created an empty template, and added a basic resource snippet, before slowly iterating on the template file until we have a more useful and robust template that we can use. As you moved through the lab you made more use of both VS Code’s functionality and also some of the available Azure documentation.
This process is fairly common, and is how you would work through the options to determine which should be hardcoded, which should be parameterised, and how flexible you will allow that parameterisation to be.
Here is the final azuredeploy.json file for this lab: https://raw.githubusercontent.com/richeney/arm-labs/master/lab1/azuredeploy.json
Compare it against yours. Visual Studio Code can help with comparing files. If you create a new file (CTRL-N), and paste in the contents then you can open up the Command Palette (CTRL-SHIFT-P) and type ‘compare’ to bring up “File: Compare Active File With…”. Select this and then the unsaved Untitled-1 file that you just created. Visual Studio Code will highlight differing lines with red and green highlighting.
Parameter Files
OK, so now we have a pretty solid template for the storage account resource type, working well with the inline parameters we used in the CLI and PowerShell deployments. We will now create a parameter file so that we can use the two files together for our deployments.
The parameter file format uses a different JSON schema to the main templates, and, as it does rather less, the parameter schema is a much simpler design. Here is the example we used in the theory section:
{
  "$schema": "http://schema.management.azure.com/schemas/2015-01-01/deploymentParameters.json#",
  "contentVersion": "1.0.0.0",
  "parameters": {
    "name": {
      "value": "myResourceName"
    },
    "sku": {
      "value": "Standard"
    }
  }
}
The JSON schema does support a few more options, but these are rarely seen. Essentially you need the schema and contentVersion, and for each object in the parameters section there is a simple sub-object that only includes the “value” name:value pair.
The template and parameters file may be called anything, but the common naming convention for both are:
| File Type | Naming Convention |
| template file | azuredeploy.json |
| parameters file | azuredeploy.parameters.json |
Creating a parameter file
Let’s create a parameter file in our lab1 folder.
Figure 11: Creating a parameter file and deploying
- Open VS Code
- Create a new file, ‘azuredeploy.parameters.json’, in the lab1 folder
- Type in
armp!to bring up the snippet for the parameter file - Break open the parameters object
- Use the
arm-paramvaluesnippet to add in parameter values for the two parameters in the section of your azuredeploy.json template - Set your values to something that will be accepted during deployment
The arm-paramvalue snippet is designed to highlight the parameter name, so you can type straight away, and then you can tab to the second placeholder to start typing the value.
You can use the split editor mode in VS Code to see both files at the same time (use CTRL-ALT-LEFT or CTRL-ALT-RIGHT to move tabs between groups). You can also save some screen estate by toggling the side bar (CTRL-B, or View | Toggle Side Bar).
Don’t forget that the two parameters will need to separated by a comma. You will see a syntax error flagged up by VS Code until you do.
Once you have created your parameter file it should look similar to this:
{
    "$schema": "https://schema.management.azure.com/schemas/2015-01-01/deploymentParameters.json#",
    "contentVersion": "1.0.0.0",
    "parameters": {
        "storageAccountPrefix": {
            "value": "richeneysa"
        },
        "accountType": {
            "value": "Standard_LRS"
        }
    }
}
Deploying with a parameter file
We will continue to use variables for the deployment name and the resource group, but we’ll switch the parm variable to our new parameter file.
Bash
rg=lab1
job=job.$(date --utc +"%Y%m%d.%H%M")
template=/mnt/c/myTemplates/lab1/azuredeploy.json
parms=/mnt/c/myTemplates/lab1/azuredeploy.parameters.json
query='properties.outputs.storageAccount.value'
storageAccount=$(az group deployment create --parameters "@$parms" --template-file $template --query "$query" --output tsv --name $job --resource-group $rg)
echo "Storage account $storageAccount has been created."
Note the @ sign just before the parms variable in the –parameters switch.
PowerShell
$rg="lab1"
$job = 'job.' + ((Get-Date).ToUniversalTime()).tostring("MMddyy.HHmm")
$template="C:\myTemplates\lab1\azuredeploy.json"
$parms="c:\myTemplates\lab1\azuredeploy.parameters.json"
$storageAccount = (New-AzResourceGroupDeployment -Name $job -TemplateParameterFile $parms -TemplateFile $template -ResourceGroupName $rg).Outputs.storageAccount.Value
echo "Storage account $storageAccount has been created."
Finishing Up
OK, that is the end of Lab 1. Whilst it may seem that we have done a lot of work around a simple resource type such as storage account, it is a useful process to follow so that you have good knowledge of the template and parameter file structure and how to move resource elements up into variables and parameters to control the level of user flexibility. And we have deployed via either PowerShell and Bash as we moved through the lab so that you are familiar with that side as well.
If you want to see what the final pair of files looks like, then click on the following links:
Lab 1 Files
The files can be copied into VS Code if you want to compare them against your existing template files. You probably have a few storage accounts now in your lab1 resource group. You can remove them all by deleting the lab1 resource group using the portal, or by running either of these commands:
Bash
az group delete --name lab1 --yes --no-wait
PowerShell
Remove-AzResourceGroup -Name lab1
What’s up next
Creating templates from scratch using empty templates and snippets is only one of the possible methods. In the next lab we will look at different sources.
Leave a comment