
Overview
The snippets we used in lab 1 are useful and easy to use. However they are looking a little dated now, and aren’t covering all of the new services or new functionality in existing services. Whilst they were useful for the first lab, the truth is that you will only rarely build a template from scratch.
So let’s look at how we can make use of:
- the ARM reference area
- portal features
- Azure Quickstart templates
These will speed up the template creation process and deploy some of the higher value services available on the Azure platform, making use of newer resource type functionality.
In this lab we will
- generate a template in the portal immediately prior to deployment
- use the resource group export to see how a configuration change should look in the template
- make use of the wide range of Azure quickstart templates on GitHub
We’ll also take a look at API versions and functions, as these are important and this is a good time to get to know about them.
API Versions
Figure 1: Overview of APIs
All of the resource types are defined by their API version and matching schema. If you look at the storage account resource type from the previous lab you will notice that the API version is dated 2015-06-15. The API defines which properties are required and which are optional.
As the services are enhanced then those enhancements requiring new properties will result in a new API version.
Not all enhancements to an Azure service require a change to the JSON schema for the service. Many enhancements can be accommodated as additional values for existing properties within the current schema.
You will find yourself needing to check the most recent ARM reference information if you are using newer functionality. Fortunately there is a nice short URL for this.
There are three short URLs that you really need to remember from these labs, and that was the first of them.
The full pathing to take you direct to individual resource type pages is https://docs.microsoft.com/en-gb/azure/templates/_resource.provider_/_type_, so you can quickly go straight to the right page.
Take a look at the reference page for the Microsoft.Storage/storageAccounts and you will see that the API version is far newer than June 2015, and includes newer features such as v2 storage accounts. You will find that some of the property values are not usefully described in the reference pages, and the documentation does not always provide good examples. We will see how we can use the resource group level export to work around that later.
Note that only the most recent API version is shown in the reference documentation, and there is sometimes a small lag between a new API being released and the documentation catching up. There is a huge amount of innovation on the Azure platform so this is a neverending task. If you do need to look backwards then there is a full list of the various API versions. You can also look at the schemas directly on GitHub. If you are feeling masochistic then you can use the schemas to check differences in API releases.
For Azure Stack there is a new root element called apiProfile which can be used to globally set the apiVersion across public Azure Cloud and Azure Stack deployments. When this is used then apiVersion does not need to be specified within the resource objects.
Exporting templates from the portal
We’ll now look at different places to source templates and we’ll start with exporting templates directly out of the Azure portal itself. There are a couple of ways of doing this:
- viewing the automation options prior to resource deployment
- creating a full export of a whole resource group
Both have their benefits and limitations and the labs will hopefully illustrate this. This is also a good lab to talk about API versions and to start utilising the reference documentation.
Exporting prior to resource deployment
OK, let’s export an example template and parameters file.
Figure 2: Exporting a web app template from the portal
Follow the steps below, but make sure you stop just prior to submission via the final ‘Create’ button.
- Open the Azure portal: https://portal.azure.com
- Click + Add on the left
- Search for “Web App”
- Select and click on Create
- App Name: <yourname>arm (has to be unique)
- Resource Group: Create New, called lab2
- App Service Plan / Location: Click on the > arrow
- Create new called <yourname>arm-plan
- App Service Plan: Free
- Location: West Europe
- Pricing tier: F1 Free
DO NOT CLICK ON THE CREATE BUTTON! Click on the Automation Options link instead.
This will open up the template that the portal has created on the fly. If you tab through the Template, Parameters, CLI, PowerShell, .NET and Ruby tabs then you will see the two JSON templates, plus deployment code for the various CLIs and key SDKs.
Copy out the template and parameter file into lab2 folder of our project as azuredeploy.json and azuredeploy.parameters.json respectively.
Factoring parameters and variables
Examine the resources. You’ll notice that both are newer than the snippets, but whilst the App Service plan (serverfarm) is up to date, the Web App (sites) is a little out. You will also notice that pretty much everything is parameterised.
Here are the example initial files:
{
    "parameters": {
        "name": {
            "type": "string"
        },
        "hostingPlanName": {
            "type": "string"
        },
        "hostingEnvironment": {
            "type": "string"
        },
        "location": {
            "type": "string"
        },
        "sku": {
            "type": "string"
        },
        "skuCode": {
            "type": "string"
        },
        "workerSize": {
            "type": "string"
        },
        "serverFarmResourceGroup": {
            "type": "string"
        },
        "subscriptionId": {
            "type": "string"
        }
    },
    "resources": [
        {
            "apiVersion": "2016-08-01",
            "name": "[parameters('name')]",
            "type": "Microsoft.Web/sites",
            "properties": {
                "name": "[parameters('name')]",
                "serverFarmId": "[concat('/subscriptions/', parameters('subscriptionId'),'/resourcegroups/', parameters('serverFarmResourceGroup'), '/providers/Microsoft.Web/serverfarms/', parameters('hostingPlanName'))]",
                "hostingEnvironment": "[parameters('hostingEnvironment')]"
            },
            "location": "[parameters('location')]",
            "tags": {
                "[concat('hidden-related:', '/subscriptions/', parameters('subscriptionId'),'/resourcegroups/', parameters('serverFarmResourceGroup'), '/providers/Microsoft.Web/serverfarms/', parameters('hostingPlanName'))]": "empty"
            },
            "dependsOn": [
                "[concat('Microsoft.Web/serverfarms/', parameters('hostingPlanName'))]"
            ]
        },
        {
            "apiVersion": "2016-09-01",
            "name": "[parameters('hostingPlanName')]",
            "type": "Microsoft.Web/serverfarms",
            "location": "[parameters('location')]",
            "properties": {
                "name": "[parameters('hostingPlanName')]",
                "workerSizeId": "[parameters('workerSize')]",
                "reserved": false,
                "numberOfWorkers": "1",
                "hostingEnvironment": "[parameters('hostingEnvironment')]"
            },
            "sku": {
                "Tier": "[parameters('sku')]",
                "Name": "[parameters('skuCode')]"
            }
        }
    ],
    "$schema": "http://schema.management.azure.com/schemas/2015-01-01/deploymentTemplate.json#",
    "contentVersion": "1.0.0.0"
}
You may find that the portal has created the template based on the
2014-04-01-previewversion of the ARM schema. If this is the case then change it to2015-01-01(as above). You may also want to change the API version of theMicrosoft.Web/sitesresource to2016-08-01which is the current API version at the time of writing. This will remove any of the “problems” as triggered by the ARM Tools extension.
Configure VS Code to have both the azuredeploy.json and the azuredeploy.parameters.json side by side. (Use either CTRL+ALT+<|>, or drag the parameters tab towards the right hand side until the snap area is shown.)
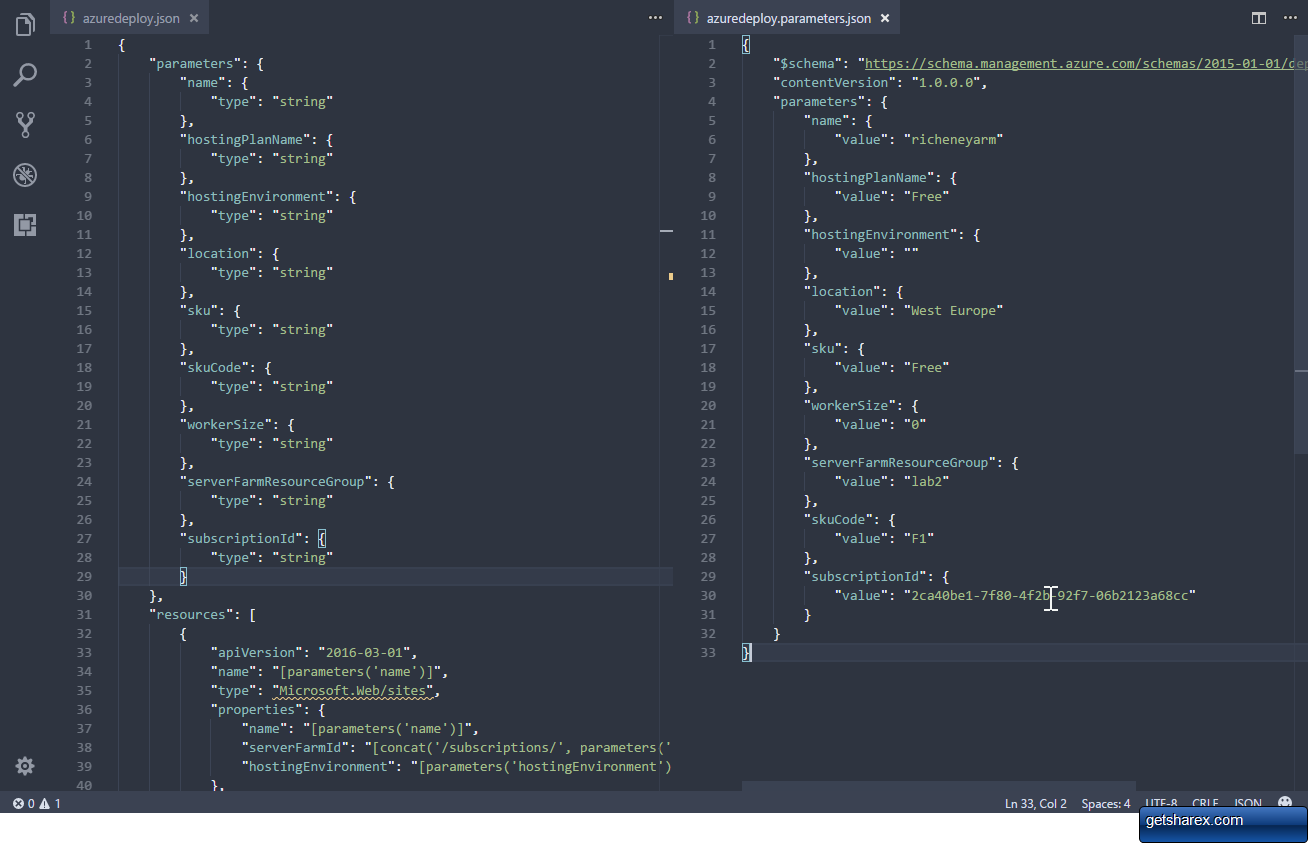 Figure 3: Side by side layout
We have a few too many parameters for our service so let’s refactor it down to a completely minimal set of parameters, i.e. just the Web App name. The quickest way to hardcode or derive certain options is to move them down to the variables section.
Quick guide:
- Rename the name parameter to webAppName (see note below)
- Hardcode values in the resources section where sensible
- Derive variable values where possible
- Use concat to derive webAppPlan, sufficing ‘-plan’ to your webAppName
- We’ll use this rather than hostingPlanName
- Create a new variable, webAppPlanId using resourceId()
- Check the https://aka.ms/armfunc page for how to use it
- Replace the properties.serverFarmID value with the webAppPlanId variable
- Also replace the dependsOn entity - IDs are more specific than names
- Remove the strange tag - this is not required
- Remove all of the parameters that are no longer required
- Change the appropriate parameter calls in the resources section to variable calls
- Strip down the parameters file to only the required webAppName parameter value
- Test
Note that the “name” parameter as generated from the portal would cause a problem for PowerShell submissions. This is because the PowerShell New-AzResourceGroupDeployment cmdlet automatically creates new switches on the fly based on the parameter names, but these must not clash with existing switches. As
-nameis one of those switches you will see an error. Changing it to ‘webAppName’ avoids this.
It is worth going through the pain of this refactoring section as it is really good practice for you. If you do get stuck then the video below shows the files being edited.
Figure 4: Refactoring the exported JSON files
Here is the resulting azuredeploy.json:
{
    "$schema": "http://schema.management.azure.com/schemas/2014-04-01-preview/deploymentTemplate.json#",
    "contentVersion": "1.0.0.0",
    "parameters": {
        "webAppName": {
            "type": "string"
        }
    },
    "variables": {
        "webAppPlan": "[concat(parameters('webAppName'), '-plan')]",
        "webAppPlanId": "[resourceId('Microsoft.Web/serverfarms', variables('webAppPlan'))]"
    },
    "resources": [
        {
            "apiVersion": "2016-08-01",
            "name": "[parameters('webAppName')]",
            "type": "Microsoft.Web/sites",
            "properties": {
                "name": "[parameters('webAppName')]",
                "serverFarmId": "[variables('webAppPlanId')]",
                "hostingEnvironment": ""
            },
            "location": "[resourceGroup().location]",
            "dependsOn": [
                "[variables('webAppPlanId')]"
            ]
        },
        {
            "apiVersion": "2016-09-01",
            "name": "[variables('webAppPlan')]",
            "type": "Microsoft.Web/serverfarms",
            "location": "[resourceGroup().location]",
            "properties": {
                "name": "[variables('webAppPlan')]",
                "workerSizeId": "0",
                "reserved": false,
                "numberOfWorkers": "1"
            },
            "sku": {
                "Tier": "Free",
                "Name": "F1"
            }
        }
    ]
}
Note that we could also change the schema from 2014-04-01-preview to 2015-01-01
And the matching azuredeploy.parameters.json file should only have one parameter:
{
    "$schema": "https://schema.management.azure.com/schemas/2015-01-01/deploymentParameters.json#",
    "contentVersion": "1.0.0.0",
    "parameters": {
        "webAppName": {
            "value": "richeneyarm"
        }
    }
}
Refactoring files is very common. In lab 1 you were mainly taking a hardcoded file and creating new parameters and variables. In this lab you have taken something that is a little too open (and strange in places) and made it a little more standardised and hardcoded.
Note that from this point onwards only the bash commands will be shown for brevity. It is not difficult to create the corresponding PowerShell commands. If you are running CLI 2.0 within PowerShell then explicitly state the string variables rather than derive them from other variables or command output.
rg=lab2
template=$(pwd)/lab2/azuredeploy.json
parms=$(pwd)/lab2/azuredeploy.parameters.json
job=job.$(date --utc +"%Y%m%d.%H%M")
az group deployment create --name $job --parameters "@$parms" --template-file $template --resource-group $rg
Note the ‘dependsOn’ property in the main azuredeploy.json. This is an explicit dependency.
You will also see implicit dependencies, where resource properties in one resource are derived from the properties of another resources. Again, the Azure Resource Manager layer will intelligently understand the implicit relationship and will order the resource creation accordingly.
Exporting a whole resource group definition
It is possible to export a whole resource group definition as ARM JSON. This is very verbose and it will hardcode many of the property values. Frankly it is not pretty and is of limited use. However, one thing it is very useful for is to compare the files before and after a manual change to see how that can be driven using ARM.
- Open up the blade for the lab2 resource group once it has successfully deployed
- Click on Export Template in the Settings section
- Copy out the JSON into a new file within VS Code
- Open up the Web App blade
- Select CORS in the API section
- Enter in a valid origin site and port, e.g.
http://azurecitadel.github.io:1976into the Allowed Origins field - Click on Save
- Go back up to the resource group and click on Export Template again
- Copy out the “after” version of the JSON and paste it into another new file in VS Code
- Type
CTRL-SHIFT-Pto bring up the Command Palette - Use the ‘File: Compare Active File With…’ to see the difference
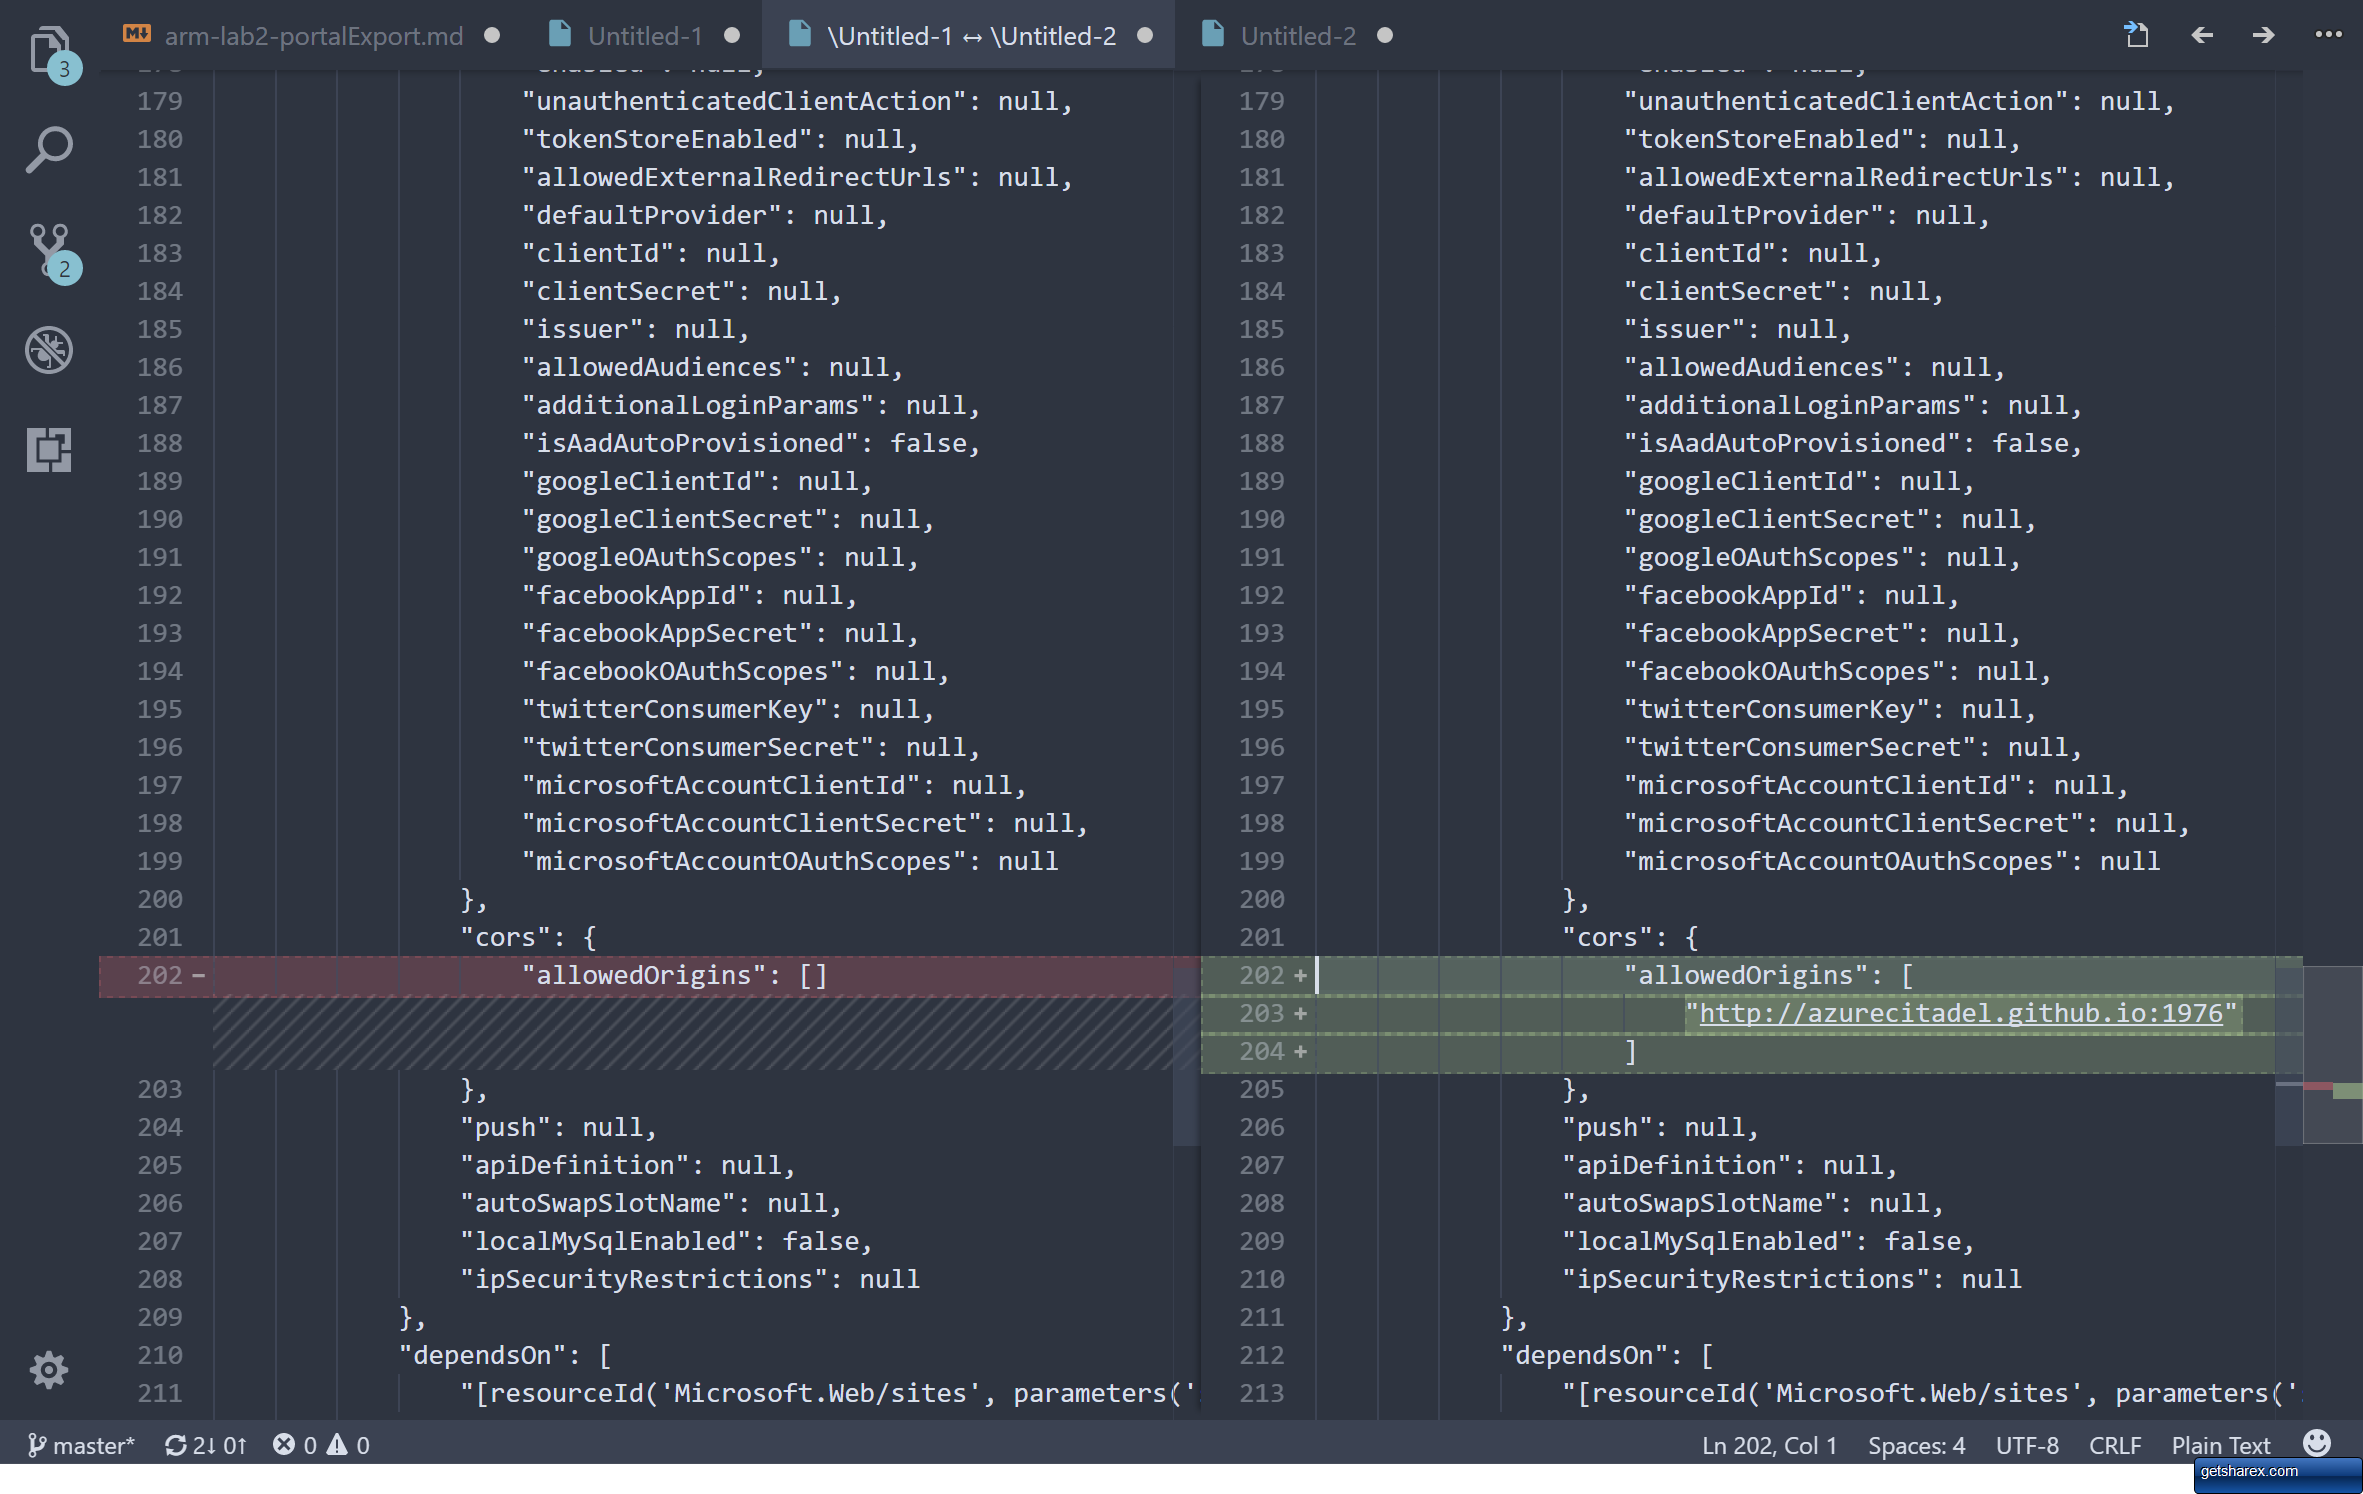 Figure 5: Comparing resource group exports
If you take a look at the web app reference page then you’ll find the CORS property and you will also see that it is comparatively well described. This is not always the case for some of the other resource properties, so this before and after comparison is a handy way of checking the format of the string, array or object that is expected.
Azure Quickstart templates
There is a GitHub repo that has a wide selection of ARM templates that have been contributed by both Microsoft employees and by the wider community. You can find it by searching for “Azure quickstart templates”, which will find both the main Azure Quickstart GitHub repo and the Azure Quickstart Templates portal site that helps to navigate some of the content. Check both links to see how they work together.
This is a good time to introduce the second of our important short URLs to take you straight through to the GitHub repo:
Go via either route and search for “deploy a simple linux VM”. You’ll find a number of templates, but we’ll take a look at the “101-vm-simple-linux” template that has been contributed by Brian Moore, one of the Microsoft employees based in Fargo. If you have gone through the Microsoft Azure route, then select the Browse on GitHub button. You should now be here.
You will find the azuredeploy.json and azuredeploy.parameters.json as expected. There are also a couple of other files that are there for the repo to work as expected:
- metadata.json contains the information that dictates how the entry is shown in the Microsoft Azure Quickstart Templates site. The parameters information is pulled directly from the azuredeploy.json, pulling out the parameter name and metadata description.
- readme.md is a readme file in markdown format. Click on the raw format to see how the markdown is written and rendered into the static HTML that you see when browsing the GitHub repo itself.
We will use this template as the starting point for the next few labs as we move through secrets, conditions and copies.
Copy out the azuredeploy.json and azuredeploy.parameters.json out into new files in a new lab3 folder ready for the next lab. This is easier when looking at the raw versions as you can then use CTRL-A and CTRL-C cleanly.
The 101-vm-simple-linux template is one of the simpler templates, but it gives us an opportunity to see how a virtual machine is constructed, and some of the common practices when developing templates.
- Parameters
The parameters are well defined in the template with sensible defaults and allowed values for the ubuntuOSVersion. As mentioned above, the metadata.description is set for each as this is used in the Microsoft Azure overview page.
Looking at the corresponding azuredeploy.parameters.json file, it is usual to pass the first three parameters, admin user and password, and the DNS label for the public IP. Note again that the password string is defined as a securestring, so once deployed you will not be able to see the value, but the password will be in clear text in the parameters file.
We will address this soon enough, looking at two different ways of preventing unwanted access to secrets:
- using secrets held in Key Vault
- controlling access to JSON files hosted centrally
These will both be covered in future labs.
- Variables
There are a large number of variables. There is always the option to refactor some of these up into the parameters section, such as vmName, vmSize, subnet names etc.
Using good variable names makes the main resource section much easier to read and understand, especially if it means that you avoid lengthy concat functions for the resource IDs.
- Resources
One thing that is not necessary, but is very good practice, is to put the resources in rough order of instantiation. You can see that in this template.
The storage account, public IP (PIP) and vNet are created first as they have no dependencies. They will be deployed in parallel by ARM. Note also that a single subnet is created as a child resource in the vNet.
The NIC is then created. Pay attention to the dependsOn array, which contains the resourceId function for both the vNet and the PIP. These cannot be predefined as a variable as those resources are not available at the time of interpretation. But ARM will see those and make the appropriate dependencies, taking the ID from those resources once they have been created.
And finally we have the virtual machine itself which has dependencies on both the NIC and the storage account. You will see all of these resources when you look at the resource group after a successful deployment.
It is worth taking a moment to look at the virtual machines reference area as a virtual machine is actually one of the most complicated resources within Azure. This template is only using a small subset of the number of possible properties in this resource type. We will be using one of those in the next lab, in order to use a password that has been stored as a secret in Key Vault and pass that through as securetext.
Also take a look at the sub-resource type that you can have within virtual machines, the virtual machines extensions reference area. This is how you can extend the virtual machines to automatically add in virtual machine agents such as antimalware, Operations Management Suite (OMS), diagnostics, Desired State Configuration (DSC) and third party extensions such as the plugin for Chef.
When defining your building block standards for key resource types such as virtual machines, use the documentation available in the Azure Docs area. For example, there is some fantastic information on the site for both Windows and Linux virtual machines to enable you to customise your standard build and build up your own IP.
- Outputs
The last section is probably the most optional out of all of the ARM template sections, but you will start to make more and more use of it if you start to nest templates, or wrap them up in other scripting.
If you have been deploying the templates using the bash CLI with the standard JSON output, then you will see that you have some standard JSON information outputted by each deployment. You can customise that output using the output section. In this template it is adding in both the server’s hostname, and the ssh connection string to connect to a terminal session.
Check the truncated JSON output showing only the outputs object that sits within properties:
    "outputs": {
      "hostname": {
        "type": "String",
        "value": "richeneyvm.westeurope.cloudapp.azure.com"
      },
      "sshCommand": {
        "type": "String",
        "value": "ssh richeney@richeneyvm.westeurope.cloudapp.azure.com"
      }
    }
With this script we have more than one output. Let look at how we can script around multiple outputs.
Reading multiple outputs
As we saw in the first lab, you could pull out a single output variable, such as the sshCommand, using a simple JMESPATH query:
sshCommand=$(az group deployment create --name $job --parameters "@$parms" --template-file $template --resource-group $rg --query properties.outputs.sshCommand.value --output tsv)
echo $sshCommand
But now we have two variables that we want, which is more of a challenge. We can change the JMESPATH to output an array with both variables in order, and use the output as an input string to the ‘read’ inbuilt command:
query='[properties.outputs.hostname.value, properties.outputs.sshCommand.value]'
read hostName sshCommand <<< $(az group deployment create --name $job --parameters "@$parms" --template-file $template --resource-group $rg --query $query --output tsv)
echo "hostName is $hostName"
echo "sshCommand is $sshCommand"
This works, but is a little risky when values can include spaces, as indeed the sshCommand does.
Another approach is to output JSON and read that into a variable as multi-line text. And then we can use jq to run JMESPATH queries against that. You can install jq on Ubuntu by typing sudo get-apt update && sudo apt-get install jq. Once that is there then we can do this instead:
outputs=$(az group deployment create --name $job --parameters "@$parms" --template-file $template --resource-group $rg --query properties.outputs --output tsv)
hostName=$(jq -r .hostname.value <<< $outputs)
sshCommand=$(jq -r .sshCommand.value <<< $outputs)
The first line used a JMESPATH query to filter down to the output section of the JSON, which then shortens the jq commands that follow. However Python and PowerShell are frankly better for natively handling JSON.
Let’s look at setting a variable in PowerShell to the full output object and then pulling out the required variables.
$outputs = (New-AzResourceGroupDeployment -Name $job -TemplateParameterFile $parms -TemplateFile $template -ResourceGroupName $rg).Outputs
$hostName = $Outputs.hostname.Value
$sshCommand = $Outputs.sshCommand.Value
What’s up next
Clean up your lab2 resource group containing the web app before moving on. From now on it will be assumed that you will clean up your resource groups as you go.
In the next section we will handle secrets and securetext.
Leave a comment